Atomic I/O letters column #107
Originally published 2010, in Atomic: Maximum Power ComputingReprinted here July 12, 2010 Last modified 16-Jan-2015.
More quackers than tweeters
A few months ago, after accidentally killing my old ThinkPad with a magnet (I cried) I decided to buy myself a netbook and join the revolution, so I picked up a reasonably priced MSI Wind U90, and it has been really good, XP is snappier than on my old machine though the Atom CPU shows its limitations on occasion. Deciding to throw caution to the wind, and to heck with the warranty, I'm going to be making some modifications, and one thing I really want to tackle is the patheticness of the Wind's internal speakers.
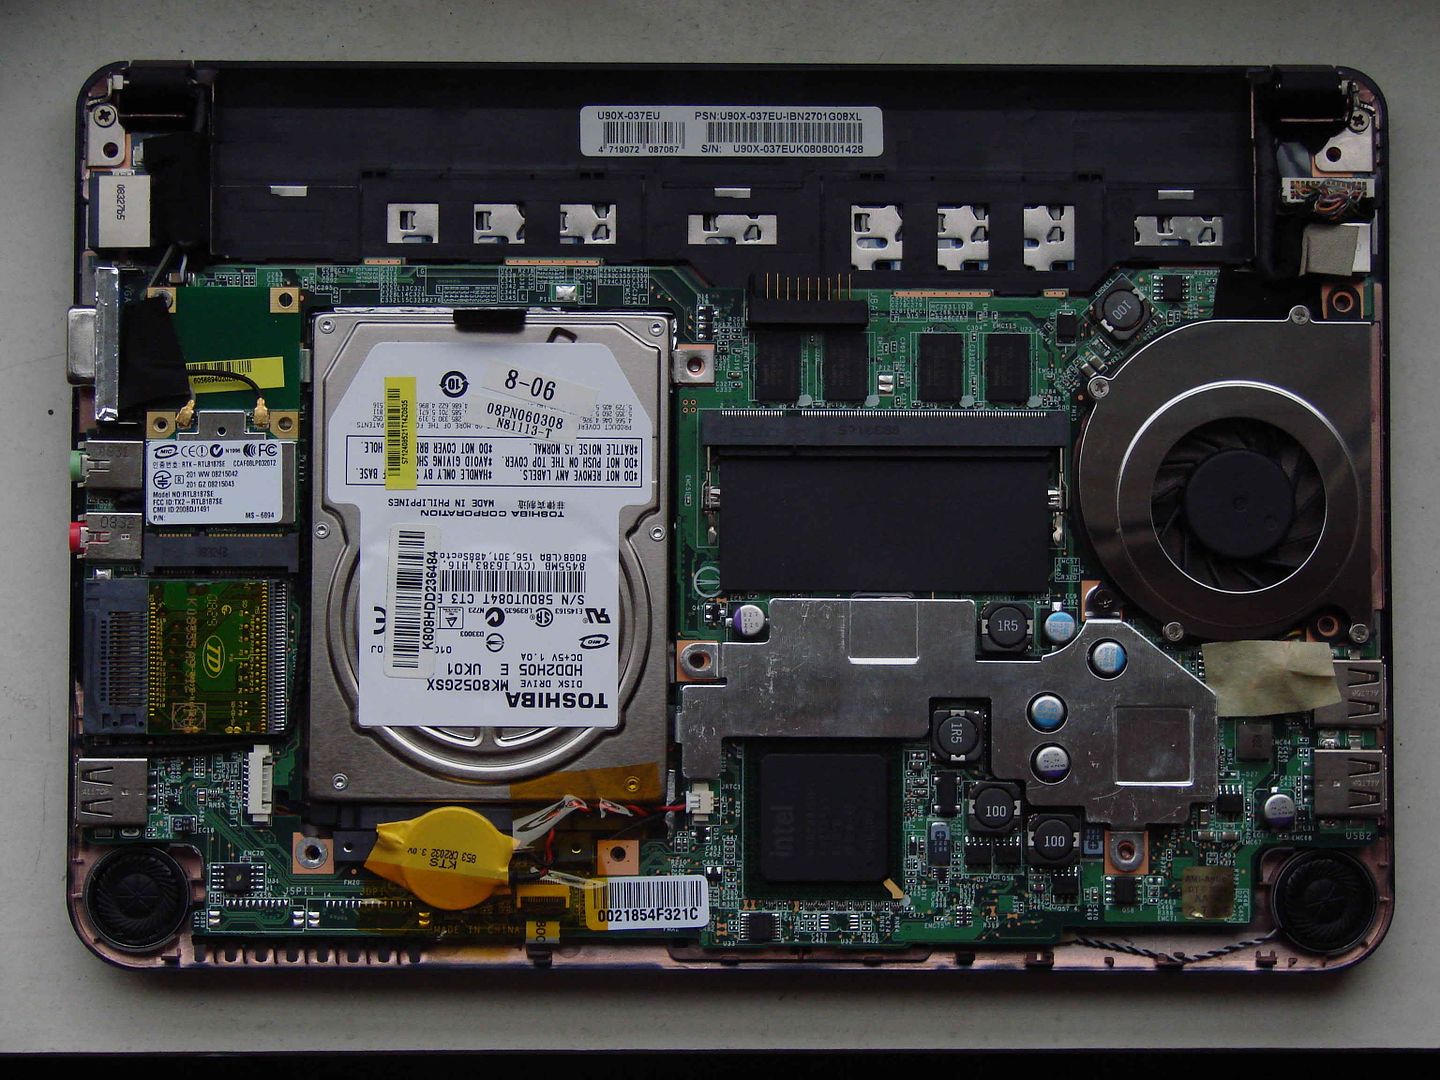
Sure I can use headphones or a set of external speakers, but if I'm on the move, which this thing is designed for, I don't want to have to take any external doodads with me (I think it defeats the point). And headphones are no good when you're trying to show friends funny YouTube videos. This picture is of the U90 mainboard and you can see just how piddly the speakers are. They're maybe 5mm deep in total. There isn't really any room to put bigger speakers in their place, but perhaps there are some higher-quality speakers that I could swap in? I'm having difficulty Googling such things.
My other thought is to put in a subwoofer of sorts - there is space in the case above what I assume is the northbridge to put maybe a slim 3cm-diameter speaker, maybe something like what's in my Sony V300 headphones. Where it gets complicated (at least for me) is that to do this I'd basically have to create my own LFE channel, so I need a circuit I can build that will be very small to cram into the case somewhere which will combine the left and right inputs (will just have to split it off from the speakers so will be pre amplified) and create a mono channel while not losing my stereo separation, and then I presume I'd want to low-frequency pass it.
Can this be done? My concern would be that by using the amplified signal, when I turned the volume down, it'd drop the voltage below the switching voltage of whatever components were used, but if that only turned off the "sub" then I could live with it.
If you think so then feel free to tell me that I can't possibly hear stereo separation from two 1 inch speakers 10 inches apart and that I should just bridge the connections and have a louder, mono signal.
If you have any other thoughts I'd love to hear them. I remember years ago seeing something about "exciters" which you stuck to a surface to turn them into a speaker, but I guess it was one of those Tomorrow's World things that never took off. I don't know if something like that attached to the underside of the case would work, assuming I only wanted lower frequencies it doesn't have to be high fidelity.
Could I build a ported driver that was slightly slimmer than a matchbox?
Matthew
Answer:
It's actively difficult to zap a modern hard drive with a magnet.
I salute your ingenuity in murdering your ThinkPad!
Yes, it is possible to upgrade laptop speakers, and even netbook speakers. Whether it can be done elegantly enough to be worth the effort is questionable, though. It's possible to buy tiny little USB speakers that sound surprisingly decent, these days; I reviewed some esoteric, but very good, ones some time ago here.
There are umpteen little rechargeable speaker doodads available now; a major subcategory are the single-driver mono ones that concertina out to give the tiny driver a reasonable enclosure size.
You can forget about your "subwoofer" idea, though. You might just possibly be able to cram some sort of headphone driver in there, but getting bass out of an enclosure with almost zero volume is impossible. A single larger driver could easily sound better than two minuscule ones - "awful stereo" versus "less awful mono" is the trade-off the little expanding speaker doodads give you, and it's not a bad one - but there just isn't room for it in your netbook, unless you bulked up the whole case somehow.
Instead, you should take your lead from portable devices with tiny speakers that sound surprisingly good. A MacBook, for instance, or (more helpfully, given netbook dimensions) many mobile phones.
There are three reasons why some phones and laptops sound good, while others sound awful.
1: Driver quality. It only costs a few bucks to get good one-inch speakers instead of bad ones, but the hardware business is cut-throat.
2: Devious enclosure design, like little open-ended transmission-lines winding around the case. You're unlikely to be able to retrofit anything like that to a device unless you're willing to put external appliqué ducts on it and make your laptop look like a Twi'lek's head, but it's eminently possible to get some benefit by just partitioning off some of the inside of the case, as we will soon see.
3: Good tiny-speaker designs give up on real bass response from the outset. They use analogue and/or digital filtering to make sure the tiny speakers never have to try to deal with frequencies below their resonance, which is way up in the hundreds of Hertz.
This means that you don't get to hear the fundamental frequency of a large proportion of the notes in your music. All small speakers have trouble with really low-frequency sounds like low-register double-bass or pipe-organ, or the TR-808 kick drum. Really tiny speakers, though, can barely even play middle C. And yet, carefully-designed tiny-speaker systems really can sound quite decent. Strip out everything below resonance, try to do a reasonable job of playing the overtones of the too-deep notes, and most human brains are pretty happy with the result.
It might be fatiguing to listen to music this way for a long time, but I reckon it's a heck of a lot less fatiguing than trying to listen to music on a truly dreadful set of laptop speakers. (Like, for instance, the speakers in my ThinkPad R40 - you definitely don't have to buy a netbook to get terrible portable-PC sound!)
You can fiddle with high-pass filtering for tiny speakers by just putting a capacitor in series with the speakers, but you can also do it in software. The "Bass Boost and Low Frequency Protection" feature that debuted in Windows Vista, for instance, lets you boost an arbitrary frequency by an arbitrary amount, and cut all output below that frequency. You can do similar things with the EQ controls in many media-player programs, too.
In your case, though, if you stick with the same tiny drivers shooting down into the desk from their zero-volume enclosures, no EQ twiddling is going to achieve much.
Here are some people talking about relatively minor hardware mods to improve, um, Wind sound.
Apparently you can just use spray-bottle caps to make tiny sealed speaker enclosures behind the drivers, and that by itself helps considerably. You can even make sort-of-tuned ducts out of drinking straws!
(The above-linked insanelywind.com site replaced another one that got hacked, or something. There's an archive of the old forum, with several posts about speakers, here.)
The next step from there is trying actual new drivers that aren't too big to fit. If it were me, I'd try making new speaker grilles on the palm-rest and bodging in larger drivers, with a little bottle-cap enclosure over the back of them, even if the enclosure ended up sticking down from the base of the laptop a bit. That'd tilt the keyboard the wrong way, so you'd have to put taller "feet" on the back edge. But it wouldn't make the computer much bulkier, and it'd be pretty solid after you hung it on the wall and tossed a bucket of epoxy at it.
There are umpteen different tiny speakers out there; look at just this one manufacturer. Most electronics stores have a pretty limited range, though. The kind of drivers I'd try, if you don't have some junked cellphones and such handy, are the rubber-roll-surround, shiny-dish-cone type that're ubiquitous in cheap iPod speakers these days. (They're the type used by the little see-through speakers in that review of mine, too.)
Here's an example of the breed from an Australian store. I wouldn't be surprised if you could get a set of tiny speakers on eBay that contain a pair of these drivers for the price of one loose driver from an electronics store.
I'd also definitely first make myself a cardboard dummy-driver and see if there's a hope in heck of actually fitting the thing in there before I started buying stuff.
Re the "exciter" doodads that, as you say, were a bit of a fad a few years ago: They're not a good option either. In an actual purpose-built "distributed-mode loudspeaker", they can work reasonably well, but don't have much bass. But distributed-mode loudspeakers are working speakers that can look like a picture hanging on the wall; in theory you could even make a laptop's whole screen into a speaker. (In practice, I don't think current LCDs would be at all happy with this. NXT have made some speaker-displays where there's an overlay over the screen that does the actual vibrating, but I think this is still something of a solution looking for a problem.)
I don't think any of the small, cheap stick-anywhere exciter gadgets ever worked worth a damn. They did turn electricity into sound, but no better than a cheaper conventional speaker of the same size and weight. And often rather worse.
Repack the RAM bearings, while you're at it
I have a three-month-old Logitech G15 v2 keyboard, and the space bar has started making an annoying squeaking sound.
I assume this is because the metal bits under the plastic space bar are rubbing. Do you know what type of grease would be suitable for the keyboard without damaging the plastic?
Jeffrey
Answer:
A squirt or two of "silicone spray" - plain light
silicone
oil in a can - ought to do it. It won't
attack plastics (well, not the plastics used in keyboards, anyway), it has very low toxicity,
and it hangs around on squeaky plastic things like WD-40 hangs around on squeaky gate hinges.
Normal PC keyboards generally have a peg on the bottom of each key that slots into a well, at the bottom of which is the switch mechanism. (I once saw a hyper-cheap keyboard that had a hinge at the back of each key. It was... unusual... to type on.)
The space bar is much too wide to just have a single pole-and-well under it, though. If it did, it'd bind when you pressed it anywhere other than in the middle. So instead, there'll usually be two or three wells under the space bar (only one of which has the actual switch at the bottom), plus a bent-wire doodad that also helps to keep the space bar lined up with the wells. When you click a space bar back into place after spraying some oil in there or cleaning out the board chow, and it's now all stiff or only works on one side, that's because you haven't gotten the wire thing back into its clips properly.
There are a number of other purposes for silicone spray in a PC:
1: Stop "Molex" drive power plugs, and any of the other old-style split-pin plugs, from locking together. Ever been hauling and wiggling the power plug on the back of a drive so hard that you can see the socket flexing around on its solder pads? Shouldn't happen if you give it a shot of silicone spray before plugging it in.
2: Stop screws from seizing. A drop of any oil on the threads of, say, a back-of-case thumbscrew, will mean that you won't have to break out a screwdriver to remove a screw you only finger-tightened in the first place. (Real "galling", where the components practically weld themselves together, usually happens with identical metals - like, an aluminium head-bolt in an alloy engine block. But various dissimilar metals can seize enough to be annoying in a PC-case situation.)
4: Recalcitrant side panels. It's quite difficult to remove the side panels from many PCs. A bit of oil on the tabs and slots that hold a sliding panel in place can only help.
5: Poke the straw of your big can of silicone spray right through the little air filter on a hard drive, and fill that sucker up! For cooling!
1: Replace all mobo traces with magnet wire...
I'm trying to measure a device's power usage on the 4 pin Molex cable. My goal is to measure the total power (watt) usage by the device (HDD, optical drive, etc).
The problem is that I can measure currents and voltages in one rail, say, 12V (using DMM) But then, I must do this for 5v as well...
How can I measure current at the same time, so that I don't need to run the test twice?
(Any way to aggregate these two currents using some sort of trick?)
I have looked at some hardware review sites, like this; there, they've built their own shunt, but even then, it appears that it needs to be measured twice?
My next advanced project is to measure the PCI Express card power usage, such as drive controller boards. For this, I have looked at PCIe extenders such as this. So that I can intercept the current in the middle. (This seems to be the only way...?)
Any help is appreciated.
Jin
Answer:
The way you'd do this if you were in a commercial electronics lab is with a multi-input datalogging
system, essentially a giant fancy computerised
multimeter. You'd set it up with the appropriate
wires running through it - or measuring the voltage across appropriate outboard
shunts - then run whatever stress
tests you wanted, and dump the output to Excel
or
what-have-you
and make graphs.
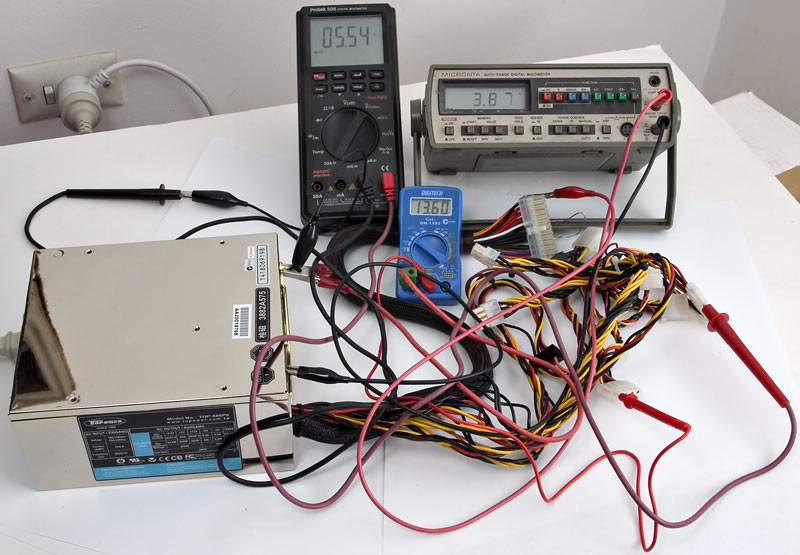
The simplest way to do the same sort of measurements, without the datalogging, on a domestic budget is to just buy as many cheap multimeters as you need to measure everything at once. For this purpose, your standard yellow $10 eBay meter will do; it probably won't be off by more than 2%, which is more than good enough accuracy for most purposes. If you want to monitor current and voltage at the same time, you'll need two meters per rail you're monitoring.
The quick-and-dirty option is to ignore the voltage and only measure current, and assume that if the computer isn't hanging, all of the rails must be pretty close to their nominal voltage. That only saves you one meter per rail, though; if you're measuring a bunch of different loads simultaneously then you may need one meter to measure the current to each device, because you don't want to try to run everything from a series of Y-adapters from a single current-metered wire.
Note that cheap multimeters usually don't have a current range above ten amps - which is plenty for drives, but not for modern video cards. They also have enough resistance to maybe make a difference in high-current situations. Two ways around this are:
1. Put a shunt (a super-low-value, very-well-calibrated resistor) in series with the load and measure the voltage across it. This is actually what a multimeter does when you put it in its amperage mode, but the ten-amp-mode shunt inside a cheap meter is much thinner, and thus higher in resistance, than a dedicated shunt.
(You can get shunts of various values cheap on eBay now; I've bought a couple from these two eBay dealers. Cheap shunts may not be very well calibrated, of course.)
2. Use clamp meters instead. Clamp meters that can measure DC as well as AC current are now easy to find relatively cheaply; you can also get clamp adapters for ordinary multimeters, which read X millivolts per amp or something. The down side of this strategy, beside the extra expense, is that clamp meters are not very accurate.

To avoid embarrassment, try to use instruments that're all identically inaccurate.
You could indeed use an extender card with "breakout" contacts to measure the power consumption of PCIe cards (not graphics cards with their own separate power plugs, of course). I think they should work OK with most cards. But the Adex adapters you mention seem to cost around the $US100 mark even for the simple version you'd need.
So you could also try cheating, by insulating the power contact between the slot and the card, and then wedging in a little conductor through which you can hook the terminal on the card up to the appropriate voltage and your ammeter.
This trick is easy to do for big, low-current contacts like the ones in the battery compartment of your average AA-powered device. You can shim battery-bay contacts with a sandwich of aluminium foil, paper and then more foil. PCIe pins only have a 1mm spacing, though, so even if you use nail polish to isolate the slot terminal (which generally works nicely; you can scrape it off again when you're done), you're going to have some fiddly work in your future. And if you mess it up, it's easy to short something to ground and blow up motherboard, card or both.
Enameled copper wire can be very useful for doing these tricks, because it comes with a thin, tough insulating coating that can easily be scraped off on only one side of the wire. (This trick is used to make a common kind of "science fair" electric motor.)
The fiddliest version of this trick I've ever had to do myself was when I did it with a bit of bent breadboard wire, to install a PAL/NTSC mode selector switch on a revision-5 Amiga 500 motherboard.

(In 1992, this was a pretty neat trick, and that was a pretty slick illustration.)

