Shuttle ST62K XPC Zen
Review date: 13 March 2004. Last modified 03-Dec-2011.
The big name in toaster-sized Small Form Factor (SFF) x86 boxes is still Shuttle. They did it first, back in the far distant days of late 2001, and their baby-PCs have always been a solid choice, whether you're looking for a high-speed screamer, a home theatre PC, or a modest business box.
This little sucker is the ST62K, also known as the XPC Zen. It's distinctly different from the other current Shuttle offerings, and from pretty much every other SFF box out there today.
The Zen isn't a product for the mad-tweaker "enthusiast" market, but it could suit a lot of other people down to the ground. Even overclockin' fools are likely to find a place in their hearts for a Zen, if they need something small and sleek and nearly silent to supplement their main LED-lit wind tunnel.
The Zen's basic specs promise a solid mid-range performer. ATI chipset with integrated Radeon 9100 graphics adapter (which steals 32Mb of your system memory, but who cares about that these days), compatibility with all Intel Socket 478 CPUs up to and including the current 800MHz-FSB units, dual channel PC3200 (DDR400) memory support (two slots, up to 2Gb total RAM, and feel free to use sub-PC3200 speed if you've got it sitting around and your CPU's bus speed doesn't need more), Realtek ALC650 six-channel audio with optical in and out, composite and S-Video TV out, USB 2.0 and FireWire 400, and 10/100BaseT networking.
You also get a pair of standard Ultra DMA 100-capable Parallel ATA drive connectors, each of which supports the usual two devices - though where the heck inside this tiny case you'd put more than one 5.25 inch and two 3.5 inch devices is left as an exercise for the reader.
Oh, and one, count it, one, PCI slot. SFF machines all have one or two slots; the tweaky ones have one PCI and one AGP slot, so you can install the bodacious graphics card of your choice.
The Zen is not for people who want to do that. But its integrated video adapter, while far off the cutting edge, still isn't useless for 3D games.
Here in Australia, you can pick up the standard "bare bones" Zen package (without CPU, RAM or drives) for $AU511.50 from Aus PC Market (well, you could; their range has now moved on, and the pricing info in this review is now historical) That price includes delivery in the Sydney metropolitan area; shoppers from elsewhere in Australia will pay more.
The Zen's a little smaller than Shuttle's previous baby-PCs...
...because its power supply is this external brick, which'll run from whatever AC mains voltage your country happens to have.
This isn't actually the whole power supply circuit. All the brick outputs, according to its label, is 12 volts DC at up to 15 amps (180 watts total), through a six-pin connector. The +12V supply's broken down to power normal PC components by the Zen's motherboard.
The external PSU hasn't done a great deal to reduce the Zen's dimensions; Shuttle just gave the case a bit more room inside. The Zen is 28cm deep by 19cm wide by 17cm high (11 by 7.5 by 6.7 inches), and it weighs only 2.1 kilograms (4.6 pounds) before you start putting components in it. The Zen's hefty power supply erases any portability benefit over regular internal-PSU SFF machines, but you'd still have no trouble at all fitting a Zen and its power supply in a quite small backpack.
SFF PCs have little narrow motherboards with lots of built-in stuff, so they always have this sort of back panel, crowded with connectors.
The pink plug at the top is the S/PDIF optical digital audio input connector; it's next to a little round knock-out for an optional wireless LAN antenna.
At the extreme right of the main connector block at the bottom, there are three 1/8th inch stereo analogue audio sockets, which you can use to get full 5.1 channel surround sound from a compatible speaker set, if you don't have a surround receiver to connect with an optical cable. These sockets aren't switchable for other functions; there are separate mic in, line in and headphone/line out sockets on the front panel.
Moving left in the bottom connector block, there are PS/2 mouse and keyboard sockets, the RJ45 LAN socket, two USB sockets (there are another two on the front panel), two FireWire sockets, one good old nine pin serial port, the optical audio output socket, the S-Video TV output, the standard HD14 monitor socket, and the six-pin PSU input socket.
There's also a handy little Clear CMOS button next to the PSU socket - it's recessed, so you need something like a pen to press it. To reset the Zen's CMOS settings to defaults, you just unplug the PSU and hold the button down for a few seconds.
This is handy, as it avoids the usual problem of wondering whether you should reboot with Insert held down, or just reset the system a few times, or actually open the case and hunt down the physical "CCMOS" jumper. It's unlikely that many users will get much use out of the button, though; most CMOS clearing is done when you've painted yourself into a corner with some over-enthusiastic overclocking, but I found the Zen to be pretty much un-overclockable.
Here are most of the extras that come with the Zen.
There's an extra 3.5 inch bay cover, which you're meant to use if you install a hard drive in the externally accessible bay; the cover the bay comes with screws in place through the hard drive mounting holes, but the extra one's a clip-in type.
Besides that, there are Shuttle's usual couple of decorative screw-in feet for the front of the case (there are less glamorous rubber feet already on the bottom of the case; put the bigger feet on the front and the whole case leans back a bit), a composite video adapter cable for the S-Video output socket (like all such cables, it connects to a couple of extra pin-holes that carry the composite signal; you can't use it with plain S-Video connectors), some screws, a couple of cable ties and some double-sided tape for cable tidying.
You also get one short-ish three-connector ATA lead with a cinched-in section for easy routing (another such lead is pre-installed, and cinched to a chassis rail), and one super-short lead for hooking up a drive in the lower 3.5 inch bay. 80-wire ATA leads like this aren't meant to be shorter than ten inches according to the spec, but this one seems to work fine.
There's also a manual for the FT62 mainboard inside the Zen, and a separate, smaller manual for the Zen itself. Both are well illustrated and comprehensive.
Looking inside
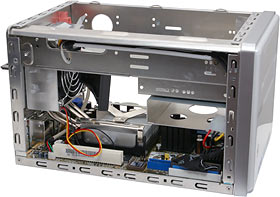
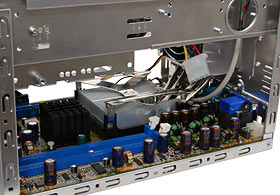
The motherboard has a few surprises. There's the usual IrDA Header That Practically Nobody Uses, but there are also two unused fan headers (in addition to the one that runs the CPU/exhaust fan), in case you want to hack more air-movers into the Zen.
There's also a Clear CMOS jumper (just in case, um, the button doesn't clear it hard enough), a parallel port header (there's a knock-out on the back panel for the 25 pin D connector to match, but you don't get the cable with the Zen; fair enough, these days), and a drive power socket in one corner. That socket's got a very short lead connected to it, which you can use to power the drive in the lower 3.5 inch bay, of which more in a moment.
There's also a header for a cable that gives you another two USB ports, which you can route to the expansion slot cut-out, provided you don't want to install a card in that slot.
One thing's missing - the floppy drive connector. There just isn't one. If you want a floppy drive for your Zen, you'll need an external USB one.
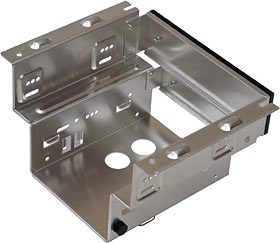
Most SFF cases, including most of Shuttle's models, have a couple of 3.5 inch drive bays and one 5.25 incher; the drives install in the usual fore-and-aft configuration. You can generally remove the whole three-bay cage in one lump...
...for ease of drive installation.
The Zen doesn't work this way. It has the same number of bays, but its 5.25 and externally accessible 3.5 inch bay are both non-removable. If you're only installing one hard drive, you're supposed to put it in the third bay, which is removable, and is mounted sideways.
The bay's held in place by one captive spring-loaded thumbscrew, and has an ingenious keyed slide-out retention system that makes it very easy to work with.
As with the other three-bay SFF PCs, the Zen has as many bays as most people need. One more, really. A lot of people these days don't need a floppy drive, so it's not a big deal that the motherboard lacks a header for one, but that does leave a bit of a question about what, if anything, to put in the externally accessible 3.5 inch bay. A second hard drive, perhaps; a Zip drive, maybe. More likely, a multi-slot memory card reader - Shuttle sell one that connects to the mobo's spare USB port header as an option, but any 3.5-inch-bay reader will fit fine.
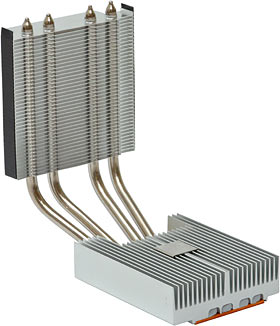
Like Shuttle's other current SFF boxes, the Zen comes with a nifty combination CPU cooler and case ventilator.
The copper-bottomed cooler assembly connects to its radiator with four heat pipes.
It's a lovely design, and quite easy to work with. The clip that holds the cooler down is a bit strong, but you can install it either way around, and it's got good-sized tabs to grip it by.
The fan assembly's vibration-isolated from the back of the case by rubber washers, and it's got a neat clear plastic pull tab attached to the top of it, to make it easy to lift out once you've undone its four screws.
The cooler screws are thumbscrews, as are the screws that hold the case together. Unless someone's tightened the heck out of them, you won't need a screwdriver to undo them.
There's a decent amount of working room inside the Zen, once you remove the transverse bay. That helps, when you're installing the CPU and its cooler. The rest of the assembly job is simple, too; no screw holes are blocked by case rails, no pieces hit other pieces, and nothing's razor sharp.
So - time to build!
Other bits
If you'd like to build a Zen just like the one I'm building here, Aus PC Market have made it easy by putting together a combo kit that sold for $AU1397 including Sydney metro delivery. There are plenty of choices involved, though, so let's poke and pry at the particular components I picked.
To power the Zen, I chose a 2.6GHz Celeron, a snip at $AU165 delivered.
Modern P4-based Celerons don't get a lot of good press. The P4 architecture needs a lot of cache to deliver halfway reasonable performance per clock tick (and, famously, doesn't perform nearly as well clock-for-clock as an Athlon, even then), but P4 Celerons have much less cache memory than full P4s, and so perform quite poorly.
That's poorly clock-for-clock, though, not poorly in absolute terms. If you're not a gamer or into some other serious number-crunching activity (ripping DVDs to CD, 3D rendering, heavy image processing...), a P4 Celeron box with ample RAM will suit you just fine. Office apps, Internet browsing, most Photoshopping, lightweight games; no problem. I'd be happy with a current Celeron for everything I do except games, and I could live with it even for that.
Generally, a 2.6GHz Celeron will struggle to keep up with a 1.8GHz P4, and will lose by a fairly solid margin for 3D games. Compared with a humble, and cheaper, Duron, Celerons are lousy value for money.
If the Zen were a Socket A box, I'd have paid less than $AU100 for a new Duron or an old Athlon and been motoring along rather faster as a result. But it isn't, and I wanted to keep the price down, so I went with the Celeron. A 3GHz 800MHz-bus P4's less than $AU370 delivered, a $AU165 2.6GHz Celeron runs around half as fast; there are worse deals than that in the world.
I said "ample RAM", above; these days, that means 1Gb. The Zen can take 2Gb, but even Windows XP has a hard time figuring out how to use that much memory.
I picked a couple of 512Mb PC3200 CAS 2.5 sticks from Geil, or GEIL, or GeIL or whatever they call themselves. I didn't need PC3200, since the Celeron's only got a 400MHz FSB, but this leaves room for an 800MHz-bus P4 to be dropped in later, without changing anything else.
I'm not a big fan of Geil RAM. When memory comes with fancy pointless heat spreaders on it, yet still costs less than un-decorated big-brand RAM with the same specs, what that means is that you're not buying the finest RAM ever made. But Geil RAM can be counted on to work at its rated speed, and those heat spreaders give you something to grab the modules by with little chance of static damage, and it's decently cheap. Full retail price, including delivery, for both sticks together, was $AU308; that's easily the cheapest two-stick 1024Mb pack you can get from Aus PC Market.
As I write this, Crucial are selling CAS 3 512Mb PC3200 sticks for $US92.99 each, ex shipping; the total for two modules including shipping to Australia is $US205.98, and it'd probably whistle through Customs without getting taxed. That's about $AU280 as I write this, though, and you get slightly slower memory (the CAS difference won't amount to much in the real world) and no local warranty.
The hard drive I chose is a 120Gb "JB" series 8Mb-cache Western Digital, currently selling for $AU159.50 delivered.
120Gb Parallel ATA drives had a clear dollars-per-gigabyte advantage over other capacities for quite a while. Now 160 and 200Gb PATA drives can be had for about the same price per gig, and 250Gb drives are less than 10% more expensive, so there's good reason to buy something huge. All things being equal, a bigger drive will give you better sustained transfer rates, though not necessarily by as much as you'd think; two hard drives from the same series will probably have different numbers of platter-sides in use, with the same amount of data per platter, and it takes a non-zero amount of time for them to switch heads, so they don't really have as much more data passing under their heads as you'd think.
A 120's still a good buy for a lot of people, though. Not everybody's a data-expands-to-fill-the-available-space type, after all. And if you've got an older computer that can't understand drives bigger than "137Gb" (actually 128Gb, as I've discussed before here and here), then a 120's the way to go, for the pseudo-Anselmic reason that of any two hard drives, the one that'll actually work in your computer is the greater.
Anyway, all I reckon this box is going to need is 120Gb. If it turns out to need more, I'll stick another drive in the other 3.5 inch bay. If it needs more than that, I'll go for external FireWire.
The supplied shortie IDE lead and pre-installed power cable let you very neatly connect a hard drive in the bottom, transverse bay. Pre-installed cabling lines up just as neatly with the data and power sockets on the optical drive.
Speaking of which - corners could not be cut when it came to the optical drive for this computer. I absolutely demanded a drive with... a front panel that matched the Zen casing.
That's a bit of a problem, because the Zen's front is white. Not beige, not silver, not black.
Voila; a white(-and-silver)-fronted DVD±RW drive. Or a black-fronted drive, if you swap the bezel over for the other one that's included in the package.
It's a Sony DRU-510AK. Not the cheapest DVD writer you can get, but still not ridiculously expensive, particularly for us old-timers over the age of seven who remember when DVD writers were seriously expensive.
Aus PC Market sell the 510AK and the basically identical (as far as I can see) DWU-14A for $AU258.50, delivered.
Stingy Sony don't include any blank media with the 510AK, but you do get a software disc, with Veritas' DLA packet writing software, the cut-down "DX" version of Stomp's RecordNow burning package, Sonic's MyDVD DVD authoring software and Simple Backup, um, backup software. Plus the very-widely-bundled MusicMatch Jukebox and Cyberlink PowerDVD 5. The documentation's on the disc, too.
The 510AK docs tell you how to swap the front panels, and also how to swap the light guides for the activity LED; some engineering genius at Sony managed to make the two front panels a slightly different shape, so you need to change the little clear piece of light-channelling plastic as well as the main bezel itself.
The drive comes with the white panel on it, though, so I didn't have to do anything but screw it in.
Not a bad match. The silver door matches the silver trim around the Zen's front panel, and the white's near enough.
Here's the fully assembled Zen, ready to have its lid put back on and WinXP installed. Assembling a PC that starts out as a "bare bones" rig never takes very long, but this was particularly quick and easy. Beginners shouldn't be afraid.
Testing
As a business box or home theatre PC, the Zen's obviously perfectly qualified, even if you feed it a mere 512Mb of RAM and an original-model Celeron. I'd only have anything to say about its performance in these departments if it blew up during the several days I've had it soak-testing, and it hasn't. All of its bits work as they should, and it's dead quiet too - at the cost of not having a whole lot of case air flow.
So, how does it do at the things Shuttle don't expect you to do with it?
First: Overclocking.
Shuttle do not want you to overclock the Zen. They have overclockable SFF PCs, with standard tweaky desktop chipsets and more powerful fans. This is not one of those. But what the heck; the Zen does have CPU and memory speed control in its BIOS setup program. Let's see if it works.
You can only wind up the Zen's CPU FSB by 15MHz, at most. For a 100MHz-FSB processor like the Celeron, this ought to be a 15% overclock, but that doesn't actually seem to be what happens; you get less, for some reason. There's an odd table explaining what different settings mean for different FSBs in the setup program.
My overclocking attempts were, as you might expect, a complete bust. Winding the CPU core voltage all the way up to the 1.5875V that's the most the Zen will allow let Windows run stably with the Celeron overclocked all the way to 2694MHz. 4%. Woohoo.
When I tried 2800MHz (still well under a 10% overclock), Windows loaded, but was flaky. So the maximum overclock lies somewhere in between. Who cares where, since CPU overclocks below 10% aren't worth doing. You're never likely to notice even 10% for any real world task.
(And yes, that does mean that paying any significant premium for a 10% faster processor is, generally, daft.)
If the Zen motherboard had normal tweaky-desktop-board overclocking features then you could stick ye olde P4 2.4C in it, wind that up to 3GHz, and congratulate yourself on sticking it to The Man once again, but such things must clearly be left to other SFFs. Actually, the Zen's small-ish PSU capacity could become an issue here, and you'd also need to beef up the cooling system; really hot chips are a bad, bad choice for practically any SFF box, unless you go a little bit crazy.
Next: 3D games. Shuttle aren't aiming the Zen at the gamer market, either, but once again, there's a hint of competence; something with "Radeon" written on it ought not to suck too badly.
I wasn't going to torture the Zen's poor little integrated Radeon 9100 with any DirectX 9 game benchmarks, but I did install the recently-released Catalyst 4.3 drivers and then try five runs of plain old 3DMark 2001SE's default 1024 by 768 benchmark test. The Zen averaged 3376 3DMarks.
That ain't exciting, but it's not a disaster either.
In this old piece on mini-PCs, a humble GeForce4 MX backed by a 1.8GHz Socket 478 Celeron turned in a 3DMark 2001 score of 4638. This isn't quite a fair comparison, because the Radeon 9100 can complete all of that benchmark's tests and the old GF4MX can't do the DirectX 8 ones. But today's mid-to-low-range standalone video cards all support DX8, and they all absolutely cream the Radeon 9100.
Next, for old time's sake, I fired up old reliable Quake 2. In 1024 by 768, 32 bit colour, the Zen ripped through the standard demo2.dm2 at better than 110 frames per second. The hectic-deathmatch Massive1 demo cruised by at about 93fps, and the worst-case-scenario Crusher demo managed 67.5fps.
OK, Q2's a six year old game, but the Half-Life engine ain't that much fancier than Q2's, and the world still teems with Counter-Strike players that use it. A Celeron-powered Zen will be better than fine for Counter-Strike and its ilk. You may find yourself in trouble if you start getting adventurous with anti-aliasing, but if your gaming preferences lean more towards CS and StarCraft than UT2004 and Painkiller, you'll probably be perfectly happy.
No-AGP-slot SFF PCs traditionally come with integrated graphics of the ProSavage level. Fine for 2D, hideously woeful for 3D games. The Zen is a breath of fresh fraggin' air, in comparison.
Overall
The XPC Zen is a great little system. Small, quiet, nice looking, not very expensive for what you get, and easy to work on, too.
And it's pretty good at 3D games, for a computer that's not actually meant to be bought by gamers.
If you need real 3D grunt from your baby-puter, then an SFF box with an AGP slot is for you; the Zen's not a great deal cheaper than various tweaky SFF models. And if you want an optical drive that matches the Zen's finish, there aren't many choices.
The Zen is, however, a surprisingly competent all-rounder. Recommended.
Review XPC Zen kindly provided by Shuttle.
Shuttle's page for the XPC Zen
Buy one!
Aus PC Market don't sell these
products any more (though they have plenty of other
bare bones systems), but you can still try a price search at
DealTime!


