Small versus smaller
(the Chyang Fun P4 CF-S868, and how you can do the same thing yourself for less)
Review date: 14 September 2002.Last modified 03-Dec-2011.
Full tower computer cases sell well, but few of them end up with their multitudinous drive bays actually filled with anything. Well, there are worse things that the people who buy them could be spending their money on, I suppose.
If you're confident that you're not going to need a dozen drive bays (or more than a dozen...), and if you don't have a bunch of expansion cards looking for a home, then you can do without a full tower, or a midi-tower, or even a mini-tower.
Most computers only have a hard drive, a floppy drive and a CD/DVD/thingummy-ROM drive, after all, and you can get motherboards with integrated audio and network adapters. Put these facts together and it becomes clear that most people don't need a big beige-box PC. They can, instead, opt for something much smaller and more elegant.
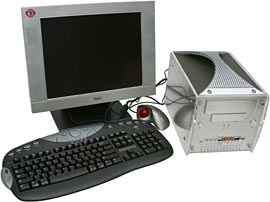
And end up with a computer that looks like this.
Except for the fact that it still has cables (it could have fewer, but not none), this collection of gear looks quite like an illustration from a 1985 computer book showing The PC Of The Future. But it's all stuff that's on retail shelves right now.
So let's have a look at what's in this setup, and what it costs. And how close you can get to the same concept, for less.
The box
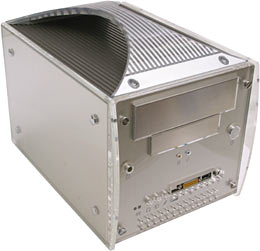
This is Chyang Fun's P4 CF-S868 Mini Barebone system. It's yours for $AU737 including delivery from Aus PC Market here in Australia, and a few other places around the world also seem to stock it, under one name or another.
This thing doesn't really count as a "system", because you have to add stuff to it to turn it into a PC. But it's not just a case, either. The "Barebone" part of its name indicates that this is a bare bones system, a case-plus-motherboard arrangement to which you generally have to add your own CPU, RAM and drives.
The bare bone concept lets non-standard avant-garde computer designs - like this pretty little thing - get into the market without locking the manufacturer or the customer down to one spec level. End users who don't want to fool around can buy these things as built systems, from retailers who install the extra stuff themselves; more discerning and/or stingier shoppers can do it themselves and install exactly the gear they want.
This particular bare bones box accepts a Socket 478 processor - a P4, or one of the P4-based Celerons that I'll talk about shortly - and DDR RAM. It's based on Via's P4M266 chipset. The P4M266's integrated video isn't very exciting for anything but 2D work, but the CF-S868 can accept a normal AGP graphics card, so that problem's totally curable. You can build this little tacker into a quite seriously speedy PC.
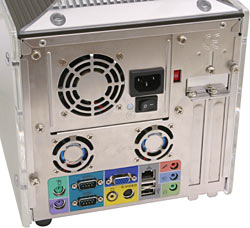
The back panel of the CF-S868 shows you that this thing's got everything most users are likely to need built into its motherboard. Which is good, because it's only got two expansion slots.
The back panel connector highlights are VGA, composite and S-Video outputs - so this box is ready for use as a lounge room MP3/DVD/DivX/game box - and an integrated 10/100BaseT network adapter. And integrated audio, too. The audio's just the basic stereo in, stereo out and mic setup, with no fancy multi-channel surround. But it'll do for most purposes.
You also get PS/2 mouse and keyboard connectors, two serial ports, and no parallel port - but that's not likely to perturb you, because there are two USB ports on the back, and another two on the front. The front panel also gives you a joystick port, duplicate headphone, input and mic audio connectors, a duplicate PS/2 mouse port, an IrDA send/receive diode/sensor pair, and a thumbwheel volume control that's quite hard to use because of its recessed position, behind the thick acrylic front panel.
This case is actually made of aluminium, but it's got acrylic sheeting on the front, top and sides (which makes it pretty, but about as heavy as it'd be if it were steel). There's a good-looking but not terribly comfortable handle on the top.
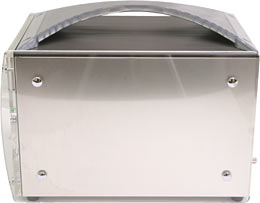
Looking at it from the side makes clear this case's dark secret. It's not as tiny as Chyang Fun want you to think it is.
Look at the manufacturer's picture of the S868 on their page for it, and you'd think it was virtually cubic. It's not; the picture is drastically foreshortened, to conceal the depth of the little box.
If you measure the CF-S868's depth from the middle of the decorative curved-at-the-front side panels, it's about 310mm deep (12.25 inches). Now, it's only about 210mm wide and 200mm high, not counting the handle, and so it definitely qualifies as a teeny weeny PC. You really couldn't make a computer much smaller and still be able to cram standard expansion cards into it. But if you put it next to a genuinely tiny little cubic handle-equipped electronic widget like, oh, a Nintendo GameCube (150 by 110 by 161mm), the CF-S868 will look distinctly plump.
The CF-S868's side panels are each held on by only one easy-to-remove thumbscrew, and they slide off smoothly - the CF-S868's general fit and finish is excellent. Here...
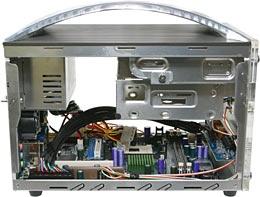
...are the innards. One fixed 5.25 inch drive bay, two removable 3.5 inch bays (one with a front panel hole, one without), and one motherboard that you can't actually remove from the case (well, not without a lot of fiddling, anyway). You can still get at the motherboard acceptably well, though, especially if you remove the drive bays first.
You get two RAM slots (so it'd be no big deal to install 1Gb of memory, if the urge struck you), plus one PCI slot and one AGP.
There's not enough room between the processor socket and the drive bays for a normal CPU cooler, so...
...you get this low-profile Arkua unit with the CF-S868. Copper core, radial fins, more than adequate performance. The CF-S868 has two rear 40mm exhaust fans along with the fan in its PSU, so it sucks enough air through itself that cooling shouldn't be a problem.
Frankly, by this stage, I'd seen enough of the CF-S868.
When I first heard about it and saw Chyang Fun's picture, I was excited. A PC that took standard desktop components (unlike certain super-tiny laptop-component units) and was the size of a lunchbox? Sign me up!
When I saw it in person and realised that it wasn't as tiny as I'd thought, though, I lost interest. For the money, I want this thing to be bigger on the inside than on the outside, dang it.
If you'd like to see a CF-S868 ripped to little bits and cruelly benchmarked, though, have no fear; littlewhitedog.com have done exactly that with one that's sold in the UK, under a different name. Their review is here.
I still wanted to build a PC with the CF-S868's basic specs, though. So I did.
Option B
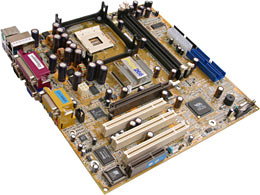
You're looking at Via's P4MA motherboard. It uses the same P4M266 chipset as the Chyang Fun bare bones box, so it's fundamentally identical to it. But since it uses the relatively expansive microATX form factor, it's got room for a normal complement of connectors. It'll set you back a very reasonable $AU165, delivered, from Aus PC Market.
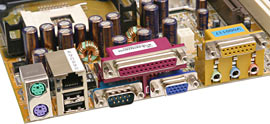
The P4MA back panel has a normal fully-integrated-ATX-board connector block, including LAN and video connectors, and a parallel port, in case that matters to you. There's no composite or S-Video output and no standard IrDA, though.
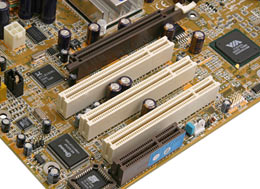
The P4MA has three PCI slots and one AGP; that's as many slots as you're going to see on any microATX board.
I quite like this little board, but the documentation's not all that it could be.
Actually, the docs aren't that bad, as long as you know to look at the full manual as well as the "Quick Installation Guide".
The Quick Installation Guide is in eight languages, and provides clear, helpful, illustrated instructions about how to install the board in a case, install memory and a CPU, connect drives, install cards, and connect power cables and peripherals. It then tells you to turn on your computer, which you won't be able to do.
Well, unless you've also connected the power switch from your case. The Guide doesn't tell you about that, or indeed about any of the case connectors - power and reset switch, power and drive LED, PC speaker. There's a troubleshooting section in the Guide that suggests that failure to proceed may occur because you haven't plugged your computer in. Well, you can do that. You can also put a paper bag on your head. That'll do just as much good, if nothing shorts the power-on pins on the motherboard together.
(By the way, this does mean that you can power up a motherboard, in the absence of a case power switch connection, by shorting the relevant two pins with a screwdriver or car key or something.)
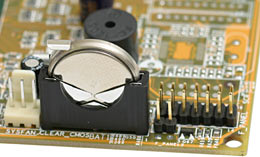
Here are the LED-and-switch pins on the P4MA, next to its novel vertical BIOS backup battery holder.
The proper manual tells you what the connector block pins are, of course, but the board has no helpful markings next to the connector block itself, and the notation in the manual wins a prize from me for making it less obvious than anyone ever has before which way around the case LEDs should be connected. Well, assuming you want them to actually light up, anyway.
There's no harm done if you get the LED plugs backwards - just flip them around and all will be well - but it should nonetheless have occurred to Via that there might be a reason why everybody else uses simple plus and minus markings to tell people which way around the plugs go, not notation like "5VDUAL" and "PLED".
I assumed that "PLED" and "HD_LED" both indicated where the negative wire should be. For the power LED, I was right.
(In case you didn't know - when case connectors have one coloured wire and one wire that's either white or black, the coloured wire ought to be the positive one. This doesn't matter for switches, and the PC speaker can also be connected either way around. But LEDs, because they're diodes, only work one way.)
A case to match the P4MA.
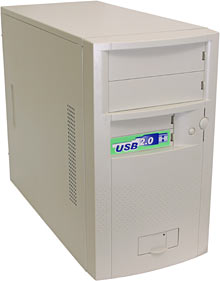
This is AOpen's H450A. It suits microATX and FlexATX motherboards (FlexATX is like microATX, but even smaller), and it's got about as much expansion space in it as most users are likely to need. Four expansion card slots, two 5.25 inch bays with front panel cutouts, two 3.5 inch bays with cutouts, and one without.
This case is made of steel, it's boring beige, and it's 430mm deep by 200mm wide by 355mm high (16.93 by 7.87 by 13.98 inches). Which makes it pretty porky compared with the little Chyang Fun box. But Aus PC Market sell the H450A, with a 250 watt PSU, for $AU121 including delivery in the Sydney metropolitan area.
Take a P4MA and put it in an H450A and you've got something that can do much the same stuff as a CF-S868, but you've only paid $AU286 - a saving of $AU451.
Saving that much money is worth this much of a size difference, if you ask me. Your opinion may vary.
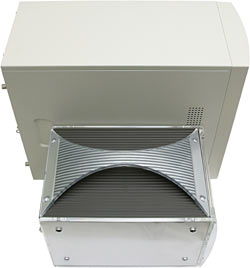
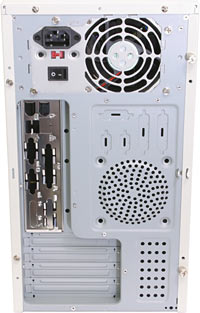
The back of the H450A. Nothing much to report, except that there's a space for an optional 80mm exhaust fan; there's room for an intake fan at the front, as well, which is a very nice change from the normal miserable ventilation provided by mini-tower boxes. The H450A even comes with mounting screws for one fan.
The right side panel, as you look at the case from behind like this, is held on by two thumbscrews. Which is another pleasing touch. Everything else is held together with the usual hex-head Phillips screws, but the primary access panel's easier to remove.
There's a good two-tab padlock receiver, too, which lets you lock the right side panel in place better than most cases permit. Anybody with a junior hacksaw could have the lock off in a minute or two, but it still shows willing.
I like AOpen's cases. Thrilling they ain't, but they're well designed, well made, easy to work on, and very well priced for what they are. You can get cases for half the price, but AOpen's products are about as cheap as good cases get.
I only had two problems getting the P4MA into the H450A.
One of them wasn't a problem at all for me, studly toasty hardware veteran that I am, but it's a common problem for people who haven't assembled many PCs.
This problem's simple enough - it's the presence of motherboard standoffs where none should be.
The H450A uses ordinary hexagonal brass standoffs, into which the motherboard mounting screws thread. The standoffs hold the board away from the case side, so that the multitude of uninsulated solder blobs on the back of the board don't touch the earthed case and cause loss of magic smoke.
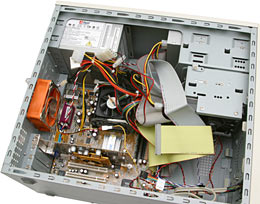
The H450A, conveniently, comes with eight standoffs pre-installed. Inconveniently, the P4MA only needs six of them. The two remaining standoffs are still under the motherboard, but they don't line up with any holes.
When you've got more standoffs than you have motherboard holes - usually because you're an enthusiastic newbie who's installed every standoff that came in the case's bits bag - you may have no problems. If the extra standoffs don't touch anything conductive on the back of the board, or if they only touch things that're earthed anyway, nothing bad will happen. If that's not the case, though, then if you're lucky you'll just have a computer that won't power up. If you're not lucky, you can toast your motherboard.
So removing the two extra standoffs, and replacing them with the little self-adhesive conical rubber things that're included with many cases to support motherboard edges that don't have standoffs under them, was job number one.
The second problem, and job number two, had to do with...
...these.
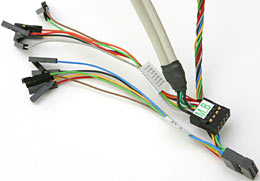
The H450A has a couple of front USB ports, and front audio connectors as well, behind a little slide-up door. You connect them with these cables.
Well, you try to connect them, anyway.
You've got a choice, see. There's a one-piece plug for each cable, which you can use if your motherboard has the right kind of header for it. The P4MA has a header for two extra USB ports which matches the H450A's one-piece USB plug (it's hard to get it wrong, thanks to a blanked-off keying pin), so that's easy enough.
If you don't have a socket to match the one-piece plugs, though, you have to either use the split-up single-pin plugs that terminate the cables, or just give up. The single pins are connected with coloured wires that're identified by a label on the cable, but you need the pinout for the header on your motherboard as well, and that may or may not be in the manual.
Fortunately, I was saved from fiddling with the multi-part plugs for the front sound connectors by the fact that the P4MA has no audio header on it at all. So I just left the front audio sockets unconnected. The front USB ports worked fine, though. The P4MA comes with a back panel two-port bracket as well, so you can use the USB port header even if you've got a case without built in ports. Practically every motherboard these days can drive four USB ports, but many of them don't come with the port bracket you need to make it happen.
Of course, a motherboard and a case do not a computer make. On with the other componentry I put in this thing.
The screen
People who've been wondering when the heck I'd get around to saying something about the LCD monitor in the picture at the top of this review can now stop.
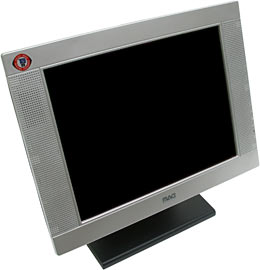
This is Mag Technology's LT565SG, a 15 inch LCD monitor with speakers in the sides. Aus PC Market list it for $AU918.50 delivered; they reckon it looks good with the Chyang Fun box, and I'm inclined to agree. If you need a tiny PC for actual space and/or portability reasons, then you're also likely to want a flat panel monitor, and one with speakers built into it will save even more space.
Whether you can afford a flat panel, with or without speakers, is another question. You can buy a perfectly good 17 inch CRT screen for less than a third of the LT565SG's price, and get 14% more viewable area (a "17 inch" CRT is only likely to have about a 16 inch genuine viewable diagonal).
But a 17 inch CRT will weigh around 15 kilograms and suck down 80 to 100 watts of power; the LT565SG weighs 5.7 kilos and draws less than 40 watts.
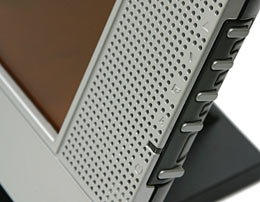
The LT565SG's controls lurk on the side of the screen's frame. It's got the usual one-touch setup button that syncs it to the video signal, at resolutions up to 1024 by 768; it's unlikely that you'll need to fiddle with anything else but contrast and brightness. LCDs don't have all of the fancy geometry adjustment features that CRTs need to get the image just right. They don't need them, because they've finally left behind the giant-firebottle technology that accounts for everything bad about CRTs.
According to Mag's page for this screen, it's got something called "AREC2 MAGIC FILTER 6-layer coated glass". The screen does, indeed, have the deep-purple look that I've seen on seriously non-reflective monitors before; using it in a well lit room, I noticed that I was seeing more picture, and less reflected Daniel, than I'm used to from flat screens.
The LT565SG's supposed to have a 400:1 contrast ratio (the ratio between the brightest white it can display and the blackest black), and luminance of 200 candelas per square metre. Both of these numbers are good, and I didn't have any complaints about contrast or brightness.
Mag don't, however, quote a response time spec for this screen. Response time matters if you want to look at high frame rate video - games, in particular. Slow response rates mean blurry animation, and that was indeed what I got from the LT565SG when I tried it with games. I've seen worse, but I've seen much better, as well; for a review of an LCD with a good response time, and more on what it means, look here.
The LT565SG's quoted horizontal viewing angle is 120 degrees; the vertical angle is 100 degrees. That's the total viewing angle tolerance the monitor's supposed to have; look at it from outside the rectangular-section cone described by those two angles and you won't see anything useful.
The horizontal angle is fairly described, but unremarkable. Only the very cheapest and nastiest LCDs these days don't let you read over someone else's shoulder. The vertical angle's fair as well, as long as you accept the standard LCD problem of everything looking washed out when you look down on the screen, and everything looking too dark when you look up at it. When you're reasonably close to the screen, your line of sight to the top and bottom of the LCD panel will be at a large enough angle that you'll notice this effect, even if your line of sight to the middle of the screen is perfectly perpendicular to it.
This is one of the reasons why LCDs still do not turn my crank.
You plug sound into the LT565SG with a standard 1/8th-inch-connector cable, which is provided; unfortunately, the speakers are no better than you'd expect from weeny little drivers shoe-horned into a flat panel monitor's frame. They're tiny, and tinny. Not much treble, no bass at all, and plenty of midrange colouration from the enclosure.
I've heard worse speakers. Portable TV designers have committed crimes against audio compared with which the Mag monitor's pale into insignificance. But the LT565SG's audio is really only suitable for Windows noises. For background music, it's got all the ear-pleasing character of a $20 clock radio.
And no, just in case you're wondering, there are no bass enhancement or stereo expansion features.
Oh - the LT565SG is also supposed to have "easy adjustment of height and view angle". Well, you can adjust the angle simply enough to aim the monitor at your face; the screen assembly slots neatly into its heavy base, and there's a nice solid hinge. You can't aim the screen downwards - which you might want to do, if you've put it on top of your CRT monitor for multi-screen computing - but that's not a major problem. If there's height adjustment, though, I don't know where it is. It's quite easy to adjust the monitor's height by putting a book under it. Perhaps that's what Mag mean.
If you must have a small footprint monitor, must have a highly portable monitor, or must have a monitor that consumes rather less power than a similar-sized CRT, then LCDs are worth buying. And they're not as painfully expensive as they were. This one's OK, but for this money, it really doesn't thrill me. It's not stupidly expensive by the standards of speaker-equipped LCDs, and its screen treatment is nice, but I'd rather have a 17 inch CRT and change. I'll stick with the giant evacuated glass things for the time being.
On to a more prosaic device.
31337
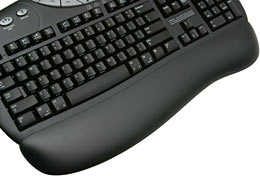
Logitech's Elite keyboard is a sleek black critter replete with extra controls, which nonetheless works OK for basic keyboard functions. This is not something that all button-encrusted "multimedia keyboards" manage.
The Elite has the same "Zero Degree Tilt" design as Logitech's fanciest current cordless 'board, but it's got a few more features, and is cheaper. Its Australian list price is $AU99; it's $US49.95 in the States. You can plug it in via USB or PS/2; it comes with an adapter plug.
Note that these adapter plugs, commonly seen on mouses, are not magical devices; they're just plug converters, and only work when the gadget you're using them with can speak both interface languages already. You can't take the Logitech USB-to-PS/2 thingy and use it with any old USB keyboard.
Once you install Logitech's bundled "iTouch" software, all of the Elite's extra controls become yours to fiddle with. They've all got default functions marked on them, but you can reconfigure them as you like.
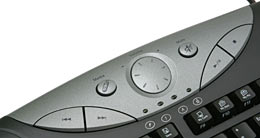
The left side of the keyboard's got a nice-feeling clickable scroll wheel, and a couple of buttons that default to doing the same thing as Web browser Back and Forward buttons. The iTouch software lets you re-bind this wheel to give you a Cut/Copy/Paste menu, cycle through applications, change text size or sound volume, browse through your Favorites menu, and so on.
Above the wheel, the "User" button defaults to dropping the system into standby mode, which is OK. Prominent buttons that're near things you press frequently should never be tied to computer-stopping functions like this, but this one's recessed and thus hard to press by accident if you're reaching for the escape key. So it's safe enough for it to be bound to standby.
The Elite does not, I'm happy to say, have a "Power" button on it. You can bind a key to the Windows shutdown function if you like, but nothing does that by default. Lots of cheapo keyboards these days have a turn-off key; I am really not seeing the sexiness of this.
The "F-Lock" key lights up one of the four green LEDs in the middle of the top of the 'board (the others are for Caps Lock, Num Lock and good old Scroll Lock, as usual), and puts all of the function keys into normal function key mode. With F-Lock off, the F-keys work as another 12 programmable keys, once you've installed iTouch.
The "Media" key will pop up your default media playing program, and the rest of the multimedia keys do what you'd expect, by default. The "Mute" key and volume dial work without iTouch installed, by the way.
The "Search" button brings up the Windows Find box, and the My Home button should give you a browser window looking at whatever your home page is. For some reason, without the software, it gave me a window showing the rather unexciting contents of C:\Program Files\Internet the first time I pressed it, and turned that into a browser window the second time.
There's also a clip-on wrist rest, in case the Elite doesn't already look enough like a puddle of plastic for your taste.
In use, the Elite feels OK. It's got a good amount of key travel despite its super-thin design, and there's an OK tactile feel to the keys. Personally, I don't get the whole zero tilt thing, but there are two little flip-down stands on the back edge of the keyboard, which let you angle it towards you a bit.
Funkified extra-buttons keyboards often have whimsical layouts that leave experienced users pressing the wrong button all the time. The Elite doesn't suffer from this disease. It doesn't even have a big L-shaped Enter key, so it's surprising how close it is to the layout of my beloved ancient IBM 'boards.
There are Windows keys (double-marked, like the Alt keys, with Apple-keyboard symbols; the Elite is Mac compatible), but they don't leap under your thumbs at inopportune moments. In fact, the only thing about this keyboard that I had a hard time getting used to is the fact that the bottom row of keys - the space bar row - slopes down to meet the rising front edge of the casing. So if you rest your thumb on the front edge of the space bar, you won't actually be able to press it.
This keyboard really isn't even in the running as far as ergonomic weirdness goes, though. Touch-typists will not need to put Logitech's designers on their People To Kill list.
If you're wondering about the funny looking trackball that features in my PC Of The Future picture, by the way, it's another Logitech product, a TrackMan Wheel. I review it here. I put it in the picture mainly because a computer has to have some sort of pointer-pushing device, and the TrackMan looks cool. But a trackball is actually a good choice for a limited-space PC; doing away with the mouse and mat gives you a few more square inches of desk space.
The processor
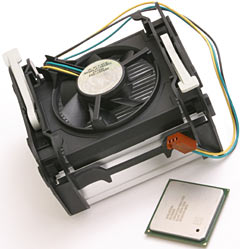
Celerons don't look like they used to.
"Celeron" is Intel's name for their budget processor line, always a cut-down version of their Pentium of the moment. We've had Pentium II and Pentium III-based Celerons; now there's a Pentium 4-based one.
To make their latest Celeron, Intel took the Willamette core of the original P4 (current P4s use the superior Northwood core), and gave it only 128 kilobytes of Level 2 cache, instead of the 256 kilobytes that the Willamette P4s had. Northwood P4s have 512kb of L2 cache, and can also be had with a 533MHz (133MHz, quad-pumped) Front Side Bus (FSB); the earlier P4s, and the P4 Celeron, use the original 400MHz FSB.
That's it for the hobbling, though. Nothing else has been chopped off the Willamette P4 to make it into a Celeron. So this Celeron, while not as close to a P4 as the good old P2 Celerons were to P2s (they were basically just as fast at a given clock speed, but cheaper and more overclockable!), is still excellent value for money.
The Celeron in the picture above is a 1.8GHz model, the fastest one currently available. Aus PC Market sell the retail-boxed version for $AU220, delivered.
The 1.8GHz Northwood P4 is the slowest one Aus PC still sell; it's currently $AU335.50, delivered.
Buy that P4, and for your 52.5% more money, you won't get 52.5% more performance. More like 25%. And not even that, for many tests; check out this piece at Tom's Hardware and you'll see that a 1.7GHz Northwood outdistanced a 1.7GHz P4 Celeron by less than 10% for quite a few tests.
That review opines that "the Celeron lags considerably behind the Pentium 4", but if you ask me, that's only true for suitably small values of "considerably". Even if you assume the Celeron only manages 80% of the speed of the P4, I reckon that's a good deal, for 66% of the price.
If you're not convinced, feel free to take Anand's word for it, too.
If you want to overclock, a Celeron's not a bad place to start, though the upcoming Northwood-based P4 Celerons will almost certainly be better. Right now, 1.7 and 1.8GHz P4 Celerons seem very likely to be happy as clams at 2GHz or more. You shouldn't have any major cooling issues, as long as your case ventilation's OK, because of the largeness of P4 coolers and of the contact patch between CPU and heat sink. Current AMD CPUs have smaller coolers and a much smaller contact patch, both of which make them harder to cool.
This still isn't a very cool CPU, mind you. The stock Thermal Design Power for the Celeron 1.8 is an imposing 66.1 watts, but it can draw more if it's working as hard as it possibly can. It probably tops out at about 88 watts, but 66-odd is as much as you're ever likely to actually see, unless you're doing some pretty peculiar computing.
Overclocking increases power consumption and heat output proportionally with the core speed, and also with the square of the core voltage. So if you wind this CPU up to 2GHz and have to increase the core voltage from the stock 1.75V to 1.8V to get there, you'll be talking a TDP of about 78 watts. 2.2GHz at 1.9V, assuming you can get there, will mean more than 95 watts. I think an after-market P4 cooler might be in order, in that case.
Since P4s and P4 Celerons have an over-temperature throttling feature that automatically cuts back their clock speed if they're in danger of overheating, overclocking experiments are likely to be pleasingly risk free, as long as you don't totally overcrank the poor chip.
I didn't bother overclocking this Celeron. I wanted to keep this machine as stable as possible, not to mention easy to cool, so I kept my five black candles in reserve.
Sundries
More bits are needed to make a PC.
Memory, for instance. I planned to put WinXP on this box, so plenty of RAM was the order of the day. 256Mb is enough for an XP box doing normal tasks, but 512Mb gives Microsoft's latest slim and elegant OS more room to move. $AU280.50 delivered, for a 512Mb PC2100 DDR module from TwinMOS.
Drive, hard, large, one.
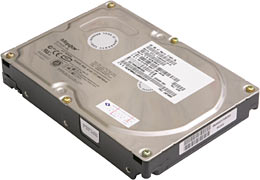
This Maxtor "80Gb" D740X-6L is a completely unremarkable commodity drive. Which is to say it's got boatloads of capacity, decent speed, and a hilariously low list price - $AU236.50 delivered.
Why'd I put 80Gb in quote marks in the last paragraph?
Because this drive's actual NTFS formatted capacity is 80,040,165,376 bytes.
That isn't 80.04 gigabytes. It's actually only 74.54.
This, in case you're new in town, is because of the good old storage manufacturers' round-numbers gyp. There aren't a billion bytes in a gigabyte. Real megabytes are 2 to the power of 20 (2^20) bytes, 1048576 to be exact; real gigabytes are 2^30, 1073741824, bytes. Storage manufacturers' megabytes are 10^6, 1000000, bytes; their gigabytes have 10^9, 1000000000, bytes in them. The small print always tells you as much. So there are 0.93 real gigabytes to the storage manufacturers' gigabyte.
The International Electrotechnical Commission is more than slightly honked off about this state of affairs. Confusion between different units with different names can be expensive enough; giving one unit different values is even worse.
Accordingly, the IEC has been trying to get people to use the prefixes "kibi", "mebi" and "gibi" for powers-of-two numbers for more than three years now. With close to no success at all.
As drives get bigger and bigger, so does the rip-off factor; about 5% per megabyte, about 7% per gigabyte, about 10% per terabyte. Enjoy.
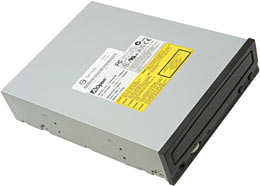
Drive, CD-RW, one. This is an AOpen CRW4048, an alarmingly cheap but thoroughly acceptable CD-ROM/CD-R/CD-RW drive that can write at up to 40X speed (well, kinda; see this review of an earlier AOpen burner to see why big burn speed numbers aren't worth getting excited about), write rewritable discs at up to 12X speed, and read at up to 48X.
Never mind the misleading numbers. The CRW4048 is fast, it's likely to work well with all but the cheapest and nastiest media, and it's not expensive. Aus PC Market are selling this black-fronted version of the CRW4048 for $AU148.50, delivered. The plain beige version - which was what I wanted for this plain beige case - is a mere $137.50 delivered. Both of them come with a couple of blank discs (one CD-R, one CD-RW), and a copy of Ahead Software's excellent Nero Burning ROM, which isn't quite the latest version but can be upgraded for free.
What's the difference between the beige and black versions?
Just the plastic on the front.
It's actually not hard to change the plastic yourself, if you can lay your hands on a new bezel set, or want to muck around with painting or dyeing (because experts recommend you drop only the bezel plastic into your boiling dye pot, not the whole drive). You just have to eject the drive tray (by using an un-bent paper clip poked through the little hole on the front, if you don't want to plug the drive in), and then unclip the plate on the front of the tray, and the frame piece on the front of the drive body.
The plastic's flexible enough that you're unlikely to break anything in the process of prodding the clips loose, but the management declines all responsibility if you get your fine adjuster jammed inside the drive.
I also put a floppy drive in the new computer. I was insufficiently motivated to take a picture of it. It's a floppy drive. You've probably seen one before.
After putting all of these bits together, I installed WinXP and the usual small collection of drivers, and then ran 3DMark2001 SE's default benchmark, to see just how awful the ProSavage8 video hardware's 3D capabilities were.
When you run 3DMark2001 and the initial low detail car chase test starts up at five frames per second, you know you're not on the way to a special 3D computing experience. After all of the tests the ProSavage could actually attempt had chugged past, the score was a big 554 3D marks.
Which, for those who came in late, is craptacular.
If you're not running 3D apps, the ProSavage8 is perfectly fine. For office stuff, DVD playback, 2D games, image editing - anything that doesn't click the chip into 3D mode - it's absolutely as good a graphics adapter as you're ever likely to need.
If you ever want to play a 3D games or use pro 3D rendering software that'll use 3D mode for previews, though, then for Pete's sake drop some more dollars on a proper video card.
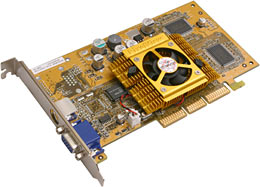
Like this one. It's a Prolink Pixelview GeForce4 MX440, with 64Mb of memory. The one I got doesn't look quite like the one on the Prolink page, but it's the same basic thing, and it's pretty good value, at $AU192.50 delivered from Aus PC Market. You can pay about $AU30 less for a GeForce4 MX board; MX420s with DDR memory aren't much slower than an MX440. US shoppers can do even better; the low price for DDR MX420s and MX440s from the suspiciously cheap brigade is now down around $US60.
The Prolink MX440, despite its low price, has about as much 3D power as most people can currently use, provided you're not a fool for FSAA. It's got a combination S-Video/composite TV output connector, too, which lets you do the same lounge-room-computing stuff you can do with the CF-S868.
Back in the days when we had to hew our PCs from the living rock with tools made from antelope bone, motherboards with built in graphics and sound really, really liked their built in graphics and sound. There might be a jumper or a BIOS option that was meant to disable the on-board hardware, to let you replace it with something less awful, but there was no guarantee that the jumper or option would actually work.
Nowadays, to replace a notveryPronotparticularlySavage with something half-decent, you just physically install the new graphics card, and the on-board video gracefully disables itself in response. You'll still have to install drivers for the new card (WinXP has drivers built in for all sorts of graphics hardware, but they don't do OpenGL; if you're installing an Nvidia-chipset card, ignore whatever came with the card and just get the latest reference drivers), but that's it for the setup chore.
With the new graphics card, hey presto, the 3DMark2001 standard benchmark started at around the eighty frame per second mark, on the way to a respectable final score of 4638 3D marks. 8.4 times the speed, for less than $AU200.
The mildly overclocked machine I'm typing this on has a GeForce4 Ti4400 and a 1500MHz Athlon; it gets 4884 3D marks in the standard 3DMark 2001 SE test with 4XS FSAA locked on, and that's including results for the high-end DirectX 8 tests that the GeForce4 MX can't attempt. The GeForce4 MX version isn't really a GeForce4 at all; feature-wise, it's more of a GeForce2.5. But it's fast, and it's cheap.
The finished product
Here's the whole kit and caboodle, with some minor effort made to corral the cable-snarl (I'm still waiting for Serial ATA drives...).
The orange thing at the back is a Thermaltake Smart Case Fan II, with its thermal sensor stuck to the middle of the fan assembly on top of the CPU, so it samples the air the CPU fan's sucking in. The Smart Case Fan II is a high power unit, but only if it's turned up all the way, which it will be if the sensor makes it to 55 degrees Celsius. When the sensor's cooler, the fan's nice and quiet, and the case still gets enough air flow.
I talk more about this fan, and the Volcano 9 cooler that it comes standard on, in my cooler comparison here.
Overall
What, you may ask, is the point of this exceedingly protracted stream-of-consciousness pseudo-review?
Well, it's that the Chyang Fun P4 CF-S868 is an OK product, but only if its fairly small size and/or very nifty styling are sufficient, in your view, to outweigh its limited expandability and somewhat high price. You can get the same thing in a bigger box for less money, without any concerns about weird proprietary tiny components that you won't be able to replace if they die.
So I like the P4MA/H450A computer. It's not glamorous, but it gets the job done. And with a GeForce4 MX, it's a truly all-purpose PC, ready for the productivity challenges of demanding users now and in the future.
When Nvidia finally manage to deliver a working nForce2 chipset to the world (the nForce2 was announced some time ago, but thanks to what seems to be a slight togetherness shortfall from Nvidia's engineers, the boards haven't made it to market yet), we'll have integrated-video motherboards with OK game performance.
For now, though, the best integrated desktop 3D option is the plain nForce, which beats the pants off ProSavage video but is slow by GeForce2 MX standards; any GeForce4 MX will leave it in the dust. And that's about it for integrated 3D solutions on desktop boards, at the moment; ATI's Radeon IGP isn't as good as the nForce.
So if you care about 3D, a separate card is still a must.
Am I going to be using a mini-PC like this as my main machine any time soon? No. I don't have to cart my PC around often, I don't have a major space problem, and I do actually need more expansion slots than a microATX box can offer.
For nine tenths of the stuff I do, though, the P4MA/H450A machine would be perfectly fine.
Recommended.
Elite keyboard and TrackMan Wheel kindly provided by Logitech
Buy stuff!
Readers from Australia or New Zealand can purchase Small Form Factor PC gear from
Aus PC Market.
Click here!
(if you're NOT from Australia or New Zealand, Aus PC Market won't deliver to you.
If you're in the USA, try a price search at
DealTime!)
