How to bake your CPU
Review date: 22 December 2000.Last modified 08-May-2016.
I was wandering past my humming room full of computers the other day, and I smelled that really-hot-circuit-board smell. Phenolic resin, airborne. You may know the smell I'm talking about.
No smoke, no flames, no little bits of electrolytic capacitor sprayed all over the wall (which bring with them another, distinctly different, smell, by the way). Just the too-hot smell.
After a bit of fishing around to find out which computer wasn't working - since they don't all have anything connected to their video cards by default, and there are so many fans that the hot-board stench was everywhere, it wasn't immediately obvious - I found the culprit.
The water-cooled machine.
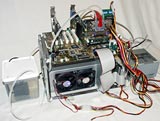
I had a Senfu water-cooling rig hooked up to one of my computers. You can see the rig, and a rather... avant-garde... computer, here. After doing that review, I took the processor out of that machine and used it, un-overclocked, on a humbler system serving mainly as just a print server. I kept the water cooler on it, because I wanted to see how the Senfu gear held up for continuous use. So I ran the machine all day and all night, on average about six and a half days a week, for months on end.
Look what I found when I undid the clamp (what clamp? Just read the Senfu piece, all right?) and pulled the water block off the processor.
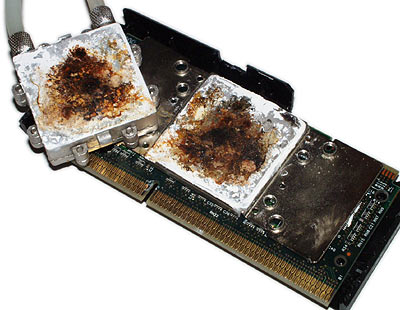
I didn't even know white thermal grease could go that colour.
The CPU was so amazingly hot that it was barbecuing its circuit board - hence the smell. Very little water was making it through the system. The computer still worked; many Athlons soldier on even when disgustingly under-cooled, though it's not something you want to make a habit of.
I wasn't going to push my luck and see how long this one'd live with busted cooling. Besides, this was still a perfectly good 500MHz Athlon. Starving kids in Africa would be happy to have it. Or something.
My first suspect was the water pump.

The inexpensive water pump I'd been using - to replace the stock Senfu one, which was rubbish - has rather better power than the stock one. Plus, it runs on low voltage DC, so you can run it from the computer power supply's five volt rail. The pump came from Dick Smith Electronics here in Australia (catalogue number P 8905), it only cost $AU19.95, and I didn't expect too much of it.
This is a non-submersible pump - unless you seal it yourself, with smears of silicone sealant. That's what I did with the first one I got, and it lasted a few weeks before the seal failed and the motor drowned.

The second one, I mounted like this, silicone-sealed through a hole in the side of the reservoir.
The pump intake is close to the surface of the water, which is bad because you can have a three-quarters-full reservoir yet still have the pump intake sucking nothing but air. I could solve this with a lower mounting point, or a bit of downward-pointing hose attached to the intake. But the high mounting point also prevents the pump from sucking up any heavier-than-water scunge that accumulates in the reservoir.
Just as well, that, really.
Because the pump was not the problem.
Little DC brush motors like the one in this pump slowly wear out as a matter of course. When your carbon brushes have worn away, or your bearings die, or the seal between the pump impeller and the motor fails and water gets into the motor, the pump stops working.
But this one hadn't, yet. Disconnected from the rest of the cooling system, it still pumped like a champion.
Which is pretty impressive - for such a cheap unit, this pump's brilliant. I certainly wouldn't use it for mission-critical applications, but if you want a pump you can run from 5V that'll last pretty well, $AU19.95's a bloomin' bargain.
But I digress.
Since the pump plainly wasn't at fault, there had to be a blockage in the rest of the cooling system.
Be vewwy vewwy quiet. I'm hunting slime.
It didn't take long to find some.
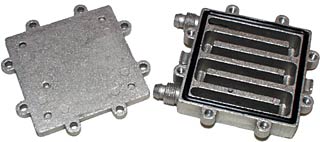
The above picture shows how the water block looked, inside, when it was new.
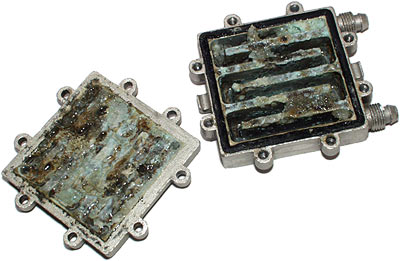
Here it is, plus six months.
I think it could be time for a communal "Eeeeeww!"
Water cooled computers, naturally, tend to keep their cooling water a bit warmer than ambient. That, plus the non-sterile nature of the system, means they're quite capable of turning into algae farms if you don't add something to the water to kill off the microflora.
It's hard not to notice all of your cooling pipes turning green, of course, and nothing like that had happened to the Senfu system. I'd given it the occasional token slug of denatured alcohol ("methylated spirits", here in Australia), but it didn't really seem to need it.
The crud inside the water block was only somewhat slimy. And it wasn't smelly, and it wasn't bright green, brown or red. It's less revolting than it looks. Think flaky tile grout. That's what it's like.

And there was plenty of it. This much inside the reservoir, for instance. And, no doubt, a fair bit more in the radiator. The silicone rubber tubing had a thin layer of the stuff caked along it, too.
There was far too much of the mystery gunk for it just to be scale - low-solubility mineral salts that accumulate in anything that's filled with tapwater and topped up as the water evaporates.
Scale isn't a huge problem here in Sydney, Australia, anyway, because our tapwater has low mineral levels. You'll still get it accumulating in kettles and steam irons eventually, but the Senfu system hadn't had nearly long enough to accumulate more than a token frosting of the stuff.
Giving the water block a jolly good clean (the gunk was tenacious - it took repeated blasts in an ultrasonic cleaner full of soapy water to shift it out of the crevices) revealed what was really going on.

Pits and ruts all over the place.
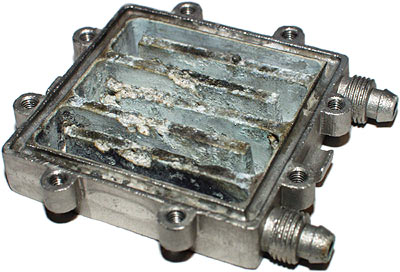
The outer seal of the block was still intact. I removed the rubber O-ring, which was pretty much shot by the heat, but Senfu included a spare. Cleaned and with the new O-ring, the block'll probably still work about as well as it did when new. The extra surface area from all of the erosion might even improve efficiency; none of the baffles are badly pitted enough that the water path should be significantly short-circuited anywhere.
But all of the aluminium that'd left the block had formed low-solubility salts with negative ions already in solution in the coolant, and precipitated out, and clogged the works up.
Why did the aluminium leave?
Galvanic corrosion, that's why.
Take dissimilar metals, connect them electrically and put an electrolyte between them, and you make a galvanic cell. The more "anodic" (or "less noble") metal will be the negative terminal of the cell thus made, and will oxidise. You get electricity, but you slowly destroy the anode.
Aluminium is highly anodic, and the pipes in the Senfu cooling system's radiator are made of copper, which is a lot less anodic than aluminium. Tapwater's not a good electrolyte - the cleaner your tapwater is, the less conductive it'll be, generally speaking - but it's conductive enough for galvanic corrosion to happen. And for, over months, the aluminium to be eaten away and create lots and lots of nasty precipitate in the process.
Without an electrical connection between the radiator and the water block, you wouldn't expect galvanic corrosion to be an issue. No circuit, no ion transfer, no problem.
But it was.
Thanks to a kindly reader, I now know why.
The copper corrodes a little, as copper in water or air always will. This is not normally a big deal, because a thin copper-oxide layer forms and protects the rest of the metal. But, in the process, some copper ions go into solution and make their way around, thanks to the pump, to the aluminium water block. They precipitate onto the water block surface as teeny little metallic copper particles.
And then plain old galvanic corrosion can happen, as the copper and aluminium are in physical, and thus electrical, contact, and both immersed in the electrolyte. The dreck you end up with is mainly aluminium oxide, with its greenish colour donated by a light lacing of copper oxide. Tah-dah.
When I flame-tested some of the precipitate, by the way, this was borne out; green flame from the copper, bright sparks from the aluminium. Case closed.
Incidentally, when I was trying to track down information on this subject, I discovered that if you start searching for "galvanic corrosion" in the company of some other computer-cooling-relevant words, you're likely to find a large number of pages belonging to homebrew enthusiasts, and a smaller number of pages belonging to nuclear-reactor technicians.
Neither of these groups of people want galvanic corrosion to happen in their equipment, but judging by the degree of unhappiness expressed by those who have had equipment destroyed by it, it would appear to be much more irritating when it ruins a batch of beer than when it results in radioactive liquid sodium spraying all over a control room.
But I, again, digress.
The way to avoid the galvanic-corrosion problem is by using non-electrolytic coolant, or by just making sure all of the metal bits in your cooling rig are made of the same metal.
Non-electrolytic coolant's easy enough to come by - ordinary demineralised water, such as you can buy at the supermarket for filling steam irons and car radiators, ought to be pretty good. Automotive anti-corrosion additives, of the sort that you're meant to use in cars with aluminium engine blocks and non-aluminium radiators, are also a good idea. Many people speak well of Red Line "WaterWetter" for its anti-corrosion and cooling enhancement properties.
It's easy enough to find copper water blocks, too. Or to use a plastic water jacket, that just sits, sealed, on top of the CPU so that the water directly contacts the top of the chip package. These last can easily enough be made at home from a little project box or round conduit elbow.
Since I didn't have any of those things, though, I just added the water cooling gear to the Pile O' Crud in the workshop for the time being, and decided to return the CPU to ordinary air cooled status.
Running at stock speed or even somewhat above, there's no reason to use a water rig; I was just testing the Senfu gear's longevity, not using it because the CPU needed that much cooling.
Since the CPU in question is a bare slot-type processor board, long since ripped out of its plastic and metal Single Edge Contact Cartridge (SECC) package, this was a perfect chance for me to try something out.
Let's Get Sticky®!
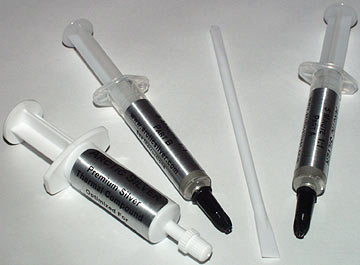
HighSpeed PC have been good enough to send me some Arctic Silver thermal grease and thermal epoxy. I got some use out of the grease in my DDR-versus-SDR Athlon comparison here, but nothing worthy of the glue had turned up before now.
The Arctic Silver products are pretty much like anybody else's silicone grease and five minute epoxy, except that they're loaded with tiny silver particles, giving them excellent thermal conductivity.
Since my previous attempts to find decent thermal adhesive here in Australia were either met with uncomprehending stares or a cheerful "Sure. How many cartons you want, mate?", I was rather pleased with my HighSpeed PC care package. Aus PC Market, though, now stock Arctic Silver paste and epoxy, so shoppers in Australia and New Zealand can get it cheaper than they could from the States. Click here if you're in the Antipodes and want to place an order!
The Arctic Silver epoxy components, like the grease, look like jellied silver pen ink. But, used straight, the glue provides a very strong bond indeed. It's not made for strength like other metal-filled epoxies (Devcon's aluminium and steel filled epoxies have been known to be used for surprisingly successful repairs to cracked engine blocks...), but it's still strong enough that you should regard it as a permanent adhesive. The heat sink, she will not come off the chip, ever.
You can reduce the glue's strength without spoiling its conductivity by "cutting" it with Arctic Silver grease, but I didn't want to do that. I wanted to perma-bond a decent cooler onto the old Athlon, so I didn't have to fool around with bolting something onto the circuit board or rebuilding the original cartridge.

This CPU's had a ridiculous cooler bolted onto it once already. Enough of that.

Because this is no longer a CPU worthy of an expensive permanently attached cooler, I decided to use a bog standard Golden Orb, from Thermaltake.
The Golden Orb, and its similarly shaped descendants, deliver good cooling for their weight - but none of the single-fan standard Orbs are actually an amazingly good cooler. Better than most stock coolers, yes. Good value for money, yes. And the monster twin-fan Super Orb brute-forces its way to quite respectable statistics. But none of this is Ultimate Overclocking Technology, and Thermaltake's performance numbers are frequently fishy. According to them, for instance, the titchy Blue Orb has lower thermal resistance than the Super Orb. Hmm.
But if you just need something on which to try out some nifty thermal adhesive, a Golden Orb's a great choice.
The original model twist-to-attach Orbs have their socket-clip arrangement affixed to the heat sink body by a couple of pins. The pins succumbed to a kiss from the Dremel and left me with an unadorned round cooler with no extra metalwork on the bottom.
The amount of epoxy needed for the contact patch of even an old model, .25 micron Athlon like this one is small enough that you pretty much can't help but mix a lot more than you need. Apply a thin layer, align CPU and cooler, and...

...clamp. The glue sets in minutes, but doesn't reach full strength for hours; I just left it clamped overnight. There are instructions for use of the adhesive here.
This big Quick-Grip bar clamp isn't exactly a finely aligned precision device, but it did the job all right. You want to keep the CPU and cooler as well aligned as possible, and you want enough pressure to make sure you get a nice thin glue layer between the two.

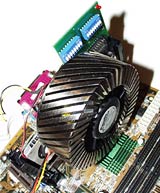
The result. Thoroughly presentable.
If I were feeling anal retentive, I could epoxy little heat sinks onto the Level 2 cache RAM chips while I was at it. If you're not pushing the limits, though, the side-breeze from the cooler's more than enough to keep the RAM chips cool. Current Athlons, like current Pentium IIIs, have L2 cache built in to the CPU, and don't need separate chips any more.

The glue joint looks pretty good. It's not perfectly square, but it's near enough.
The CPU works well, and the cooler gets significantly warmer than ambient, which is good. If your CPU cooler doesn't warm up, it either means you've got a cooler with a lot more power than it needs, or you've got a lousy thermal connection between the CPU and the heat sink.
Sticking other stuff
Epoxying a cooler directly to your CPU is a pretty good idea, for slot-type CPUs. You'll need to remove the thermal plate from Single Edge Contact Cartridge (SECC) type units, but SECC2 processors (including all Intel slot CPUs for a while now) let you get at the bare processor, once you've got rid of their stock cooler.
For socket-type CPUs, epoxying the cooler on will work if you can arrange, or hack up, the cooler so that it doesn't foul the lever of the Zero Insertion Force (ZIF) CPU socket. All clip-on coolers with a wide, flat base can be glued on off-centre to miss the lever, but they may foul capacitors near the CPU socket if you do that.
Most people buying thermal epoxy for computer purposes want to use it to attach a better cooler to something other than a CPU - usually a graphics card processor.
Some graphics card coolers are held onto their chips with low-rent thermal adhesive - you can pop the heat sink off easily. Most of the small coolers and heat sinks on video cards, though, are held on with thermal tape or with a couple of spring-pins and a blob of thermal grease. A properly epoxied cooler, even if it doesn't have specifications much better than the stock one, can work much better if it's got better thermal contact with the processor.
Whether this is worth doing depends on whether you think you can get much more of an overclock out of your video card with better cooling; many modern cards are limited more by RAM speed than by core speed in the higher resolutions that all of us studly folk are running these days. Cooling the RAM doesn't necessarily help much, though you can stick coolers all over the memory as well if you like.
Putting after-market coolers on the main chip of your motherboard - the one that's probably wearing a crummy little spring-pin heatsink without even any thermal grease, at the moment - can be a good idea if you're running a multi-processor board, or a much higher than normal Front Side Bus speed. It could also be an idea for mission-critical computers in general.
If you want thermal adhesive, for good reasons or bad, the Arctic Circle stuff is easy to use and works well. HighSpeed PC are selling it for $US14.95 plus postage, for the two little tubes that'll give you enough glue to do rather a lot of jobs. For glue, that's very expensive. For a computer gadget, it's very cheap.
Water pistol time
Want to know how I cleaned the radiator? Sure you do.

I couldn't look inside the radiator to see if it was as goopy as the water block. With much wider pipes and larger corners, it shouldn't have been, but I couldn't tell. From the outside, it looked as it did when new, except for a healthy fuzz of dust on the grille section.
I was still going to give it a darn good cleaning, though. With small input and output pipes, it'd be a pain to hook it up to a tap and give it a thorough blasting; the pump I was using, even running from more than 12 volts (which is not good for it) didn't have anything like enough power to shove significantly heavier than water crud around all of the corners and out.
So here's how to flush out a somewhat clogged radiator on the cheap, without using amazingly toxic solvents or pumping soapy water through it for days on end.
1) Make sure the radiator tubing's full of water.
2) Point the radiator's pipes at something you don't mind getting all wet. Since the Senfu radiator pipes are copper, it's easy to bend the smaller-diameter header pipes up a bit, for ease of access. And longer range.
3) Jam a butane (lighter gas) can with an appropriate nozzle on it onto one radiator connector. Push down.
4) Observe 20 foot jet of water created when butane flashes to vapour and pushes all of the water out of the radiator very quickly indeed.
Butane's not very good for you, but if you do this in a decently ventilated area without any ignition sources nearby, there's no cause for alarm. And lighter gas is cheap. The ejected water carried plenty of precipitate with it; a few repeats of the flushing procedure probably got the radiator tolerably clean.
You could also do this with an air compressor, of course, but most people don't have one.
Conclusion
My print server's back up, my Senfu gear's fairly clean and ought to live to fight another day, and now the humming computer room at least doesn't have anything in it that needs to be topped up now and then. A job well done.
Hmm. Time for the next project. A couple of Peltier elements, a pair of slabs of copper, the Senfu rig and quite a lot of thermal epoxy may be called for, methinks...