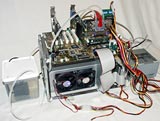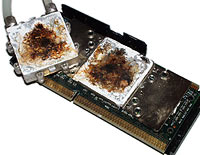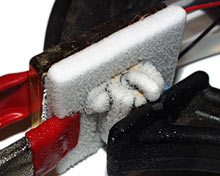
Infinipro AquaCool PC water cooling kit
Review date: 23 April 2001.Last modified 03-Dec-2011.
Water cooling your PC allows you to put a great big cooler somewhere other than right on top of the CPU - or video card chip, for that matter. With a great big cooler, you can keep you CPU surprisingly close to ambient temperature, or even below it if you use a heat-pump active cooling system. And by making that cooler a radiator instead of a simple directly connected heat sink and fan, you can use a much larger and more efficient cooler than you otherwise could.
This doesn't guarantee you the Ultimate Overclock Of All Time. Regardless of how chilly you make 'em, chips do have limits, and some are better than others, and some that give you a decent overclock without exotic cooling don't give you a great deal more, no matter what you do. But serious cooling is a standard part of the recipe for a reliable large CPU or video card overclock. And water cooling, done properly, is not significantly less reliable than ordinary air cooling.
Water cooling can be more elegant, too. But it usually doesn't look that way.
Water cooler radiators are usually mounted outside the computer case, partly so they can get plenty of fresh air, and partly because most PC cases don't have enough room for them. Often reservoirs are also mounted outside, for the same reason. So the computer ends up looking like a piece of equipment from a mad scientist's laboratory.
Which is cool in itself, of course. But having pipes and fans hanging in the breeze waiting to get bashed, kinked or yanked is not a good way to achieve trouble-free computing.
The "Golden Cool" water cooling kit being sold by Infinipro as "AquaCool", though, bucks the trend. With a small radiator and pump, and everything else you need included, this outfit aims to make it easy to get a proper, self-contained, sealed, professional-looking water cooling rig inside pretty much any PC case.
Does it succeed?
Read on.
What you get
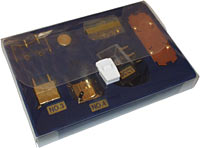
The full Golden Cool kit comes in two packages. The first one, the "AquaCool Deluxe Kit" costs $US88 plus shipping from Infinipro (they accept PayPal for payments, by the way). It contains the water blocks and tubing and mounting hardware for socket and slot CPUs.
And it comes in this purty case.
The packaging makes a good first impression, as does the gold plating on practically everything. The closer you get to the kit, though, the more you can see that the packaging's actually rather cheesy, and the finish on the cooling gear itself isn't really all that good. But none of that matters, as long as the gear works. And it does.
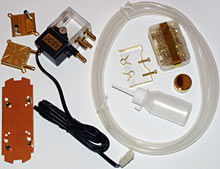
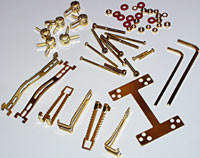
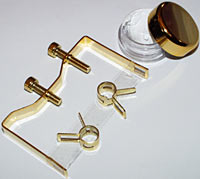
There's an excellent selection of stuff. As well as the two water blocks, of which more in a moment, you get a plethora of mounting hardware...
...which, you'll note, includes a pair of Allen keys for the socket head cap screws. And the Allen keys are gold plated too.
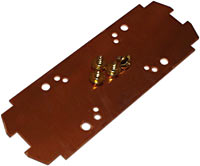
The slot CPU mounting plate...
...allows you to attach the water blocks to older Slot 1 or Slot A CPUs. That, plus all of the other hardware, should allow you to strap one or another of the water blocks onto any vaguely recent PC CPU.
This M-shaped clip by itself lets you install either of the included water blocks onto pretty much any socket CPU. By adjusting or inverting the two screws you can make it fit all sorts of things. There's an adjustable ratchet clip arrangement, too, and umpteen mounting suggestions in the documentation.
Note also the little gold-lidded (naturally) tub of thermal grease. It's your ordinary white stuff, not fancy silver-loaded thermal transfer compound, but it'll do.
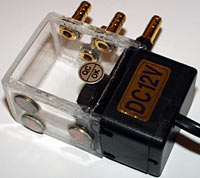
The AquaCool water pump has a small reservoir attached to it, with one output and three inputs. For normal two-connection use, you plug two of the inputs with a short piece of tubing bridging them. If you need to top up the reservoir, the extra connections make it easy.
The pump's got a pre-wired power connector that fits a normal four pin drive power plug.
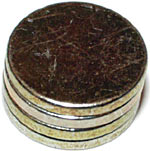
The little discs on the sides of the Infinipro pump - the radiator has them, too - are magnets, for mounting them to the inside of a steel case. The pump magnets are glued onto its plastic case; the radiator ones are loose and can be clicked onto its steel frame anywhere, or used for something else if you mount the radiator another way.
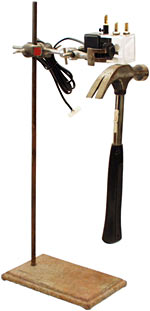
The magnets are rather strong little rare earth numbers.
How strong?
This strong.
And that's only using two of the three on the pump.
The idea of sticking magnets to your computer may set off alarm bells in the mind of anybody who's read one of those introduction-to-computers books that invariably tells you, somewhere in chapter one, how to tell the difference between input and output. But high powered static magnets stuck to the sides of a PC case won't have any effect on the data on your hard drive. And not enough field will penetrate the case to give you any real chance of even wiping a floppy, unless you diligently rub it around over the area with the magnets.
That said, though, the magnets won't be enough to hold the pump or radiator in one place on the side or back of a case. Vibration will cause the pump or radiator to walk down the case, which is probably not what you had in mind. A little square of double sided tape will solve that problem.
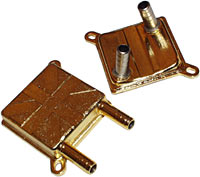
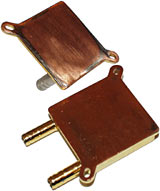
The two water blocks. The one with the hose barbs on the side is meant to be used for video card cooling, while the one with the tilted connectors on the top is for CPU cooling.
The top-connector water block's patented. Its design is supposed, according to the patent, to create a "venturi effect" in the thinner middle of the block, to more effectively cool whatever it's connected to.
I don't quite get that. The venturi effect is the lowering of pressure when a constriction in a conduit speeds up the flow of a fluid; if you put a side tube in at that point, it can be used to draw some other gas or liquid into the fluid stream flow. The venturi effect is what makes carburettors and spray-guns work, and people usually mention it only when they're talking about such devices.
The venturi effect happens in any point of constriction, though; you don't need a side tube. And it clearly happens in the Infinipro water block. And I'm sure that it does cause the water that flows through to more effectively come into contact with the warm block base plate, and carry the heat away. Most of the world's patents are, after all, filed for things that work. Well, some probably don't. But most of 'em do. If they're preposterous, they're usually preposterous for some other reason.
But, of course, the constriction in the venturi block itself inhibits water flow, like any constriction in the water path. And so the design works against itself, to some extent. The water picks up heat better, but less water flows through.
If your water pump has sufficient cojones to not care much about the small amount of extra flow resistance the venturi block causes, then there ought not to be a problem. But the AquaCool pump is not the world's most muscular; as it turned out, in my testing the venturi block didn't work quite as well as the other one. But I'm getting ahead of myself.
The bases of the two water blocks are quite flat, and are not gold plated; they're plain solid copper, as they ought to be. Perfectionists may enjoy lapping them down flatter with ultra-fine wet and dry paper on a sheet of glass, but they'll do, as is. They're certainly a lot smoother than the standard Senfu water block that I played with here.
The AquaCool kit also gives you about three metres of quarter inch soft rubber tubing, a handy little squeeze bottle for priming the pump reservoir and a plethora of little spring hose clamps.
Which are gold, of course.
And there's a surprisingly good manual, too. According to Infinipro, they're working on a better manual with less hilarious English (the parts list includes a "Ratch Ouch", a "Spring Shrapnel" and an "Obtuse Screw", and there are references to the "Computey Case" and an implement referred to as a "Conoid Nip"), but the manual is lavishly illustrated throughout, and so very easy to understand. It shows you how to set up sealed and unsealed cooling systems of every variety, and how to attach the water blocks to various chips.
The separate radiator kit costs $US62 plus shipping from Infinipro. It gives you more mounting hardware, and the radiator itself, complete with mounting magnets.
Here are the radiator magnets, pried from their home and allowed to do what rare earth magnets always do when you put them near each other.
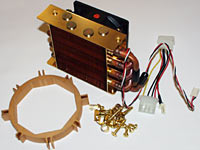
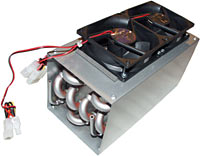
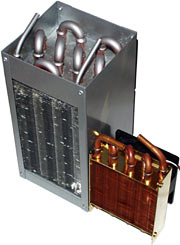
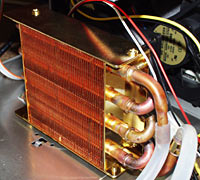
The radiator's only about 14 by 8.5 by 6 centimetres in size (5.5 by 3.25 by 2.25 inches), including the single 80mm fan attached to it. The fan's a reasonably low speed (and therefore nice and quiet) three-wire speed-reporting type, but there's an adapter cable included so you can run it from a normal four-pin power supply connector, if you like.
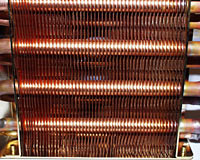
Mmm. Fins. And lots of 'em.
Most air coolers for CPUs have to have pretty substantial fins or pins, which give you less surface area per unit volume of heat sink than do super-thin fins like these. The heat sinks have big pins partly because they're structural - there's a fan on top, and something has to hold it up - and partly because the heat's all coming from the bottom, and you need something solid to conduct it. There are some whimsical designs with super-thin fins in some sort of framework, but they haven't really taken off.
Radiators, on the other hand, just have a pipe carrying water that folds around through the fin structure and contacts all of the thin fins in multiple places. You end up with something that's more susceptible to damage - as anybody whose air conditioner radiator has been got at by someone who's squished all of the fins over will bitterly know - but which, when undamaged, works a lot better at getting heat energy out into the air.
This spacer attaches to the fan on the radiator, and lets you mount it in the front-fan location in many cases, without sandwiching the fan between a case panel and the radiator and restricting airflow. It's a neat idea, and works well.
Money back guarantee
Interestingly, Infinipro are offering a lifetime warranty on all of the AquaCool components. It doesn't cover incompetent installation, of course, but it shows you that they're confident that the pump motor will last - which is more than the little Senfu sinker pump I tried out a while ago did - and that the hoses are made of good non-perishable silicone rubber, and that the radiator fan bearing's decent.
Since the instructions don't warn you to put corrosion inhibitor in the coolant - essential if there are dissimilar metals in the water path, as I found out the hard way, I presume that the guarantee also covers galvanic corrosion, and assures you that there won't be any. Which there certainly shouldn't be, if the water blocks and the radiator are both 100% copper on the inside, which I think they are.
Of course, a lifetime warranty doesn't help you much if the pump explodes and your whole computer's fried. You get a new pump. Zippedy doo dah. But it's nonetheless impressive.
Other toys
Because the little Infinipro pump didn't look very exciting to me, I decided to test it against a couple of other pumps.
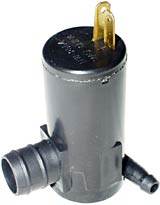
One is this little unit from Dick Smith Electronics here in Australia, which I've used before in my Senfu water cooled rig. It's DSE catalogue number P8905, and it costs only $AU21.75. Which, in US dollars, is currently roughly the price of a used newspaper.
This pump's supposed to be a 12 volt unit, but it can't run continuously from 12V without overheating. It's still got strong performance from five volts, though, so you can run it from a PC power supply with no trouble. It beat the heck out of the crummy Senfu pump, and it proved to last well in service, too.
If you want real durability, though - not to mention rather more power - you need a more expensive AC powered pump.
Like this one, for instance.
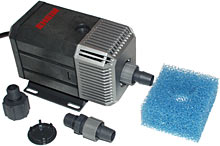
Fish-fanciers know Eheim as makers of solid, serious, German, expensive aquarium kit. Big pumps and filters and fittings and such. This model 1048 pump is almost the smallest one Eheim make. It's meant for long term service in aquaria, but also for other purposes like running little garden fountains and waterfalls. It's a dandy computer water cooling pump.
The 1048, kindly provided by Silverprop here in Australia (click here to buy one from their site!) is a ten watt centrifugal pump with half-inch hose connections and a nominal output rating of 600 litres per hour (158 US gallons per hour). It costs $AU145 from Silverprop, and this one's the 220/240 volt model, which works with Australian AC power. There is, naturally, a 110/120V version as well.
The 1048's only 147 by 75 by 118mm (5.8 by 3 by 4.7 inches) with its end cap on; if you're not using it as a submerged pump, you don't need to leave the end cap there, and can just attach two hoses, which reduces the pump's bulk a bit.
The blue thing to the right of the pump in the above picture is the foam filter block, which you can use if you've got the pump submerged. It shouldn't be necessary for PC water cooling, unless you have a nasty galvanic corrosion problem that's filling the system with insoluble crud. Even then, simple centrifugal pumps like the ones we're looking at here will just blow sand-sized garbage through without suffering any damage. The water block may be a mess, but the pump'll be fine.
Because testing three pumps just didn't give me enough opportunities to squirt water all over my pants, I rolled out another radiator, too.
This sucker's Senfu's largest radiator model, and it's the one I used in the Senfu rig I reviewed before. The total pipe length in the Infinipro radiator's little more than a metre; the total pipe length in the Senfu is about three times that.
Which translates to a rather large size difference.
More pipe length, though, means more flow resistance. The bigger radiator, with its twin fans and much greater fin area, can suck considerably more heat out of a given volume of water. But, using the same pump, a considerably larger volume of water is going to make it through the lower resistance, smaller radiator.
So I was interested to see whether the big radiator gave better or worse performance than the little one.
Moving water
The raw flow rate of the Infinipro pump, moving the water through nothing but a couple of feet of tubing, was only a hair under a litre a minute. About 970 millilitres per 60 seconds.
The flow-per-hour figures that pump sellers quote tell you only how much water a pump will move when there are no pipes attached to it at all. You also need to know the "delivery head" figure, which tells you how tall a water column the pump can support in a vertical pipe. Alternatively, you may find a simple pressure measurement telling you how much pressure the pump can generate into a sealed pipe. Either of those will give you some idea of how the pump really performs. A low flow, high pressure pump is more useful than a high flow one that can't actually move much water through a real cooling system.
Lots of water cooling vendors only quote flow figures, which by themselves are useless. Infinipro, to their credit, don't seem to quote any specs for their little pump at all.
To understand why adding more resistance has such a big effect on water flow, you need to know how one of these centrifugal pumps works.
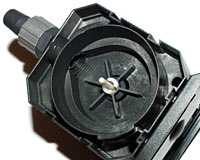
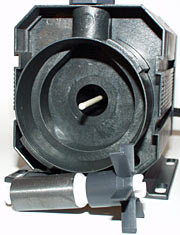
The Eheim is a proper serviceable pump (not glued together, like the little cheap ones), so you can take off the intake cap and see the single moving part - the impeller.
The impeller's the paddle-wheel thing in the middle. It flings water outward, where it exits via the outlet at the top of the pump. More water's drawn in through the inlet that lines up with the middle of the impeller. That's all there is to it. And this also explains why centrifugal pumps can't prime themselves - create suction to draw water into the pump chamber. If there's only air in the chamber, the pump will do close to nothing. If your centrifugal pump's working, but not very well, and it's making a funny noise, there's probably an air bubble being swished around inside the chamber. Stopping and starting the pump a couple of times can help.
Centrifugal pumps have considerable advantages. They don't clog easily, for a start; the Eheim could probably pump lentil soup without mashing legumes. And they don't wear out very quickly. And they can move a respectable amount of water per minute for a given input power. But they don't deal well with back pressure. Increase the resistance of the system a centrifugal pump's feeding, by adding more tubing, a bigger radiator, or whatever, and the water flow will fall rapidly.
Not that this is an insuperable problem. You just need More Power. If you double the impeller speed of a centrifugal pump you double its flow rating, as you'd expect. But you also quadruple the pressure the pump generates, and that's what determines its ability to shove water through higher resistance systems. To turn the impeller at that doubled speed, though, you need eight times the power.
The Eheim, unlike the two little DC pumps, is magnetically coupled. There's no mechanical connection, and therefore no seal to wear out, between the electrified part and the impeller.
In direct drive pumps, like the other two, there's a motor with a shaft that goes through a seal and drives the impeller. Magnetically coupled pumps make the impeller part of the motor; there's a cylindrical magnet on the impeller shaft, which is made to rotate by the switching of the field coils in the body of the pump. The coils are separated from the "wet" area by solid plastic all the way around, which the magnetic field of course penetrates just fine.
So the impeller shaft bearings can wear out, in time, but even that won't let the electronics get wet. And the impeller will keep turning even if it's got no bearings at all - it'll just rattle around inside the housing and be rather less efficient.
Magnetic coupling means the impeller magnet can't be very close to the field coils, and so the resultant motor's not nearly as efficient as the one in a direct drive pump. But the superior durability, especially for something important like a computer cooling system or an aquarium full of beloved fish, is a big plus.
Pipe splicing
When you've got a pump like the Eheim, with large connectors, and you need to hook it up to water blocks like the Infinipro ones, with small connectors, you have two options. You can use a big-to-small adapter for every single connection and run big pipes everywhere - which is fiddly, but which gives you a bit less flow resistance. Or you can just adapt the pipe size down at the pump and have done with it. Either way, the economical way to do the size-change is not by buying adapter hardware - which you may have a hard time finding - but by splicing pipes together.
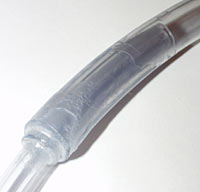
The obvious way to connect pipes is the ugly way, like this. Use neutral cure silicone adhesive, or Shoe Goo-type "liquid rubber". Splodge a hefty blob of it around the thin tube back a bit from its end. And insert it into the bigger tube. Wiggle it around, squish in more goop, get a nice plug of the stuff around the inner pipe. Then smooth the edge with a dampened finger, and leave it to cure fully.
This can take a surprisingly long time. That's a big blob of goop in there. The stuff in the middle pretty much doesn't know that it's meant to be curing.
If you don't leave the splice sitting for the geological ages it will take to cure the glue, and instead use it as soon as it seems solid, it can blow out under pressure. Then you come back to your test bench and find everything for a surprising distance, including two power supplies, is wet, and the pump's sucking air, and there's steam in the tubing, and the heater thermometer reads 106 degrees Centigrade.
Or so I'm told.
Here's the proper way to do it. And it's the way I did it first off, obviously. Shut up, all of you.
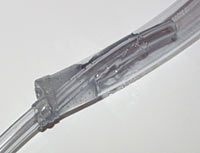
Use an intermediate size of tubing, and glue it into the bigger tubing, and then glue the smaller tubing into the middle of the medium sized stuff. Less glue, more vinyl (or silicone rubber, if you're using the expensive kind of tubing, you mad plutocratic overclockin' fools).
You can use silicone or liquid rubber goop here; I used swimming pool repair adhesive, that's meant to work for PVC-to-PVC joins. Wet ones, even. It appears to be composed of roughly equal portions of acetone and distilled evil, but it cures quickly and is quite flexible. If you're gluing silicone rubber, not much but silicone sealant will work. Silicone sealant sticks to pretty much everything, but pretty much nothing sticks to silicone.
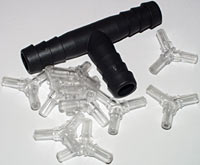
If you want to buy pipe fittings, head to an aquarium store. T-adapters are common and cheap (the little ones here cost me 30 Aussie cents each; the big Eheim one cost six bucks) and they're handy if you want to run more than one water block without choking up your pump.
You'll get better overall water flow from a setup that, say, sends water from the pump through the radiator and then bifurcates to the two water blocks, than you will if you daisy-chain the three components. T-pieces also let you fool around with multiple pumps and radiators, and make a complete pig's breakfast of the water flow.
Fun!
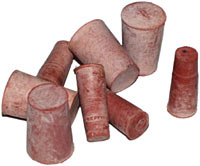
Another handy thing to have sitting around, while I'm on the subject, is a pile of rubber stoppers in sizes to suit your tubing. This dramatically reduces the puddle factor when you're experimenting with different setups. The water cooling setup experience will give you quite an acute familiarity with siphon physics. Stoppers mean you don't have to get quite as wet every time you unplug something.
Testing, testing...
If you want to get accurate performance figures for a CPU cooler, you can't test it on a CPU.
There are tables - and handy utilities like this one - that tell you the ceiling power output of different CPUs running at different speeds and voltages. But CPUs don't output their maximum power all of the time.
You can get them to run pretty close to maximum power by running looping benchmarks or little CPU-workout utilities, but you have no way of knowing how well these things are working. It's easy to overestimate how much heat a CPU's delivering to a cooler.
Here's how you test a chip cooler.
First, you attach it to a heater the same shape as a CPU.
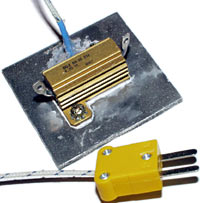
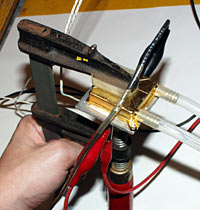
Here's my heater. A 4.7 ohm wirewound resistor screwed to a socket-CPU-sized aluminium plate. The resistor's rated for 25 watt dissipation with nothing but air cooling, but with better cooling than that you can wind it up a lot warmer.
My big bench power supply can output a bit more than 15 volts, which lets me simulate a 50-odd watt load. That's about the same heat output as a current model 1GHz Athlon (or a Duron at the same speed, which quite a few of them can attain with enough cooling), and it's considerably hotter than any P-III's likely to get.
The wire coming out of the heater and terminating in the yellow connector at the bottom of the picture is a temperature probe. It's thermal-epoxied into a slot cut in the bottom of the resistor.
A second temperature probe hangs somewhere where it'll be exposed to ambient-temperature air; sticking it in the intake airflow for the radiator or CPU cooler's a good idea.
Attach both of the probes to...
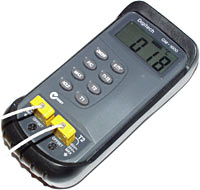
...a dual-input digital thermometer, and you can figure out the difference in temperature, or delta-T, between the two readings. This lets you see the real cooler performance, independent of ambient temperature.
Take the delta-T and divide it by the input wattage (in this case, input volts divided by 4.7 equals input current in amps, and voltage multiplied by current is the power in watts), and you've got the "thermal resistance" of the cooler, in degrees Centigrade per watt (°C/W).
The lower the °C/W rating, the better. Use a cooler with a 1°C/W rating and your CPU will get one degree Centigrade warmer for every watt of heat it outputs; 50 degrees above ambient, for a 50 watt CPU. If your cooler has a 0.5°C/W rating, the same CPU will only run 25 degrees warmer than the air.
The actual thermal rating of a cooler may be considerably better than the results you get from a test like this, because manufacturers' thermal ratings tell you how well the cooler gets rid of heat that's already managed to get into it. If an absolutely definite 50 watts of heat has managed to get into the cooler, and it's got 20 degrees warmer, then it's got a 0.4°C/W rating. Hurrah.
Unfortunately, though, CPUs and CPU coolers don't have a perfect thermal connection. The connection itself has thermal resistance. So a "0.4°C/W" cooling system may indeed work that well, once the heat's made it into the cooler. But your 50 watt CPU may be 30 degrees above ambient when it's going full blast. From the CPU's point of view, it's only got a 0.6°C/W cooler.
A heater with an integral thermal probe, like this one, gives you the CPU's-eye view.
Oh yes. It's also vitally important that you use a space-age, sub-micron-tolerance affixment system to keep your heater precisely aligned with your cooler.
Ahem.
Fuzzy numbers
Why should you not believe my performance numbers? Glad you asked.
Some of the heat a real CPU produces gets away from it via conduction through the socket contacts and down motherboard traces, and a tiny amount is lost via convection and radiation, but the cooling system has to deal with most of it. It's hard to get constant heat output from a real CPU, but whatever it does produce goes mainly to its cooler.
My heater doesn't have insulation on the back of it, so it'll manage to shed a larger proportion of its heat by convection than will a real CPU.
And my heater's contact plate is much bigger than the contact patch of a real CPU, especially a Flip Chip Pin Grid Array (FC-PGA) P-III or Celeron, or Socket A Athlon or Duron. This gives the heater a better thermal connection to the cooling gadget, but also makes it more sensitive to overapplication of thermal grease.
A small contact patch with too much grease on it will have sufficient pressure applied to it by the cooling system mounting clip that the grease will be squished out the side fairly well. This isn't an excuse for not applying the proper very thin layer, of course; the idea of thermal transfer compound is that it should fill the little air gaps between two surfaces, not sit between them in a continuous lubricating layer. But if you do splodge the stuff on like toothpaste, a small-contact-patch CPU will give you a better final thermal contact than a large one.
Assuming equal grease layer thickness, a contact patch that's twice as big (with four times the area) will squish out little more than a quarter as much grease along any given amount of its edge (because the grease is glutinous and can't easily flow to an edge, even under pressure). But the bigger patch will only have twice as much edge as the smaller patch. And will therefore end up getting rid of only about half as much of its original excessive grease amount as will the smaller patch. Even less, probably, as the small contact patch will have its grease smeared and squished out more, proportionally, by the cooler-application process.
I can't believe I just spent time figuring that out. Let's proceed.
There are some other results-fuzzing factors. My dual-input thermometer isn't the most accurate one in the world, for instance. All of my °C/W numbers should be treated as being plus-or-minus about ten per cent.
My flow rate numbers were determined by just sticking the output pipe into a jug and timing how long it took to transfer one or two litres of water. The relative height of the water in the source and destination vessels makes a difference, then, for siphon-physics reasons. And the accuracy of my results depended on my eye on the jug markings and my thumb on the stopwatch button. Neither of those parts of me have recently been employed by the Organisation Internationale de Normalisation for use in calibrating any world time or volume standards. But I live in hope.
The performance of a pump with a given water block and radiator will vary considerably with the length and diameter of the tubing in the system. Because I didn't have one set of tubing that matched all of the gear, that variable shifted around a bit too. I could have spent more time hitting my vinyl tubing with the heat gun and squishing it onto odd-sized connections, but I didn't. Sue me.
I did do a couple of tubing-length tests, though. Generally, going from a bit too much tubing (more than you'd need to install the system in a computer) to a bit too little (not enough to reach, in many real-world setups) made less than 10% difference to the water flow rate, and a smaller difference still to the system cooling performance.
Results
With the Infinipro radiator and the side-ported water block, the Infinipro pump moved about 0.775 litres per minute, and scored about 0.35°C/W.
With the top-ported venturi effect block, the flow rate fell to 0.647l/minute, which was probably responsible for the crummier 0.38°C/W cooling score.
I switched back to the side-ported block, and to the Senfu radiator. Now it was clear that the little Infinipro pump wasn't having a good day. No wonder they're going to ship a bigger one soon; the pump couldn't even prime the new radiator, and its flow rate fell to a miserable 260-odd millitres per minute!
So it wasn't a big surprise to find that this permutation still scored 0.38°C/W. The sluggishly moving water was being well cooled by the much bigger radiator, but the flow rate was so lousy that the system didn't actually work any better.
Rather than spend time with a turkey baster or abuse a bicycle pump, I'd used my old DSE pump to prime the Senfu radiator, so I knew it was considerably more powerful than the Infinipro one. Indeed, it managed 2.4 litres per minute through just enough tubing to reach to the output jug - about two and a half times the Infinipro pump's result.
Pumping through the Senfu radiator and side-vent water block, the DSE pump still moved 0.810 l/minute, better than three times the Infinipro's performance. And that extra flow made a difference - now the thermal resistance was just 0.27°C/W. Almost 51 watts of heat only drove up the heater's temperature 14 degrees above ambient.
Was the Senfu radiator the main reason for this more impressive result, or was it primarily the higher powered pump, or did they both have a similar effect? What was the balance of influence like?
To find out, I swapped out the Senfu again and put the Infinipro radiator back in the circuit. Now, the flow rate jumped to a most impressive 1.579 litres per minute, far and away the best full-circuit figure so far. But the thermal performance fell, to 0.29°C/W.
So I was dancing around the peak of the performance graph for this combination of parts - driving up the flow rate by putting the smaller radiator in circuit didn't compensate for the little radiator's lower heat exchange ability. The fuzziness of my tests means that these last two readings might actually have been identical, but nonetheless, a radiator mid-way between the Senfu and the Infinipro might be just what the doctor ordered.
Senfu make a radiator in the same style as this one, but roughly half the size and with only one fan. That'd probably work very nicely with the DSE pump and Infinipro water block, not to mention be easier to mount inside a case than the Senfu I've got.
OK. Big gun time.
Out came the Eheim pump.
In use, the Eheim's very quiet. A faint hum and vibration; its operating noise will be masked by the fan in your PSU, let alone any radiator fans.
The Infinipro pump, like many cheap aquarium pumps, makes a noise reminscent of a distant coffee-grinder. The DSE pump sounds like what it is - a little brush motor, very nearly as wide as the pump's tubular case, cranking away merrily. The Eheim's bigger, slower-turning impeller is much quieter than the impellers in the other pumps, for the same reason that big fans are quieter than little fans with the same power.
The free-flow score for the Eheim, with its output choked down to tubing small enough to fit onto the Infinipro water block, was 3.43 litres per minute - 43% better than the little DSE pump could manage. Without the thin tubing attached, it shifted 5.45 litres per minute - still little more than half of its nominal rating, even though all it was doing was moving water through a foot and a half of half inch tubing into a measuring jug sitting at the same level as the bucket I'd submerged the Eheim in. Nominal flow ratings for centrifugal pumps are, as I mentioned before, not very informative.
Hooked up to the Inifinipro side-port water block and radiator, the Eheim still managed to move 1.62 litres per minute. Which wasn't a lot better than the DSE pump managed, so I didn't expect greatly improved results.
The Eheim/Infinipro system's performance, though, was good enough that I thought perhaps there might have been too much water in its immersion bucket, so thermal inertia was making it look better than it really was. I drained most of the water, so there was just enough to feed the pump, and left it for another lengthy test run. It still utterly frickin' ruled. That's a technical term.
We are talking 0.175°C/W with the Infinipro radiator, here. With the Senfu radiator, its flow rate fell to about 970 millilitres a minute - the same as the poor little Infinipro pump manages when it's practically unloaded - and its performance fell to 0.24°C/W. That Senfu radiator just has too much darn tubing in it.
Compared with air
By way of comparison, I stuck the heater onto a Global Win FOP38 air cooler. The FOP38 may not quite be the king of the socket coolers any more, but it has a howling 6800RPM fan and a well-designed heat sink (and a rather less well-designed clip...). It's definitely still up there with the best normal socket CPU coolers you can buy.
The FOP38 had a better thermal contact with the wide heater plate than it'd have with the small die of a CPU, but it still only managed a thermal resistance of 0.45°C/W. 51 watts input meant a delta-T of 23 degrees.
So the Infinipro setup, with its standard pump and the side-port block, even pushing water through more tubing than it's likely to really have to put up with, works almost 30% better than a really top-notch air cooler.
The cheap DSE pump, Senfu radiator, Infinipro water block combination beat the FOP38 by 67%. And with the Infinipro radiator and the Eheim pump, the water cooled rig won by a factor of about 2.6.
A CPU temperature 25 degrees above ambient with the Eheim-pumped Infinipro setup would be something like 65 degrees above ambient with the FOP38. Which would put it up into the flaky zone, unless you're computing in a snowfield.
Installed
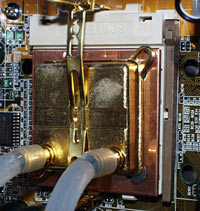
Here's an Infinipro water block sitting on an Athlon. Yeah, I know there should be hose clamps. Let's live dangerously.
This water block's a top-vent model, which works the same as the side-vent one in the test. You can buy it separately, as I'll explain in a moment.
The CPU looks all coppery because there's a shim between it and the water block, to reduce the chance of physical damage to the core. The shim's a groovy one with cutouts for the Athlon's top-of-chip hardware, including its standard rubber spacer feet. The mounting clip used here is the one with the ah, "Ratch Ouch" side pieces.
The pump, stuck to the back of the case. The reservoir's doing just what it's meant to do - collecting any air bubbles in the circuit and stopping the pump from sucking them in.
The radiator in place at the front of the case. This case has front intake fans already, so the spacer ring hasn't been used; the radiator just sits a bit back from the other fans and inhales their exhaust.
In Australia
Infinipro don't have an Australian distributor, but you can get a decent selection of the exact same hardware under a different name locally. From my site sponsors Aus PC Market, as it happens.
[Well, you could; now their range has moved on. The pricing info in the rest of this review is now historical.]
They don't have the pretty boxed kit, but they'll sell you a water block like the side-port one I reviewed, only with top-mounted fittings instead. That, plus the radiator, plus the pump, plus the socket CPU mounting hardware (without the slot CPU plate) and the nice manual, will set you back $AU286, including delivery.
If you get the AusPC package, you'll need to add your own tubing. If you head off to a place like Clark Rubber you can get food grade clear vinyl tubing that's more than good enough for about one Australian buck a metre.
You'll want 5mm inside diameter (ID) tubing; that's a snug fit on the water blocks and slightly too small for the radiator connections. But if you heat it up a bit - boiling water, or a hot blow gun - it softens, and you can easily work it onto slightly larger connectors, and end up with an excellent seal.
The Infinipro hose clamps don't quite fit the 5mm vinyl tubing I tried, but that's no big deal. You can just use nylon cable ties, which cinch down more than tight enough.
Aus PC's pricing for this gear is OK, but not amazing, compared with the direct-from-Infinipro price. Infinipro are in Texas, and air mail shipping for the gear I got cost more than $US25. There's also a non-zero probability that Aussie buyers will be charged another 10% GST by Customs.
If you dodge the GST, you could get all of the stuff I reviewed landed here for about $AU340, so you wouldn't be paying all that much for the extra bits and pieces the packaged kit gives you. If you want the socket CPU plate, buy from Infinipro.
If you're in North America, of course - and most of the people who read this will be - go ahead and hit Infinipro's site. I'm reliably informed that, despite its best efforts, Texas is not yet regarded as a separate nation from the USA.
Overall
I like this kit. It looks pretty good, it comes with all the bits you need, and even with its stock, not-so-great pump, it works better than the best socket air coolers.
Upgrade the pump, even if it's only to a cheap alternative like the DSE unit, and you can get very impressive performance out of the Infinipro kit. With the DSE pump, this gear's good enough to use for active cooling - when you put a Peltier heat pump element on the CPU to cool it below ambient.
Peltier elements add their own slab of heat to the heat they transfer, and they don't like running hot. They need a really good cooler on their top side to be worth using, and the Infinipro kit, with a better pump, qualifies. That radiator may be small, but it works.
With the expensive Eheim pump, I think you could count on this system to keep working for years on end. Put a reservoir in line with the pump or use it submerged, put a splash of disinfectant in the water to prevent algae growth, and check the water level about as often as you check the water in your car's radiator (or rather less often, if you own an English car), and you'll be fine.
UPDATE!
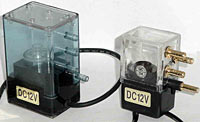
Shortly after I got the Aquacool kit for review, Infinipro told me that a larger, more powerful pump was going to come in future versions, and sent me this picture of the two compared.
I've got the new pump, now...
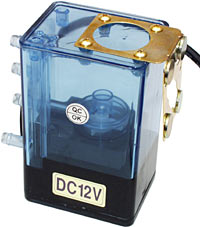
...and here it is.
There's a springy bracket mounted to the pump, which has more of those rare earth magnets on it - but since the bracket's made of steel, the magnets don't have to be glued on, as they are to the plastic case of the original pump.
The bracket has a hole that may come in handy for screw-mounting it, and you could use double sided tape as well. Whatever method you use, the springiness of the bracket means that this pump won't transfer as much vibration to the computer case as the old one did. Neither of them really buzzes that much, though.
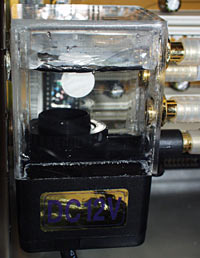
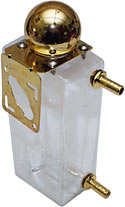
Infinipro now also have these reservoirs available. They're pretty obviously just a cheap cosmetics bottle with a couple of pipe fittings and another bracket (but no magnets provided, this time), but they're not expensive either. If the reservoir on the pump isn't enough, or if you want to use a different pump with no reservoir built in, the standalone reservoir could be handy.
Infinipro's $US88 price for the AquaCool kit (without radiator) has stayed the same, but you now get the bigger pump and the reservoir as standard equipment. If you want to buy the new pump by itself, it'll cost you a hefty $US40; you can get the new pump with the new reservoir as well for $US46.
I hooked the new pump up to the standard AquaCool side-port water block and radiator to see how much better than the smaller pump it was.
Set up to drain a jug of water into a basin, with the output pipe at about the same height as the input - so there wasn't any help from gravity - the original pump moved 0.545 litres per minute. There was a bit more tubing involved than there had been in my original test, so this was a plausible enough result.
In the same setup, the new pump shifted 0.617 litres per minute.
Whoopty, as they say, doo.
To make sure there wasn't some blockage in the test rig, I hooked up the little DSE pump again (remember, it's about a $US10 item, at most...). It merrily squirted out about one and a third litres per minute; down a bit on its previous comparative figures, but still obviously superior.
So the new Infinipro/AquaCool/Golden Cool pump is better than the old one, but only barely, and it's still not very good. It only manages about 13% more water flow, through a realistic cooling system; my well-used DSE windscreen washer pump is more than twice as powerful.
Even if the new pump had twice the performance of the original, I wouldn't recommend you buy it as an upgrade for the $US40 Infinipro are asking. That's a rather audaciously high price for a simple 12 volt pump like this, reservoir or no reservoir. The fact that the new pump performs little better than the old one makes it a particularly unattractive purchase.
As standard equipment in the existing kit, it's a better deal, but serious overclockers are probably still going to want something better.
My opinion of this kit, therefore, remains unchanged. Perfect it is not, bit it's a good first step into water cooling for people who don't have time to buy everything separately and then make the bits work together.
It's worth buying. Recommended.
Water cooling kit kindly supplied by Infinipro.
Eheim pump kindly supplied by Silverprop Australia. Aussie overclockers can get all kinds of extreme cooling gear from Silverprop.
Buy water cooling gear!
Aus PC Market no longer sells any of the products listed here, but fear not; they've got plenty of other water cooling
gear in their CPU accessories listing
here.
