The Loud Speaker Kit F6 Mark II Tower speaker kit
Reviewer: Mark CocquioReview date: 11 August 2007. Last modified 22-Feb-2013.
Again with the kit speakers.
Last month I reviewed the M6 large bookshelf speaker kit from Perth-based outfit The Loudspeaker Kit (LSK). This time around they've well and truly iced the cake by sending me a pair of the M6's big brothers - the F6s.
(They are, strictly speaking, the F6 Mark II.)
[UPDATE: As of 2012, The Loud Speaker Kit were out of business; as of early 2013 they're back under new management, though not with a full line of products yet. There are several other kit-speaker companies both here in Australia and overseas. It can also be easier than you'd think to design your own speakers from scratch!]
These are the full-height, floor standing equivalents of the M6 speakers. They're also the larger and more imposing siblings of the smaller floor-standing F5 speakers that Dan reviewed here.
Let's back the truck up briefly though, for the benefit of anyone who's stumbled onto this review with no prior knowledge of the others. The executive summary is that The LSK are an Australian company that make kit speakers, for the domestic market only (basically due to the practicality of shipping enormous, heavy boxes overseas).
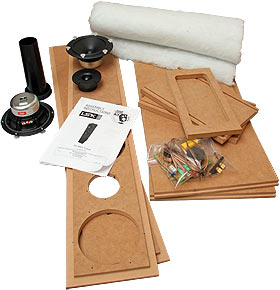
For the well and truly uninitiated, kit speakers in this case means a collection of MDF panels (that you glue together yourself), along with the speaker drivers and other related paraphernalia. The idea is that, by assembling (and optionally adding a finish to) the cabinets yourself, you'll save quite a few dollars over pre-built, equivalent-sounding speakers of a more commercial nature.
The LSK have a pretty wide range of speaker kits available, and Dan and I have already reviewed four of them between us.
As I said above, the F6s, which I'm looking at now, are the larger cousins of the F5 speakers.
So, what's to say about them? The LSK describe them as a "large floor standing speaker, warm sound with powerful bass". They go on to say that they are "an excellent choice if you want high levels in your home theatre and your musical tastes include rock, grunge or heavy metal. If you are a Tool, Metallica or Chili Peppers fan, these are the speakers for you!"
You see, there's another large, floor standing "6" series kit by the LSK - the TL6 - which are priced the same as the F6s ($AU1199 - but read on for a big discount!). The TL6 apparently has a more "English" sound, which I take to mean less boomy bass (although "English" doesn't necessarily mean soft and poncy).
So the F6s are supposed to sound better with some nice loud rockinwrolllll and/or metal. If your tastes lie there, then they're a better choice than the TL6s.
Me, I have both types of music at my venue (hard rock and metal!) - so I can certainly test that end of the spectrum (hell, several years on, I'm still Derd of the Week!).
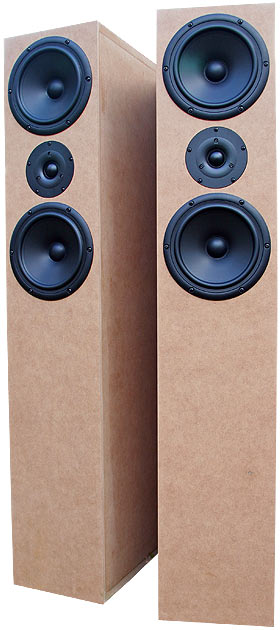
Like the F5s, the F6 speakers use a MTM (midrange-tweeter-midrange) design, also known as a D'Appolito configuration. As Dan mentions in the F5 review, the idea behind this configuration is to help blend the sound from the three separate drivers into a single horizontal fan shape, and make it sound like it's coming from a smaller source than it actually is.
The reason this is a Good Thing is that it improves the stereo imaging of the speakers. An ideal loudspeaker is a perfect tiny point source of wideband sound. In practice, such a thing is pretty much impossible with our current puny science, but the MTM configuration helps.
The F6s, being somewhat scaled-up versions of the F5s, use slightly larger tweeters and midranges/woofers. In fact, they're the same drivers as used in the M6 bookshelf speakers - although each speaker has an extra midrange because of the MTM configuration.
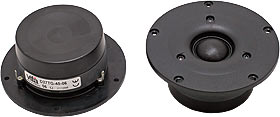
As I discovered in the course of the M6 review, the tweeters are Vifa D27TG-45-06s, a step up from the slightly smaller and cheaper Vifa units used in the F5 kits. They're both quality silk domed units, with good frequency response in the "tish" department (to wax technical).
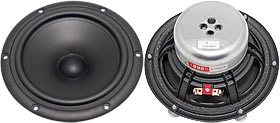
The F6 bass drivers are the same as the M6 units, too - Peerless BC18SG08-08s, but with two of them per speaker instead of only one. They're quoted as having a diameter of 165mm, which in reality works out to a cone diameter of about 120mm.
The remaining hardware consists of the crossovers, binding posts, tuned ports and screws.
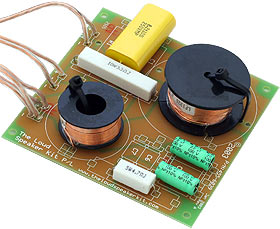
Like almost all of the LSK crossovers, those in the F6s are built on a generic circuit board, but are designed and "computer optimised" for the kit.
Like the F5 kits, and the other "6" series kits, the F6 kits are supplied with gold plated banana plug type binding posts. Banana plugs give slightly better electrical connections, in theory, than a bare wire connection (ordinary banana-plug terminals can accept bare wires as well; cheaper speakers generally come with spring terminals that can only accept bare wires), but they're mainly handy because they make connecting the speakers a bit less fiddly. This isn't such a big deal if you only move your speakers when you move house every seventeen years, but if you're reviewing speakers a-plenty, nicer terminals are a detail you learn to appreciate.
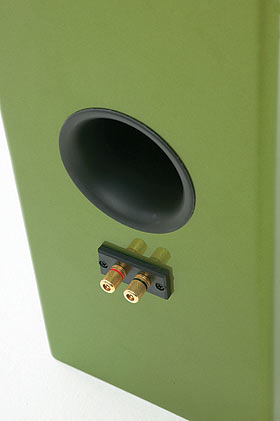
As for the ports on the F6s, well, they're manly man's man ports. They're big, solid, and, unlike those of the F5 kit, point backwards, out of the back panel of the speakers. This means that sticking the F6s right up against a wall is a no-no, but if you're short on space chances are you'll be looking at the F5s anyway.
Construction time
I'm becoming a bit of a veteran now when it comes to constructing the LSK's babies. You see, before I built and reviewed the M6 kit, I'd already built an entire 5.1 kit for myself, and half of a 5.1 kit for my parents.
I actually paid for those speakers. Then the LSK decided to send me their big daddies for review. It's a twisted old world.
It has been interesting though, because it's given me a chance to get a feeling for the different LSK kits, and, in particular, how easy or hard it is to build them.
At the end of the day, it pretty much comes down to size. The only reason the bigger kits are harder to build is that they are physically harder to manhandle on your own when you're sloshing glue about the place.
Apart from that, putting these kits together is really quite easy. Even if you spent your high school woodwork classes squirting oil at the blackboard and creating large clouds of smoke with the engraving tool, it's pretty hard to stuff up one of these kits, provided you have half a brain and don't rush it.
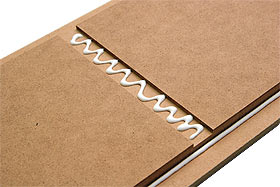
As most readers already know, this is because the LSK have a tongue and groove arrangement called "Jig-lock" which they use on several of the MDF panels, so everything fits together neatly.
The F6 cabinet is really no different in this regard. In fact, it's pretty much an exact replica of the F5 kit, only scaled up a bit, and with the port at the back.
Here's the componentry for one speaker. You can see the various panels, drivers, port and crossover baggie (which also contains the screws for attaching the drivers), as well as the internal brace, used to strengthen and stabilise the box.
The F6 kits all use 18mm MDF, and they're on the big side - 1.2m high - so the panels themselves (in particular the side ones) are weighty. Because of this, when you test fit it all together, it's advisable to build the speaker on its back, in order to avoid inadvertently damaging the recessed grooves in the top and bottom panels.
This is exactly what I haven't done in the following picture, but it shows the Jig-lock system nicely.
I only had small dramas with the test fitting. I had to trim a little bit of excess MDF fluff from one of the side panel tongues to make it line up extra-well, and one of the other big MDF side panels was slightly curvy when it came out of the box.
Apparently this is a common thing when MDF absorbs some moisture, and it wasn't a big deal; I just left the speaker dry-assembled for a day and the panel straightened out nicely.
The internal brace fit like a dream. This was a different experience to both my and Dan's F5 building, where the internal baffle was incredibly tight (in his case it needed whittling; in mine just sticking it in and pulling it out a few times loosened it up sufficiently).
Like the F5 instructions, those of the F6 kit suffer from slight discrepancies between reality and the pictures used as examples. In particular, the internal baffle is only recessed on the front and back panels - not the side ones as shown in the instructions.
In fact, I've noticed that many of the LSK manuals borrow pictures from each other, and it's possible in some cases to see that the speakers in the pictures aren't even the ones you're building. This isn't a serious an issue as it sounds, because in general it's quite easy to work out what's going on - the differences are minor.
Still, it wouldn't hurt if The LSK revamped their booklets at some stage.
Anyway, with the test fitting completed, and feeling as if I wasn't in for any nasty surprises, I broke out the sticky stuff and started going nuts.
Having built quite a few of these kits before, I decided to build the speakers from the back up, rather than follow the stand-it-up-lie-it-down advice of the instructions.
I started by laying down the back panel, and making sure it was nice and flat.
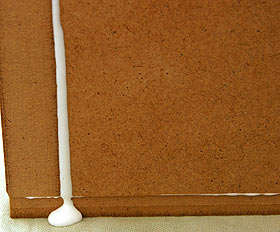
Then it was time to start the main event. The back-upwards approach made life much easier when it came to gluing some parts...
...but not others.
Perhaps I was a little too generous with the PVA there.
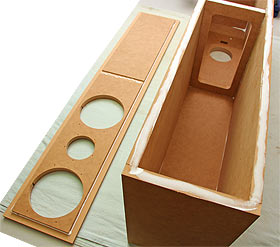
Here you can see the almost-finished box, with the internal brace in place, and the top panel ready to go on.
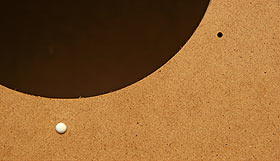
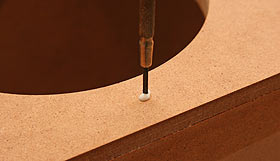
Once I put the top panel in place, I noticed that my liberal application of PVA had resulted in some being squeezed out through the pre-drilled screw holes for the bass drivers.
PVA isn't particularly hard to work once it's dry, but nonetheless it would make life harder when it came to putting in those screws if I left it as it was.
In the end a simple poke with a jeweller's screwdriver...
...was all it took to squeeze most of the glue out.
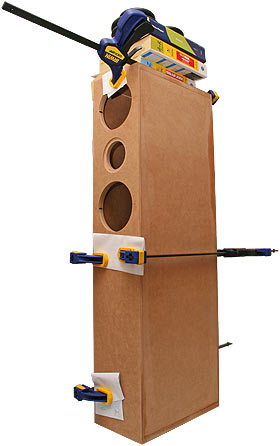
After that little cleanup, and much wiping of all the other oozing joints, I carefully stood the cabinet up and weighted it on top, before finally clamping the front and back panels.
After another round of oozing and wiping (the clamped panels always ooze a bit more), I was done. The bits of paper underneath the clamps are there to stop them marking the MDF.
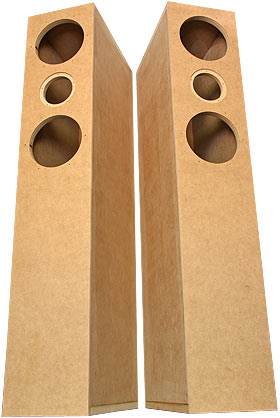
Leave overnight, unclamp, repeat for cabinet number two. Now we have boxes.
The cabinets aren't flared, by the way. They just look that way thanks to the slight pincushion distortion of my wide angle lens.
Apparently, each finished speaker weighs in at a hefty 18kg. I can tell you that most of that weight is solid MDF.
Once again, I elected to put the listening first and the finishing second, so I cut straight to installing the drivers.
You start with the crossover, which can be glued, screwed or Blu-Tacked to the inside of the box. The F5 and F6 enclosures both have an internal brace, and this serves as a handy spot to anchor the crossover. Once again, I went for Blu-Tack.
It's possible that putting the crossover here could generate some internal reflections and influence the sound slightly, but you can always stick it to the back panel instead. In reality, it is unlikely you'd hear any difference - and I regret to say that I am insufficiently dedicated to test this out.
The wires are easily fed to their respective destinations, starting with the rear binding posts. Then you stuff the bottom half of the speaker with the acoustic fluff.
In time honoured Dan's Data tradition, I did try to get a picture for the review of a cute animal lying on the stuffing, however my four legged friend was more intent on carrying the fluff outside and tearing it to pieces.
Naughty puppy. Cute, naughty puppy.
It was a great game, retrieving the fluff, at least for her. It taught me a few things, not least that dragging acoustic dampening material around the back yard will make sure it picks up just about every single loose leaf and piece of grass possible.
Several minutes of fluff picking later, I had it into the bottom half of the speaker boxes. Tearing the fluff into little pieces is actually a recommended part of the installation process, so I guess Jez did help me out there.
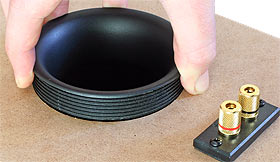
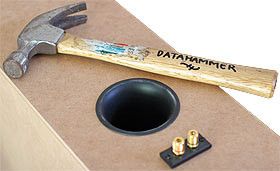
Next up, the large, rear facing port. Almost all of the LSK speakers that I've built have ports, and the instructions always say that a small rubber mallet may be of assistance to get them in. I'd never needed to even consider that, until I tried to install the massive F6 ports.
Not only are these buggers large, they're tight. Here you can see the amount of clearance (approximately zero), as well as the speaker binding posts.
After a fair bit of cursing and swearing, I finally managed to get them in, with a little percussive aid from my hiking boots and Datahammer.
From then on it was clockwork to attach the three drivers and screw them into place. I finished by sticking some rubber feet onto the bottom of the boxes (not included in the kit - I had them lying around), and then my fully armed and operational speakers were ready to go.
In appearance, the F6s really are scaled up F5s. Here's a comparison shot, with one of my finished F5s:
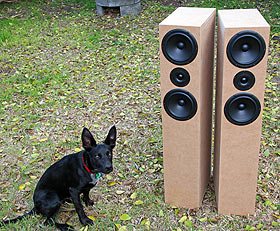
And just so you can get a feel for how big they are overall, here's a comparison shot with Jez, the aforementioned cute puppy:
Cue Led Zeppelin.
I was shooting outside, by the way, because a) it was a nice day, and b) my flash is on the blink (and a special shout-out to Canon Australia for quoting me 10 days repair time, and then taking more than a month to even look at it!). So I made use of the big light source in the sky, just to try something different.
Listening
The F6s are supposedly the boom boxes of the LSK range. "Boom box", though, is all relative. They're not lousy chain-store hi-fi speakers with a big fat tuned bass hump. Rather, they're full range hi-fi speakers with, shall we say, a slight emphasis on meat in the bottom end.
As with the M6s, I subjected myself (and my neighbours) to a multi-hour battery of eclectic music, from the usual madhouse of genres.
This time round, I set up a switch box, and compared the F6s to my F5s, as well as to my M5s and M6s. It was a veritable speaker-fest!
The first thing to note about any comparison like this is that it's purely subjective. It's also completely unscientific, and making any absolute statements about the speakers is therefore problematic, because the acoustics of the room will always change the way things sound. Corners, furniture and windows all absorb and reflect sound, and my lounge room is far from an optimal listening environment.
The other problem with a comparison like this is that two speakers can't be in the same place at once, so the sound stage will move about when you switch between them.
Because of all this, I'm going to keep my observations fairly generic. At the end of the day, though, the F6s are the nicest sounding LSK speakers I've heard so far.
Because of their size, both of the floor standing "F" series speakers have noticeably more bass than the smaller "M" series bookshelf speakers. Interestingly, the F5s have a very similar bottom end response to the F6s - The LSK list their -3db cut-off frequencies at 36Hz and 37Hz respectively.
Yes - the F5s apparently go one Hertz lower.
What did this mean in the real world? Nothing. They sound just as bassy at the bottom end as each other, although the lower register of the F6s as a whole is somewhat fuller.
The smaller bookshelf speakers have noticeably less bass, although as I noted in my M6 review, for smaller speakers they are far from bass-free.
One thing I did also notice while doing my testing is that a subwoofer is a great leveller of the playing field. Most of my listening was done with the sub off, but once I switched on it made even the smaller bookshelf speakers sound a hell of a lot better. This is something to bear in mind when allocating your dollars.
Tonally, the F6s sound quite different to the F5s. The F5s, in particular, have quite a pronounced midrange presence that isn't there with the larger F6s. This was surprising, because I've become quite used to the sound of the F5s. Once the comparison started though, it jumped out at me.
To my ears, the F6s have a much nicer, more neutral sound. They have a rich, warmer sounding lower end, which did indeed make the Tool and early Metallica particularly pleasing to listen to.
The F6s are not just for headbangers though. Almost every track I played sounded best (to my highly subjective ears) through them, although a couple of solo vocal tracks did seem to have better clarity when played on the F5s.
(The F6s are also touted as great home theatre speakers, which I can attest to after squeezing twelve hours of Peter Jackson magic through them)
At the end of the day, a bit of careful multi-band equalisation could probably make the F5 and F6 kits sound quite similar, although I think the F6s, with their higher quality tweeters and better power handling would still win out in the end, with a much flatter response overall.
Any speaker will benefit from good equalisation to some extent. As far as playing "out of the box" with a flat EQ goes, though, the F6s have it hands down. They sound rich and full over a wide range of music.
Cheap!
The LSK normally charge $AU1199 for a pair of F6s - $300 more than for the F5s. But for the next month (until September the 12th, 2007), the LSK are offering a pair of F6s for two hundred dollars off - only $AU999, plus shipping, to anyone who mentions this review!
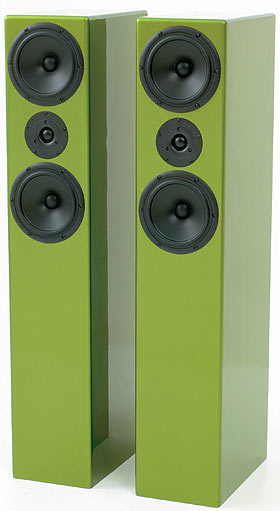
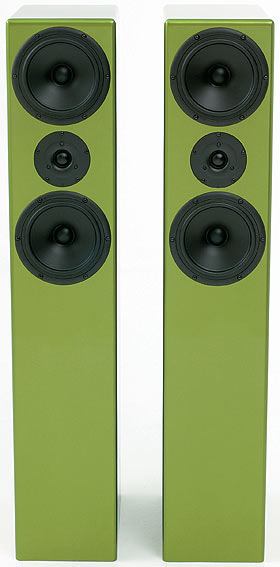
They've also asked me to plug a one-off, pre-built and finished pair of "Holden Ute Green" F6s that they have going for $AU1599 plus shipping.
These are they:
These pictures (supplied by The LSK) should give you a good idea of what can be made of kit speakers with a professional finish.
Let's get back to our comparison, though.
All things being equal, for my money, I'd go the F6s over the F5s, even though the F5s only cost $AU899. With this special offer bringing the F6 price down to only a hundred bucks more than the F5s, it's pretty much a no-brainer, unless you're building a full 5.1 home theatre system.
In that case, you'll want to bear in mind that a good timbral match between all of your speakers will give you the best results, so you might like to consider one of The LSK's matched packages - they have a page to help you here.
If you live in the right parts of Australia you can also visit the LSK showroom in Perth, or their outlet in Melbourne, to have a look and listen.
Now, if you'll excuse me, I have to go and continue our pet's musical education.
Review speaker kit kindly provided by The Loud Speaker Kit.
[UPDATE: As of 2012, The Loud Speaker Kit were out of business; as of early 2013 they're back under new management, though not with a full line of products yet. There are several other kit-speaker companies both here in Australia and overseas. It can also be easier than you'd think to design your own speakers from scratch!]
