The Loud Speaker Kit M6 large bookshelf speakers
Reviewer: Mark CocquioReview date: 10 July 2007. Last modified 22-Feb-2013.
Long-time readers will be familiar with Dan's attraction to kit speakers.
In the past, he's reviewed a few different packages from the Australian company (Perth, to be exact), The Loud Speaker Kit.
[UPDATE: As of 2012, The Loud Speaker Kit were out of business; as of early 2013 they're back under new management, though not with a full line of products yet. There are several other kit-speaker companies both here in Australia and overseas. It can also be easier than you'd think to design your own speakers from scratch!]
Specifically, he's reviewed their rather imposing 250 watt powered sub (the S250), their medium sized but still very respectable front speakers (the F5s), and their little M4s, the smallest bookshelf speaker kit they sell.
Now, they've been kind enough to send me a kit of their large bookshelf speakers - the M6s - to have a play with.
When it comes to the pros and cons of kit speakers in general, Dan's covered a lot of ground in his previous three reviews, so I won't reiterate it in too much detail (I am, after all, a lazy bastard).
The condensed version is basically this: Sound quality-wise, you can get rather more bang for your buck by building speaker kits; it's not unusual for a kit speaker to cost half as much as a fully assembled speaker of similar audio quality. And it's not actually that hard to build them.
The down side, of course, is that you do need to actually build the things, and once built they won't have a finish on them unless you put it there with your own elbow grease. Some speaker kits come with stick-on vinyl finish or real wood veneer, but The Loudspeaker Kit leave that stuff as an option to keep price and complexity down.
The Loud Speaker Kit have been in business for a number of years now, and they have a wide range of speakers on offer, provided you're in Australia. Yes, they don't ship overseas - but even if they did, MDF is not light, and the postage would quickly become frightening.
Anyway, for the Aussies, their "4" series kits include the mini monitors that Dan reviewed, as well as their interesting dipole design surround speakers.
Up a notch in sound quality you have the "5" series - F5 fronts, C5 centre and M5 bookshelf speakers.
Similarly, at the top of the range you have the F6, TL6, C6, and M6.
The M6 kits (these are actually the M6 Mark II) are described by The Loud Speaker Kit website as "large bookshelf speakers" - and indeed they are at 44cm high, 20cm wide and 29.5cm deep.
Because of their size, they're suitable as front speakers in a good-sized home theatre setup, or just as a plain set of stereo speakers.
Like the M4s, the M6s are a two-way (meaning that they have two sizes of driver per enclosure), ported design. The port is front facing, so you can wedge the M6s into a bookshelf or up against the wall without messing up the sound quality.
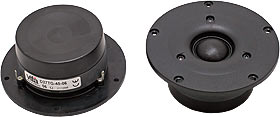
The tweeter is a Vifa D27TG-45-06, a "25mm treated silk and fabric dome tweeter with bulged face plate and double chamber" according to one website I found.
Despite the description making it sound like it's targeted solidly at the wacky tobaccy crowd, the tweeter is a high quality unit, and in fact it's the same one used in all of "6" series kits.
Like the soft dome tweeters that Dan discusses in his F5 review, the Vifa tweeter in the M6 kit is a good choice, giving nice crisp treble without adding too much to the cost of the kit.
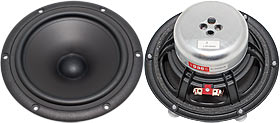
The M6 bass driver is a Peerless BC18SG08-08, the bigger brother of the ones used in the "5" series kits. Ostensibly a 165mm, or 6.5" driver, its treated paper cone in reality is only 120mm in diameter, but that still gives it plenty of punch when incorporated into a decent design.
As Dan mentions in his M5 review, both the Vifa and Peerless brands have been swallowed by a mob called Tymphany.
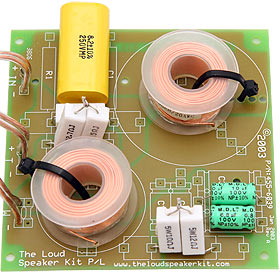
The M6 crossovers are built on the same generic circuit board as the other LSK crossovers, and all the leads are clearly labelled and have spade lugs fitted for easy connection to the drivers.
The rear terminals on the M6s are gold plated screw terminals with banana plug sockets. These are the same as the ones on the other high-end Loud Speaker Kit kits (I had to say that at least once, but I'll stick with LSK from now).
Construction
The M6s arrived well packed in a single hefty cardboard container. Everything was packed in all "nice and Kentucky".
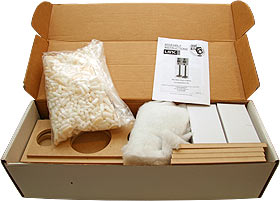
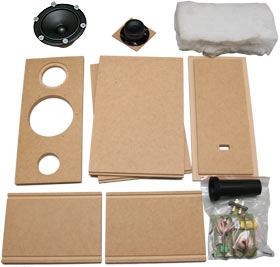
This obligatory, but photographically uninspired, "before" shot...
...is of the components for a single speaker. LSK supply everything you need, short of some glue and a screwdriver.
All the panels, drivers, screws and crossovers are there of course, as well as the little pillows of acoustic stuffing and the instructions.
When it comes to building the speakers, you'll need a decent work area, with a drop sheet or something laid down to catch the inevitable blobs of surplus glue. As Dan has noted in the past, the instructions helpfully remind you not to use newspaper, as the ink will run and possibly stain your lovely bare MDF.
I'd recommend against using paper at all, as it may stick and rip, giving your cabinets a nice Norman Gunston shaving-cut look. An old sheet worked just fine for me.
Before you get the glue out though, the first thing to do is to test fit all the panels together, so you know how it's all going to work. This also gives you a chance to work out if any panels are going to be a bit tight when you fit them together.
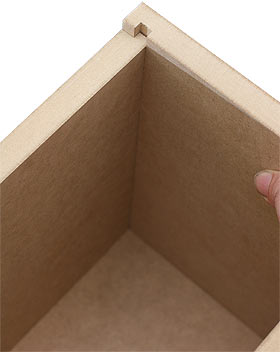
LSK are proud of their "unique JigLock™ system", which is a fancy way of referring to the tongue-and-groove-like arrangement of the side and top/bottom panels.
You can see it in action in the following shot.
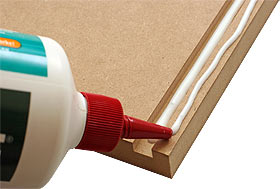
Once you're happy with fitting the panels together, and you've had a good read of the instructions (an un-nerdy thing to do certainly, but when glue is involved it's better to be safe than sorry), it's time to start squeezing out vast quantities of PVA.
The instructions tell you to be liberal with the glue. So I was.
PVA, incidentally, is a wonderful invention. It wipes up with water, doesn't bond to skin, dries quickly (but not too quickly), and it even smells good (memories of woodworking class come flooding back if you haven't used the stuff in a while). Also, according to Wikipedia, it can "be used to protect cheese from fungi and humidity". You learn something every day.
Best of all though, it's a bloody excellent wood glue. The bonds it makes are often stronger than the material around it. This is why the LSK kits don't need to be screwed or nailed together.
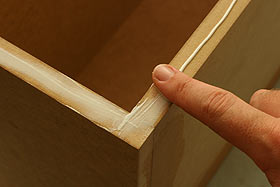
You do need a good contact patch when it comes to the gluing though, so it doesn't hurt to be liberal. Just be prepared to do a lot of wiping with your wet rag once the panels squeeze together, because even though splashes and smears of PVA dry clear, they'll still be quite visible if you're not bothering to put a finish on the speakers, and will show through thin paint too.
I've actually built a few LSK kits previous to this review, so I know the panels they use are going to be one of two thicknesses. Their smaller kits like the C5 and M5 speakers use a thinner board, which is a little harder to glue neatly, but the larger kits use 18mm MDF, which is much sturdier, and fits together very squarely. The M6s use this thicker MDF.
The M6s were easy to assemble, and everything fit together like clockwork for me. For some of the larger LSK kits it helps to have another pair of hands to help, but I found that it wasn't necessary with the M6s.
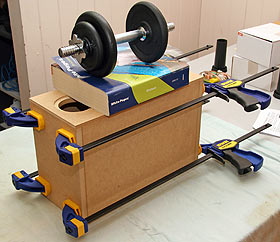
Once glued, I mopped up the dribbling excess PVA (perhaps I was a little too liberal) and clamped them.
LSK say in their instructions that strictly speaking, you don't need to clamp the kits, but that it doesn't hurt. The M6s are ported, so you don't need a strong seal everywhere, but given the thickness of the MDF I think you'd have to try quite hard not to get one, even without clamping.
Regardless of all that, I clamped the speakers as a matter of course. You get a stronger box this way, and, as you can see, I finally found a use for my exercise equipment.
Because I only have four clamps, I did the speakers one at a time. I could have just used two clamps per speaker and done them both simultaneously, but I'm a laid back kinda guy, and waiting another day wasn't going to kill me.
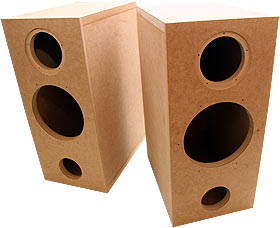
Ta-dah. After a good overnight clamping, the cabinets are well and truly set.
It is at this point that you would normally go about putting a finish on your speakers. What I've done with the other LSK kits I've built is to sand them (which removes glue spots on the panels), and then spray them matte black. This time, I decided to be lazy, and my ears were itching to hear the M6s. So I went with a Dan-style plain old MDF finish. Function over form, after all!
Installing the drivers in the M6s is very straightforward. The crossover goes in first. The LSK suggest that you can secure it to the inside of the speaker if you like, or just leave it floating. I've elected to secure it in all the speakers that I've built; this makes somewhat more sense to me than to have a crossover flapping about inside the box.
Dan's used hot-melt glue in the past for this particular task, but I lack a glue gun, so Blu-tack it was. For speakers that will most likely stay put for their entire lives, this is a fine option, but if you're planning on using your M6s for DJing or something like that, I'd go with the hot-melt option, or even screw the crossovers in place; the circuit boards have holes in them to make this easy.
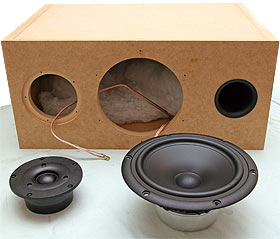
Once the crossover is in place, you stuff in the acoustic fluff, and install the plastic port. The instructions suggest that a "light rubber mallet might be useful to help with this"; in all the kits I've built, finger pressure has been more than enough, but this is not to say that it might not be more fun with a mallet.
The acoustic stuffing is standard polyester fluff, and it serves to eliminate some internal reverberations within the speakers. You lose a small amount of efficiency, but get a better sound.
(I don't currently have a cat, incidentally, so there is not obligatory picture of a feline resting on the stuffing. I'll try harder for the next review.)
Once the port is in place, all that's left to do is to attach the rear terminals and two drivers, using the spade lugs already connected to them. These connections can be soldered, but at low power levels it makes no difference electrically - you just get a stronger joint - and it makes it much easier to remove the drivers later if you change your mind and want to change the finish.
Once you've connected the drivers, screw them into place carefully. You don't want to slip with the screwdriver and punch a hole in your nice new speaker. Of course, the LSK sensibly supply Phillips head screws for this job, not the flat blade types that are designed by evil speaker-hating bastards.
That's it then. Ready to rock.
Listening
I actually already have a set of LSK F5 speakers attached to my main stereo, so, while I did some A-B listening between them and the M6, the new speakers ultimately ended up on my PC as a set of near field monitors.
Ridiculous, aren't they?
The truth of the matter is that the M6s are a bit oversized for this sort of application (and it's arguable that they actually sound too good to be proper studio monitors). Nonetheless, they make my PC audio experience quite pleasant.
Because the M6 bass drivers are magnetically shielded, it's fine to put them this close to a CRT monitor or TV. Any closer though, and you can see some image distortion (mainly from the tweeter magnets).
Eventually I'll be using a set of M5s here; the M5s are supposed to be fully shielded, so this won't be a problem.
In the meantime though, it was test time.
Dan still manages to out-eclect (is that a word?) me in the music department, but my collection includes plenty of odd variety with which to put the M6s through their paces.
I started softly (figuratively - the volume was actually quite loud) with one of the world's favourite classical pieces - a bit of the old Ludwig Van. Then I moved to progressively heavier genres, starting with some very mellow rock and ending up at the Tool and Machine Head end of the spectrum.
Along the way I passed through a variety of musical styles and eras, from 70s hard rock and funk to acoustic blues, with a touch of trance techno. A couple of classic albums also got a workout.
I also ran a few movies through the M6s, as part of the playoff against the F5s.
The results? Everything sounded pretty damn nice. For speakers this size, the M6s produce a decent amount of bass, as you'd expect from their 40Hz quoted bass response. Their bass response isn't as good as that of the F5s (36Hz), but it's still very good, all things considered.
Really deep bass is the domain of a subwoofer anyway, and I'd rather my main speakers were clear and crisp, with good power handling and a moderate amount of bass for their size. The M6s fit this bill nicely.
At the end of the day, a speaker review like this is either going to be full of numbers and graphs (which I lack the equipment to generate), or it's going to be full of subjective judgements about the quality of the sound. I don't claim to have golden ears, but neither am I a cloth-eared git who can't tell when a stereo has an enormous bass hump, speakers wired out of phase, and the "stereo-x-pander" set to maximum.
Without equalisation, the M6s have decent bass, with good clear mids and treble. They have quite a neutral sounding, smooth response, which I found very listenable without having to reach for the equaliser, although you could probably improve things by tweaking the bass a tiny bit at lower volume (and I do mean tiny).
That's about all I'll say. Any more and I'll start to sound like the audio equivalent of a wine bottle label.
At $AU599 a pair plus delivery, the M6s aren't super-cheap; go to a store that sells both speakers and couches and you can get a much more impressive looking product for the same money.
But you get what you pay for. Strong, thick cabinets, with quality drivers, and good power handling (nominally 90 watts RMS) all add up to a nice little package that will blow most other bookshelf speakers out of the water - and similarly humiliate the good-looking competition from the department store. I have no problem recommending them.
It gets better, though. For the next month (until the 10th of August 2007), The Loud Speaker Kit are offering the M6s for only $AU539 per pair, provided you mention this review when you order. So if you're an Aussie looking for a good set of medium-sized speakers, get cracking!
Review speaker kit kindly provided by The Loud Speaker Kit.
[UPDATE: As of 2012, The Loud Speaker Kit were out of business; as of early 2013 they're back under new management, though not with a full line of products yet. There are several other kit-speaker companies both here in Australia and overseas. It can also be easier than you'd think to design your own speakers from scratch!]
