Building an all-purpose PC
Review date: 16 May 2000.Last modified 03-Dec-2011.
Let's back off from the gigahertz-processor, cutting-edge-graphics-card, bleeding edge end of the market for just a moment, shall we?
What kind of PC should people be using if they're, well, not to put too fine a point on it, sane?

I needed to build a general purpose home computer for a relative. This is what I did.
Processor power
If you're looking for value in a CPU, you should never be looking at the upper end of the market. The CPU speed-to-price graph is an exponential curve, and the data points towards the right hand side are the processors purchased by those who actually do have rather a lot of money burning a hole in their pocket, thank you very much.
On the other hand, you can pick up a highly competent mid-range CPU like Intel's 500MHz Celeron for, by comparison, approximately nothing. $AU250'll get you one.
A 500MHz Celeron has roughly half of the processing power of an 800MHz P-III, but the faster processor costs five times as much. Assuming you can find one, of course; thanks to manufacturing shortfalls, Intel CPUs faster than 700MHz pretty much don't exist in the retail channel at the moment. But there ain't no shortage of Celerons.
Intel's had a fixation about Internet access for a while now, and persists in running ads for its processors that imply they'll somehow enhance your Internet experience.
Well, that's a bunch of hooey.
If you visit Web sites with strange bloated 3D Shockwave applications on them, or something, then CPU speed may make a difference. But the overwhelming determinant of Internet performance is the speed of your connection, not the speed of your PC. I'd much rather browse the Web on a 300MHz machine with a cable connection than a 1GHz one with a plain old dial-up modem, and a 500MHz Celeron is a fine general purpose CPU for home and office purposes.
Mobo mojo
My choice of motherboard for this PC was somewhat influenced by motherboard and RAM manufacturer Transcend's decision to send me one of their TS-AVE3 boards for review.

The AVE3 is a Socket 370 motherboard that uses the VIA Apollo Pro 133A chipset. This means it'll work with any Celeron, including the new ones, running at 566MHz and faster, that are based on the "Coppermine" Pentium III core. You can also use full Pentium IIIs in the Socket 370 package; since the 133A supports Front Side Bus (FSB) speeds from 66 to 133MHz, the board will also work with the as-yet-unreleased 133MHz FSB models.
Like a lot of current motherboards, the AVE3 also supports non-standard FSB settings, allowing you to "overclock" your CPU by running it from a faster-than-normal bus speed. All current Intel processors run at a set multiple of the FSB; increase the bus speed, and you increase the processor core speed. The 500MHz Celeron wants to run from a 66MHz FSB with a 7.5X multiplier; if you run it at, say, 83MHz FSB, the core speed will therefore be 625MHz. If it can handle that speed, that is.
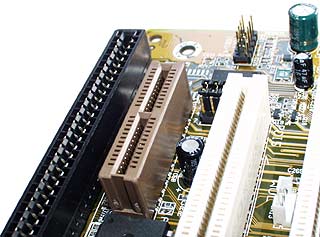
Many Socket 370 motherboards are cut-down units, meant to be built into "basic" PCs that don't need much expansion. The AVE3 doesn't cut corners like this, though. There are five PCI slots, one AGP slot (capable of operation at the maximum, 4X, speed) and one ISA slot, and you get three memory slots. And, again thanks to the VIA chipset, the two IDE drive connectors are both Ultra ATA/66 compatible, for maximum speed from the current crop of cheap drives.

The AVE3 has on-board sound - mic and line input, and line output. Which explains this cluster of audio connectors on the motherboard.
It's only your standard stereo setup, with no fancy 3D positional audio, but that's enough for the purposes this PC'll be put to. Not having to pay for a separate sound card is a considerable plus.
The AVE3 is a slim ATX motherboard, at 19 by 30.5 centimetres (7.5 by 12 inches). All ATX mobos have screw holes in the same places and so can be mounted in the same cases, but some boards stick out further past the screw holes on the top and right edges (looking at the board with its connectors to the left) than others. This can complicated mounting in more cramped cases.
There's an AMR (Audio Modem Riser) slot on the AVE3, but it shares a back panel opening with the single ISA slot. Since AMR slots are very close to useless for retail buyers - you can get modems to go in them, but not very good modems - it's nice to see that this one doesn't get in the way of anything.
The only other unusual thing about the AVE3 are its four USB (Universal Serial Bus) ports. Most motherboards have only two USB ports, but the AVE3 comes with another two on a standard expansion slot cover bracket, with a cable that goes to a header on the motherboard.

You don't have to connect the extra ports if you don't want to, but they're likely to be handy.
The AVE3 costs $AU239, which is an excellent price for a well made audio-included board like this.
Finding a home
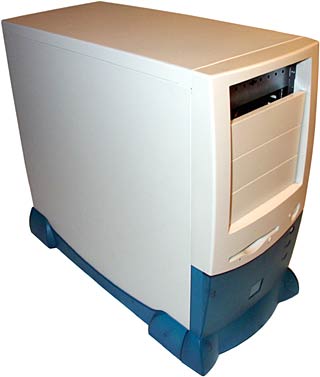
Continuing the cheap-and-cheerful motif, I settled on this rather, well, flashy, offering from Skyhawk. This practically unknown Taiwanese manufacturer has hit upon the strategy of making basically the same exceedingly cheap gear as everyone else but putting see-through plastic on it, and the resultant products certainly stand out from the crowd.
This case, which looks as if it's one-sixteenth iMac, sells for $AU99 including a Power Supply Unit (PSU), which is rather good value.
Of course, when you pay peanuts for your case, you have to expect some corners to have been cut. And they were. And so was I. But I'll get to that in a moment.
Input

As you may have guessed, this keyboard's another Skyhawk effort. Its key-feel is on the lousy side of average. It's got some extra keys I don't very much care for - Windows sleep and power keys, for instance. If your system isn't set up to handle the functions these keys try to call, it'll hang if you press them; even if your system is set up to handle them, I really don't think a power button on your keyboard is a good thing, given what happens if you press it by mistake in the middle of a game, or something.
There's also a mysterious "Turbo" key which, so far as I can see, does nothing at all; some 'boards with this key use it in conjunction with extra programmable keys, but this one has none.
But the Skyhawk keyboard's see-through, and it's purple. And it's only $AU25, which pretty much settles the issue.
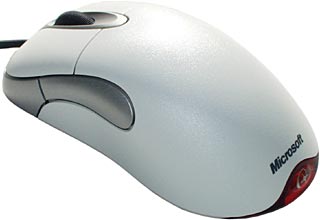
I briefly abandoned the must-be-cheap doctrine when picking the mouse. You don't want a bargain basement mouse. It'll drive you nuts.
In this case, I chose Microsoft's $AU79 IntelliMouse Optical, the mid-priced member of their no-ball, strange-glow mouse family. I review it in detail here; basically, it looks nice, and it works well.
If I were sticking more closely to the brief, I would have picked a Logitech First Mouse Plus, the OEM version of which (no box, no frills) will only set you back $AU39.
But it's got a ball. That's so 1980s.
Graphics

One (1) Leadtek S325 TNT2 Model 64 ("M64") AGP graphics card. Fast enough to give a reasonable account of itself in even the latest games, but only $AU215. I review this card in detail here. This is the version with video out, so you can play games (or, with a DVD-ROM drive, DVDs) on your TV, too.
M64 TNT2s aren't quite as fast as the "true" TNT2s that preceded them; they're more like the original TNT boards. But they're good value.
Speakers
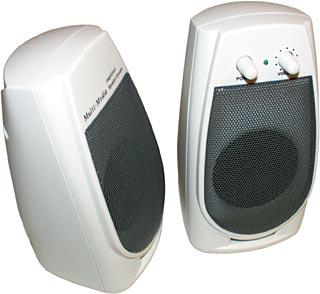
These OEM speakers have the usual unexciting three inch drivers, the usual rather resonant cheap plastic enclosures, and the usual hilarious quoted power handling - 180 watts, no less!
But they're mains powered, they sound no worse than any other speakers of their ilk, and they only cost $AU35.
Sold.
Random components
I could come up with a big spiel on how these next two items are essential to the modern home and office PC. But I won't, because the real reason I included them is that they'd been sitting on the to-review pile for a while and didn't seem to warrant a separate review.
First, the less silly one.

This is the Skymaster internal USB hub, currently selling for only $AU39. USB hubs let you take one USB port and turn it into several, getting you closer to the theoretical limit of 127 USB devices per controller. Most PCs have only two USB ports as standard, and many users find they need more.
This hub's so cheap because, unlike other self-powered USB hubs, it mounts inside a computer instead of sitting in its own box. Like other examples of the external-thing-made-internal, its connection method is less than perfectly elegant; you thread its lead through a rear panel hole in your PC (a blank expansion slot cover with an appropriate cut-out is included) and plug the hub into one of the rear panel USB ports.
Putting USB ports on the front panel is a sensible thing, for devices you connect and disconnect often, or things like webcams that you want to be able to move as far from the PC as you can.
Now, the more silly one.

This is Senfu's Super Box. It fits in a 5.25 inch drive bay.

It's a drawer.
You put things in it.
You can remove the internal dividers, if you like.
See why I didn't think it was worth a separate review?
Other bits

This pile, from the bottom up, contains:
The CD-ROM drive - a yum cha 40X selling for $AU95.
The floppy drive - another $AU42.
The hard drive - a 7.8Gb Fujitsu. Advertised, of course, as an "8.4Gb" device, because hard drive manufacturers use powers of ten instead of powers of two when they specify their hard drive capacities. Measure in proper megabytes, after formatting the drive, and your "8.4 gigabyte" drive actually has about 600Mb less capacity.
The CPU and RAM. There are two 64Mb SDRAM modules, because I had a spare one sitting about already. You'll pay a bit less if you buy one 128Mb module. Less than 128Mb of RAM is false economy. Windows 98 will run OK with 64Mb for less demanding applications, but Windows 2000 will flog the drive mercilessly unless you give it at least 128Mb.
Building it
I've dealt with the basics of sticking a PC together before, in reviews like this one, so I won't dwell on the details this time, except where they're peculiar to this project.
When you're building a PC in a cheap-ish case like the Skyhawk I chose, you've got to expect some annoyances. I was surprised, under the circumstances, by how nice the Skyhawk case was to work with.
It's got thinnish steel, and screws that are hard to remove. But at least it doesn't have razor sharp edges all over the place inside. Only one edge in four in this thing wants to sever your fingers. I only bled once.
Why? Glad you asked. Like many cheaper cases, the Skyhawk doesn't have individual removable covers for the rear expansion slots, but just appropriately shaped flaps of sharp pressed metal, held in place with a couple of connecting shreds of steel. You wiggle the flaps back and forth to break them off when you want to install a card in the matching slot. It was one of the flaps that bit me.
There are actually a couple of blank slot covers included with the case, though, so if you remove a card and don't replace it with something else you'll have something to put over the gap. Apparently, including half a dozen more of 'em would have broken Skyhawk's budget.
Wiggling bits of metal until they fall off is something most PC builders are familiar with; you have to do the same thing to uncover drive bays and rear panel connector holes in most cases. The covers on the Skyhawk were particularly recalcitrant; the design of the case makes it difficult to wiggle them very far.
If confronted with this particular problem, always remember: Violence Is The Solution. The first appropriate solid object to hand at the time was an Everglide mousemat; after a few moments and several loud noises, the metal let go. Pleasingly, this case has removable sides, and a removable top. As usual with cheap cases, the locking tabs for the sides are too tight. But once the panels had been wrestled off once, the mounting tabs immediately loosened up and worked perfectly. I've had cases where you needed a club hammer to take the panels off every darn time; this one's far better.
And it's not a U-shaped lid, as seen on many mini-tower cases. A U-shaped lid with all of that decorative plastic along the bottom would be really annoying. Think "huge rubber tuning fork" and you'll get the general idea.

The motherboard standoffs in the Skyhawk case aren't the usual screw-in brass jobbies; they're these odd clip-in bent metal items. You put one side into the hole, and you push on the other side with a screwdriver to pop it into place. They do the job very well.
You do get one standard brass standoff, for the top left corner of the motherboard.
Before attaching whatever kind of standoffs come with a given case, you should put your chosen motherboard in the case first to see what holes in the board line up with what holes in the case. If you put metal standoffs anywhere there isn't a motherboard screw-hole, you will very likely create a horrible short circuit problem which may or may not execute your motherboard as soon as you turn on the power.
The good people at Skyhawk appear to think that instructions are for the weak; you get absolutely none with this case. It doesn't exactly take a degree in cogno-intellectual quantum cosmology to figure out that you stick the little plastic pins into the case feet to make 'em stick in their holes, though; there's nothing especially tricky to work out about this case.
The funny recessed floppy drive location in the Skyhawk case looks as if you're meant to take the front bezel off the drive to mount it, or something; at a glance, you'd think it'd be the sort of thing that ought to at least come with an exploded diagram.
But it's actually dead easy. You just slide the floppy drive in until it hits the back of the front panel, and screw it in place perfectly normally; the extended eject button that sticks out through the front panel presses the standard eject button on the drive, and everything just works. Nice.
As with all of these simple recessed floppy drive designs, you need to push the disk in quite a way before it'll click into the drive. If you're the size of Andre The Giant, you'll need to borrow someone else's finger to do this. But most people shouldn't have a problem.

The Skymaster hub mounts in any 3.5 inch bay with a front panel cutout. Unfortunately, this case doesn't have any 3.5 inch bays with cutouts, so I screwed a 5.25 inch bay mounting kit onto the hub. These kits cost close to nothing...

...and this one worked perfectly.

I didn't bother using the slot cover included with the hub; I just threaded the cable out through an unused serial port hole in the back of the case.
Plugging stuff in
The AVE3 instructions are in somewhat fractured English, but they're perfectly comprehensible.
The Transcend board comes with one ATA/66 cable, with the usual pair of connectors, so you could easily enough connect a hard drive (left on the default Master setting) and a CD-ROM drive (left on the default Slave setting) to it.
But ATA/66 compatible CD-ROM drives are thin on the ground; quite a few support ATA/33, but that's it.
When you connect IDE devices that support different maximum transfer rates to the one cable, the speed they both end up using is the fastest one they both support. Hang an ATA/33 device on the same cable as an ATA/66 one, and you run 'em both at ATA/33.
Not that this makes very much difference; no sub-10,000 RPM hard drive can move more data per second than ATA/33 can handle, and most "ATA/66" drives are actually 5400 RPM units with maximum sustained transfer rates well below half of ATA/33 capacity. All ATA/66 gives you is faster burst transfers, which manifest as only a few per cent more overall drive speed. But hey, you paid for it, you might as well use it.
Accordingly, I hooked up the CD-ROM drive to the second IDE channel, with a spare plain 40 wire IDE cable (ATA/66 cables have 80 wires; every second one is an earth, for better signal clarity at high data rates). IDE cables lie around in great abundance in most computer-assembly places; you should always be able to get one thrown in free if you buy a pile of other components.
While you're at it, make sure that you get a CD-ROM audio cable. Modern PCs can play audio CDs without this analogue sound connection from the CD-ROM drive to the sound card (or, in this case, to the sound connector on the motherboard), but how good they are at it depends on the quality of the CD-ROM drive's Digital Audio Extraction (DAE). The cheap drive I used is not very good at DAE, and pops and crackles a bit when playing CDs that way. Hence, the audio cable is still needed.
Like pretty much every drive these days, the CD-ROM drive I picked is smart enough to realise that if it's set to Slave but all by itself on one IDE channel, it should act like a Master drive and not try to turn over control to a nonexistent other device. If you've got a CD-ROM by itself on an IDE channel, it no longer matters whether it's set to Master or Slave. But if you've got two drives on one channel, you still have to set 'em both correctly.
I managed to control my urge to plug something into the Super Box.
Overclocking
Like all civilised motherboards these days, the TS-AVE3 lets you change your CPU settings from the BIOS setup menu, accessed by pressing delete when you boot the computer. And you can reset the various tweak settings to the default, low, safe numbers automatically on booting by holding down the Insert key.
This gives you an easy way out if you paint yourself into a corner with overly enthusiastic bus speed settings, or discover that your adventurous new RAM timing figures have made the memory very upset.
Unfortunately, the "Frequency/Voltage Control" menu item in the AVE3's BIOS setup seems misnamed. All you'll find in there is FSB speed adjustment. This makes the AVE3 a lot less interesting for overclockers. You can get better stability out of a CPU by increasing its core voltage a bit, and the extra heat generated can easily be dealt with by the big fat after-market coolers commonly strapped onto the processors.
Indeed, proper Socket 370 boards like the AVE3 are physically better suited to overclocking than Slot 1 boards with a Socket 370 processor mounted in a "slotket" adaptor that lets it work on the other kind of board. A huge CPU cooler latched onto a socket that's soldered to the motherboard, as it is on the AVE3, will be perfectly stable. But the same thing hanging off the side of a slotket can put enough strain on the slot connector to make the system unreliable, not to mention dangerous to move. And big Socket 370 coolers on Slot 1 boards commonly stick out far enough to foul RAM sockets or power connectors or other important things.
But without voltage control, all of this might be quite academic. If you can't wind the CPU up very far anyway, there's no point hopping aboard the Nutty Overclocker Express and investing in giant chunks of finned aluminium to deal with an unusually hot processor.
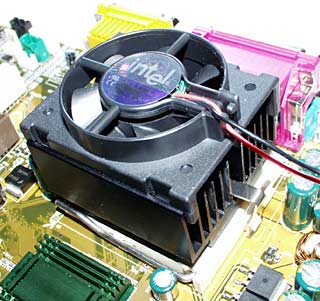
Intel are packaging quite big coolers with their Socket 370 CPUs these days, anyway. This one's rather bigger than the Celeron coolers you used to get; if you scrape off the standard thermally conductive tape on the bottom of the heatsink and replace it with a thin smear of thermal transfer grease, I wouldn't be surprised if this was all the cooler you needed for moderate overclocking.
Unusually, but quite sensibly, the frequency control options on the TS-AVE3 just let you wind the CPU speed up from whatever its stock speed is, to the speed step below the next stock speed. The board can auto-detect CPU stock speed, or you can force it to default to 66, 100 or 133MHz, by changing the setting of a jumper block.
At 83MHz FSB (623MHz core speed) the system made it past the Power On Self Test (POST), but not much further. At 75MHz FSB (563MHz core speed), Windows started, but the system didn't make it far into a 3DMark 2000 test before it piled up.
This isn't too remarkable; there's a reason why Celeron processors faster than 533MHz use the Coppermine P-III core instead of the older P-II one. The P-II core, at stock voltage, just doesn't like running much faster than 533MHz.
Certainly, some Celerons overclock surprisingly well, and quite a few more make it to higher speeds with elevated voltage and serious cooling, but the casual overclocker who's not keen on the idea of spending extra money to get that cooling can't really expect to wring a lot more speed out of these cheap CPUs.
If you get 83MHz stable, that's a 25% speed gain, but 75MHz is more likely, and that's a practically-unnoticeable 14%. Remember, CPU speed increases do not create identical system speed increases, except for number-crunching tasks where the CPU's not held back by any other component. Including the user.
68MHz FSB, by the way, seemed perfectly stable. And the 2% CPU grunt increase it gave filled me with boundless exhilaration, I can tell you.
Further tweaking
Apollo Pro motherboards are known for less than totally amazing performance. They work, they're stable, but computers based on them are not as fast as ones with identical componentry, based on motherboards with the older Intel i440BX chipset.
Unfortunately, these "BX boards" don't properly support 133MHz FSB, and have to have extra bits bolted on for ATA/66 and AGP 4X and so on. None of this is actually very much of a handicap, especially for Celeron powered machines that never get anywhere near 133MHz FSB, but it's nice to have it all built in. And the Via chipset motherboards do.
Via motherboard owners thus have something of an inferiority complex, and try to allay it with a variety of tweaks and twiddles. I obligingly gave 'em all a shot to see if they helped.
First, I ran 3Dmark 2000 on the machine in stock trim, with the standard support software installed. With the CPU at 500MHz, it clocked in at a not-too-exciting 1116 3Dmarks, or trivially faster when overclocked to 510MHz.
The current average for M64 cards on 500MHz Celeron CPUs, according to 3DMark 2000 creators MadOnion.com, is 1380 3DMarks, a substantial 24% faster. Now, that's skewed, because the people who bother to enter their results into the online database are more likely to be "enthusiasts".
"Enthusiast" is the popularly accepted euphemism for "raving maniacs".
But I still thought I'd have a go at catching up. After all, the 750MHz Athlon based PC I'm writing this review on scores 3758 3DMarks, with its GeForce 256 SDR (not the faster DDR) card, running on a none-too-speedy ASUS K7M motherboard, with nothing juiced up past its stock speed. It couldn't be that hard to improve things a bit, I thought.
The TS-AVE3's support software CD comes with the current v4.20 version of the VIA "4-in-1" drivers, essential to get the motherboard working properly under Windows. The 4.20 drivers, though, are widely perceived as inferior in speed to the older 4.17 ones. VIA have released a new v4.02 AGP driver, which hasn't yet been rolled into the 4-in-1 collection; you can get it from here, and the Via gurus say it's as fast as the 4.17 one.
Installing it boosted the non-overclocked result to 1139 3DMarks, and the overclocked one to 1165. Whoopee.
A standard feature of the Apollo Pro 133 chipset is the odd ability to run your RAM 33MHz faster, or slower, than your Front Side Bus speed. This can give a significant increase in RAM bandwidth in some synthetic tests, or let you run 133MHz FSB processors with older RAM that can't do more than 100MHz. The actual impact of RAM bandwidth changes, up or down, on performance is slight, though, and the improvement from doing it in this split-clock way is almost entirely illusory anyway. But what the heck.
If your FSB is only 66MHz or so, any PC100 or higher rated RAM will be more than happy to run 33MHz faster, so you might as well do it.
Doing it made no difference at all to WinTune's opinion of the RAM bandwidth (about 855 megabytes per second), but it pushed the overclocked 3DMark result to 1214.
Interestingly, overclocking the M64 card's core and RAM clocks with TNTClk seemed to make no substantial difference at all to the system's speed; for the 3DMark 2000 tests, the CPU was the limiting factor.
So, between overclocking, RAM tweaking and driver updating, I managed to crank another hundred or so 3DMarks out of the system. That only adds up to a 9% improvement, though.
The Pro 133 chipset also supports a feature called "memory interleaving", but only recently have BIOS updates that allow it to be turned on, for a few motherboards, come out. There's no such update available for the AVE3.
Transcend's page here has an updated BIOS, but the only listed change is a fix for Windows 2000 installation problems. So, if you're going to run Win2K, you'll want it. Otherwise, you needn't bother. Check the page, though, to see if a BIOS version after 1.04's come out since I wrote this.
But seriously...
In 800 by 600 mode, 16 bit colour, with the video card running at stock speed, this PC chugged through Quake 2's standard demo2.dm2 at about 50 frames per second, and on the much more demanding Massive1 and Crusher demos scored 49.5 and 35 fps, respectively.
50 Quake 2 frames per second, at that resolution and colour depth, is about all the graphics card can push out. Overclocking the video card again to 165MHz for both the core and RAM clock (versus the default speeds of 125 and 150MHz, respectively) pushed the demo2 score up by only about 5 fps, did nothing for the much more processor-intensive Crusher demo, and improved Massive1 by only about 2 fps.
All of this, in English, means that without any special tweaking and twiddling, this is a perfectly acceptable, though certainly not cutting edge, 3D game box.
And it's got enough RAM and CPU grunt to deal with bloated Microsoft Office documents, or big Photoshop files, or sound or home video editing.
Thanks to the extra USB hub it's got a plethora of connection points for current peripherals.
Thanks to the Senfu drawer it's got, ah, somewhere to keep your spare floppy disks and golf tees. Actually, if you take out the dividers, you can fit CDs, with or without jewel cases, in the drawer; that could be quite handy.
Can you build a PC for less? Oh, certainly. But this machine doesn't cut corners. It's one I'd be happy to use every day, if someone took my big macho Athlon box away. But it cost a half to a third as much as people happily pay, every day, for brand-name computers on which they'll do nothing that this computer can't do.
Buy PC parts!
Every part used in this PC project except for the Senfu Super Box can be
purchased, if you're in Australia or New Zealand, from
Aus PC Market.
Click
here!
(if you're NOT from Australia or New Zealand,
Aus PC Market won't deliver to you. If you're in the USA, try a price search
at
DealTime!)


