GTR 7106 PC case
28 March 2006 Last modified 03-Dec-2011.
There are several nice things about assembling your own PC from parts - or getting your local clone shop to assemble one for you. You will, of course, very probably pay considerably less than you would for a big-brand machine with the same specs. It won't come with a bunch of crapware, either.
And, furthermore, you'll get to decide not only what it has in it, but also what it looks like. Well, within limits. It's probably going to be box-shaped, unless you go nuts.
I'm not going to feed you the usual line of marketing bollocks about expressing your inner self through the colour of your car's upholstery, but it's still nice to be able to buy a nifty looking case for your new PC, especially if it doesn't cost much more than a boring beige box.
Check this out, for instance.
It's GTR's model 7106 midi-tower case (its uninformative Web page is here), for ATX and microATX motherboards of all flavours. Its weight and dimensions are unremarkable, but it's just a little bit flashy.
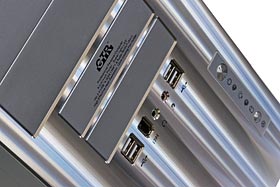
OK, actually it's quite a lot flashy. It's got a plain steel chassis, but the front panel is shiny aluminium, with a wavy-line pattern on it that gives a rudimentary engine-turned effect.
This is quite novel, by cheap flashy PC case standards. Usually, they go for ornamentation, not surface treatments.
The pattern of light and dark moves across the surface as the viewing or lighting angle changes.
And you can file your fingernails on it, if you like.
Here in Australia, Aus PC Market sell the 7106 for only $AU104.50 including delivery in the Sydney metro area, but that's without a power supply, so it's not incredibly cheap. It still won't put much of a dent in your PC budget, though. Aus PC even have a promo deal that saves you the kabbalistically energised sum of exactly $AU29.70 if you match this case with any GTR power supply.
The 7106 is also worth considering even if you're not a fashion-forward sort of PC builder. Like a lot of funny lookin' cases, it's got some other unusual features. Unlike a lot of funny lookin' cases, the 7106's unusual features are good.
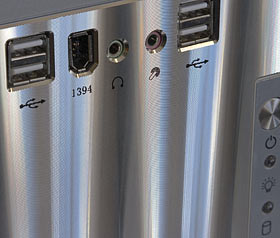
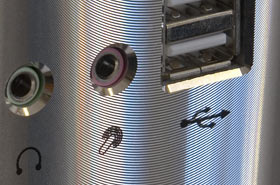
As well as all those wavy lines, the 7106 front panel has four USB ports, one IEEE-1394 (FireWire) port, and two 1/8th inch audio sockets. Oh, and a blue power LED, a green drive LED (both normal LED sized, not blown up to outrageous dimensions by light guides), a power button and a reset button. Reset buttons are not guaranteed equipment on slick-looking cases any more.
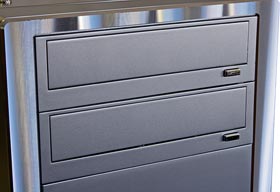
There are six "external" drive bays - bays you can get at from the outside. Two are 3.5 inch (three more "internal" 3.5 inch bays are hidden inside), four are 5.25 inch.
You get "stealth" covers for the top two 5.25 inch bays, which as usual are likely to suit most optical drives. If they don't fit whatever you want to put there, you can just remove them, of course.
All of the bay covers are plastic, but they match the rest of the front panel well enough. One of the 3.5 inch covers is printed with helpful information about the Unique Selling Points of the case, though, so if you're not going to install a floppy drive, you might like to invest in a sticker or something.
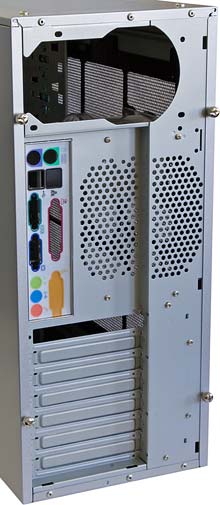
The back panel's standard fare, except for a great big fan grille. The 7106 doesn't come with any fans pre-installed, but it's not short of places where you could put a few, as we'll see. This back fan mount is for a 120mm unit, which is good; 120mm fans work better than the usual 80 and 92mm ones, so they can move more air and/or make less noise than smaller units.
Unfortunately, this fan mount is the usual stamped metal, which doesn't let air through very well. There's a reason for this - stamp the holes much bigger than they are here, and the remaining metal bends if you breathe on it. I've seen much worse cases than this, too. But if you're a severe, some might say certifiable, ventilation nut, you'll want to cut the grille section out and replace it with a wire grille, or no grille at all.
The reason why you'd have to be very, very keen on ventilation indeed to bother doing this is that the 7106 resembles a colander in more places than this.
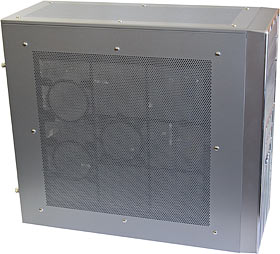
There's a grille like this one on the other side of the 7106, too, and yet another one on the top panel. The other side grille doesn't do a great deal, since it directly faces the motherboard tray, but it shows willing. And, as you can faintly see through the grille, there are three fan mount locations in there.
Here's this side panel by itself. Three 80mm fan mount locations, and one duct that you can screw onto whichever location most closely matches the location of the CPU on your motherboard.
You can sandwich a fan between the duct and the case side if you like, provided you CPU cooler isn't too tall, but just leaving it to feed cool air to the CPU fan, or exhaust warm air from the CPU fan, is likely to be adequate.
Oh, and that is indeed a filter you see over the whole side grille. The top grille has a filter as well, but the largely decorative grille on the motherboard-tray side doesn't.
You can theoretically remove the filters for cleaning (or for even freer air flow, never mind the dust) by extracting the expanding pin fasteners that hold the black plastic frame in place, but just vacuuming the filter while it's in place ought to be adequate.
On to the inside.
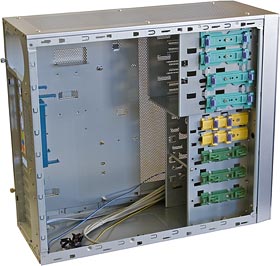
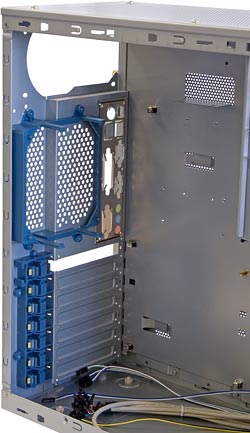
Rolled edges to reduce blood loss, no removable anything (drive bays or motherboard tray), and a lot of mysterious plastic things.
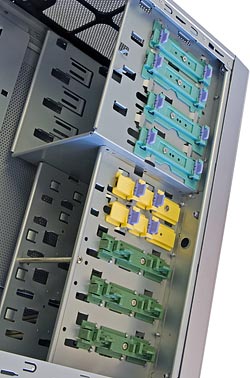
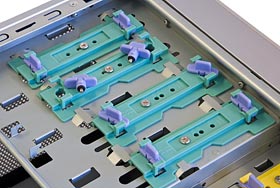
The drive bay plastic doodads are the most obvious ones. Yes, this is yet another Novel Drive Retaining Idea.
Oddly, most of these sorts of things actually work quite well. This is probably only because anything seems like an engineering marvel compared with threading fiddly little screws in sharp-edged stamped metal slots, but I'm still mildly surprised every time I see simpler retainers that really are simpler.
The idea with these ones is that there are four twist-lock plastic thingies for each drive bay, which mate into a rail that you can move fore and aft by undoing a single screw.
The twist-lock things each terminate in a threadless peg that fits into a drive screw hole. So you remove the twist-lock pieces, slide your drive in so that its screw holes line up with the twist-lock locations, then replace the fasteners and bing, you've got a mounted drive.
I like this system a lot. It beats the fairly popular drive rail idea (as seen in this case) in two ways - one, it lets you alter the fore-and-aft drive position quite easily, and two, all of the fastening stuff stays inside the case, whether you're using all of the bays or not. Drive rails sit in the bits box that comes with the case, and the bits box commonly gets lost. These fasteners won't.
As with every half-decent innovative drive mounting system, this one also lets you install your drives the old-fashioned way. Just remove the whole plastic assembly from each side of a bay and you can use the normal screw-in-slot procedure instead.
There's also, by the way, another 80mm fan mount location in front of the internal 3.5 inch drive bays. This fan has to breathe through a gap at the bottom of the front panel, though, so you shouldn't expect a huge amount of value from it; you'd probably do better to install a beefier rear exhaust fan.
More oddness, on the inside of the back panel.
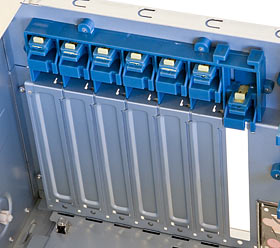
There's nothing very peculiar about the 120 fan mount - it's a simple snap-in frame - but there's another bunch of plastic above the expansion card slots.
Lo and behold, I think this ought to work, too. Neat sliding, locking clips for the top of every card. No more angled-screwdriver-not-quite-engaging-the-screw-head nonsense. Cool.
I can't guarantee that the clips will fit every card and motherboard - it's quite common for PCs built in cheap cases to end up with alignment issues around the back. The best strategy in this situation is to yank all of the cards, loosen off all of the mobo mount screws, and wiggle the board around to see if the original assembler screwed it into place funny. If that doesn't help, though, or if you just can't be bothered, a bit of brutalisation of the expansion card tags is called for, and the result can be hard enough to fix in place with a screw, let alone a namby-pamby plastic clip.
Once again, though, you can do it the old way if you like. You can't remove the clip assembly for only one expansion slot, but you can remove the entire assembly and screw your cards in the normal way.
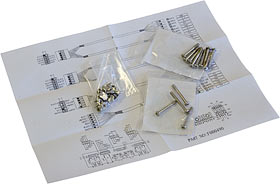
The 7106 comes not only with a guide to what all the little front panel cables do (as usual, you may or may not be able to plug 'em all into your motherboard, though an awful lot of boards these days are bristling with extra port headers), and the usual baggie of screws and standoffs, but also with long screws for installing hefty fans in the various available locations.
These items you can of course, and are expected to, lose.
Overall
A hundred dollar case with a shiny front and no other features of note wouldn't be worth reviewing. The GTR 7106, however, is really quite a nice piece of gear, and should be particularly pleasing for people who (a) don't have a huge amount of spare money, (b) need a lot of ventilation for their computer, (c) are likely to be adding and/or removing hardware quite often, and (d) don't mind the idea of having a computer that looks a bit different.
Since this description matches pretty much the entire market for high performance PCs, I anticipate considerable success for the 7106.
It deserves it. Recommended.
Buy
one!
Readers in Australia or New Zealand can purchase the GTR 7106 from Aus PC Market,
for $AU104.50 plus delivery (which is free,
in the Sydney metropolitan area).
Click here!
(If you're not in Australia or New Zealand,
Aus PC Market won't deliver to you. Try a
price search at
Shopping.com!

