Tamiya 1/16th scale radio controlled M26 Pershing tank
Review date: 4 December 2002.Last modified 11-Mar-2017.
There are toys, there are really good toys...
...and then there are 1/16th scale radio controlled tanks with motorised turret, engine and gun sound effects, light-up main and machine guns, working headlights and tail lights, and realistic main gun recoil. Full suspension, fully articulated tracks, lots of scale detail, respectable speed...

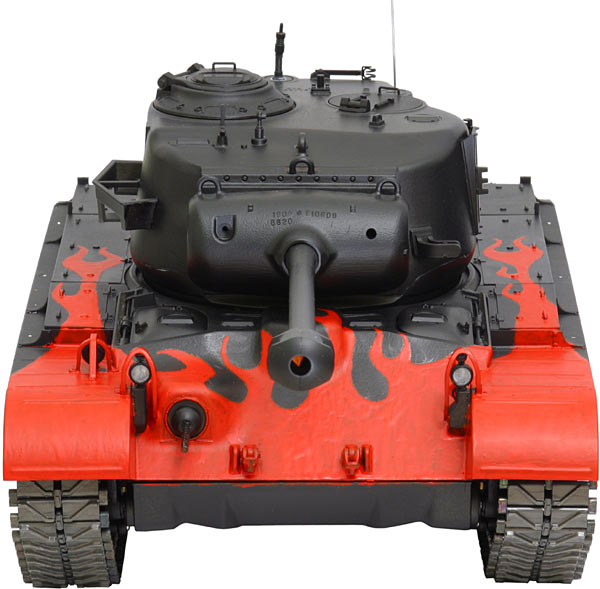
...and, um, a non-standard paint job.
The guy at the model shop where I bought the paint was not, after I explained what I was going to do with it, entirely sure that he wanted to sell it to me.
I just figure the world's got enough green tanks in it. So sue me.
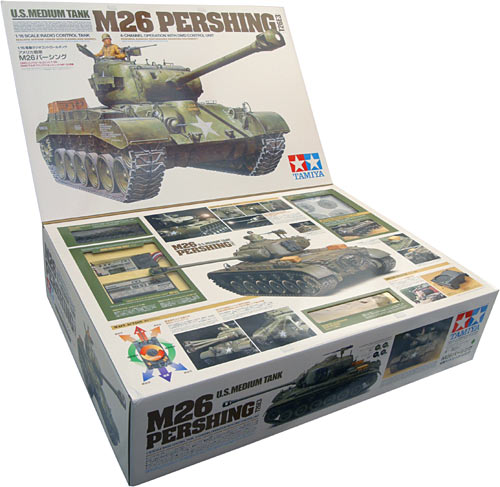
Anyway, you're looking at Tamiya's kit number 56016, the "Full Option" M26 Pershing. The "Full Option" part indicates that this is an all-singing, all-dancing model; not only does it drive around, but it also has stuff that moves and lights up and goes bang.
This is the only 1/16th scale Pershing kit that Tamiya have made, so far, but they've produced a fair few others in their "Big Tank" series, and they're not all "Full Option". Some of them are the regular versions, without the light-and-sound-and-motorised-turret stuff. Some of them are merely "motorised" - non-radio-controlled, with a single small motor that allows them to drive forward, but that's it; see this model, for instance. Some of them are bereft of electronics altogether, for people who just want a big static display model.
The 56016, though, is the whole enchilada. It's also a quite considerable project to build. The word "kit" does not imply that you just need to stick together a few pieces, paint the result, and get rolling. This thing will take you several evenings, even if you're an experienced kit-builder.
That's half the fun, though, if you ask me.
Before we get to the fun stuff, though, let's deal with the tiresome subject of how much one of these things costs.
Filthy lucre
I bought this Pershing with money kindly donated by my readers.
Seriously. I did.
I couldn't talk anyone into giving me a Pershing kit for free, so I asked for PayPal donations from anyone who wanted to see a review of it, and enough people did that I could afford it. Donations paid for the radio, too.
Apparently, this is the kind of life that I get to live. I'll be darned. Thanks, everybody.
Assuming that you can't call upon an army of suckers kindly benefactors to buy a Pershing for
you, you'll need to stump up at least five hundred US dollars for the kit. I paid $US520 for this one, from
eTamiya.com. That included shipping from Hong Kong (which is where all of the
really cheap online hobby stores seem to be headquartered) to me here in Australia.
That was a special deal, and a deep discount, but as I write this eTamiya have the 56016 kit marked down from their usual $US740-odd to $US499.99. So you, too, can buy the thing for around what I paid.
A quick eBay search, at the moment, turns up a few 56016s with Buy It Now prices of $US439 and $US465, ex shipping.
(The above search will probably also show you some much, much cheaper Tamiya Pershings, but those are the #35254 1/35th scale static model. Sorry.)
Anything around $US500 for a 56016 is a very good price, compared with what you'll pay from any normal store. The big mail order hobby places generally have the 56016 for about $US700 - that's what Tower Hobbies are charging, for instance. Here in Australia, you can expect a hobby shop to charge about the same - $AU1200 or more. Hobbyco have the Pershing for $AU1239, for instance; that's $US695, as I write this.
If you think you're going to have some trouble building or detailing your new toy tank - and if you're not an expert modeller, then it's a good bet that you will - then there's a good case to be made for buying the thing from a local shop, even if they do charge like wounded bulls. They may charge big bucks just because they want to milk their customers, but there's a good chance that they're doing it because they have, you know, staff, who'll help you out if you're stuck, suggest ways to avoid problems in the first place, and have a good old chinwag with you on a quiet afternoon on the subject of radio-controlled tanks, Significant Others, and the frequent failure of the latter to realise the self-evident marvellousness of the former. That stuff is worth the extra money.
For Pete's sake, don't buy a complicated kit on eBay, screw something up, and then try to get free help from your local hobby shop. Not without buying something substantial there to justify their time, anyway. People do that sort of thing all the time, and some hobby shops actually help them out, but it's just mean to take advantage of them like that, without buying anything.
Screed concludes.
Anyway, whatever you pay for the 56016 kit, that's not the end of it. Oh, no, son. This is a proper R/C kit, which means you still need a radio (which is what lazy R/Cers call a complete transmitter/receiver set), a battery for the model (it uses a standard six-sub-C-cell "stick pack"), batteries for the transmitter, a charger for the batteries, paint, glue, and a few hand tools. If you're starting from scratch and need to buy everything, all this will cost you a few hundred bucks more. Budget for $US250, and you may be pleasantly surprised. But you probably won't, especially if you buy a good charger, which I strongly suggest you do.
Part of the reason why the extras cost more is that the Full Option, uh, options, need a couple more radio channels to operate them. Normal terrestrial R/C models need only a two-channel radio, and two-channel terrestrial-frequency AM radios are very cheap indeed. FM radios - less susceptible to interference, and with more channels available, for multi-model fun - are pretty affordable, too.
Four-channel terrestrial-frequency radios, however, are quite expensive, mainly because practically nobody needs one. Some fancy-pants land and water models need three-channel radios, with the third channel used to change gear or switch lights or turn on the water cannon or cause a tiny gangsta to wave a tiny MAC-10 out of the window or something, but not much needs four channels.
Four-channel aircraft frequency radios, mind you, are cheap. But you shouldn't use one.
In most countries, the two categories of radio are clearly defined, and one of the terms under which you're allowed to use them without a license is that you may not use a plane radio for a terrestrial model, lest some unfortunate plane-flyer off in the distance have his aircraft shot down by your tank transmitter. Your tank won't be able to hear his transmitter, because it's, like, on the ground and stuff, but your transmitter will be able to give his plane conniptions, thanks to the plane being, like, up in the air.
OK. That's enough of that. Executive summary: The Pershing kit, and the other stuff you'll need to make it work, cost a whole bunch of money. There are worse things you could be spending your money on, but there are also quite a lot of better things. The fact that you can spend a lot more on an R/C tank is neither here nor there.
So please allow any residual sense of guilt, or moral outrage, to dissipate before you continue to read this review.
You may continue to envy me for being given the money to buy this tank.
What you get
The Pershing comes in a great big box, which does not contain nearly as much genuine Japanese air as you might expect. There are a lot of parts...

...and some of them are rather complex.
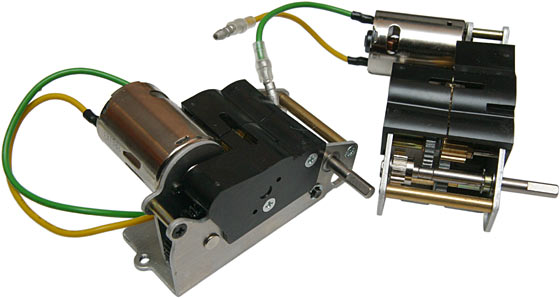
Thankfully, the extra motor assemblies needed for the Full Option features are pre-built. The one above is for main gun elevation...

...and this is the one that rotates the turret, and which has a neat little clicky clutch arrangement in it to prevent a jammed turret from stripping gears...

...and this is the recoil motor.
The Pershing's main-gun fire feature is really cool. It doesn't just flash a light in the end of the barrel. There's a light, yes, but there's also a nice sampled cannon sound (coming from some componentry which we'll see in a moment), and the gun barrel recoils realistically into the turret, which trick is done by the above assembly. And, as if that wasn't enough, the tank's motor controller causes the whole tank to hop backwards and then forwards a bit in sync with the shot, to further simulate recoil.
Well, as long as the gun barrel is facing forwards, anyway. The tank doesn't actually know where you've rotated its gun to, so even if the gun's pointing sideways or backwards, the hull still kicks backwards when you fire. Newton would be very irritated. But no matter.
The main gun light, by the way, is no weedy bulb or LED. It's a strobe, and a bright one.

The strobe is the chunky harness with the red-striped orange end (translucent, to give the strobe a more explosion-ish colour). Also visible here are the LED harness for the tank's front machine gun - it can "shoot" too - and the three-lamp tiny-incandescent-bulb harness for the headlights and tail light. Only one of the two tail lights actually lights up, but the other one hides amid enough bodywork that this doesn't matter much.
[A correspondent's now pointed out to me that this is actually quite historically accurate - it was apparently normal for US military vehicles to have one ordinary tail-light, and one very dim "blackout" one that was only visible to vehicles directly behind them. The dim light could be used by itself, for those "Put that bloody light out!" moments.]

Here's the machine-gun LED - which isn't big - next to two of the incandescent bulbs - which really aren't big. Yes, that's a match-head for scale.
While we're on the subject of parts-that-will-frighten-people-with-very-large-hands, there's...

...these. The two black things in the foreground are the metal front-machine-gun components - no cheesy plastic for this part of the tank, which can reasonably expect to get knocked about now and then. A clear light-guide stick (not shown in this picture) goes down the middle of the barrel; the machine-gun LED mounts at the back of the realistically ball-turreted gun.
The stuff in the background of the above picture comes in the same bag as the machine-gun bits; parts from quite unassociated assembly steps are often bagged together in Tamiya kits. There's method to this madness, though; Tamiya take pains to make it difficult to get confused while building one of their kits, but they also don't want to unnecessarily increase the already large number of bags that come in the box.
So one bag may have an odd assortment of bits in it, but it won't contain parts that look very similar to each other. As long as you keep your parts segregated - do not open any bags before you have to, and absolutely do not clip parts off the sprue trees before they're needed - this system works well. Invest in a couple of ice-cube trays - plastic microwave muffin trays are good, too - to hold de-bagged parts, and it all becomes quite easy to manage.
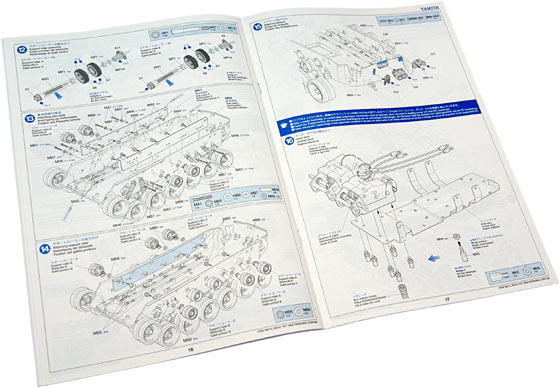
The big reason why the Pershing is (relatively) easy to build is the instructions. Tamiya's instructions are always very good. The Pershing's manual could, I think, have been clearer now and then, but the problems were minor.
The authors, for instance, seem to have a problem with the word "also"; many steps show something being done to, say, the left side of the tank, that also needs to be done to the right side, but the instructions just say "Do this to the right side", which might leave novice readers wondering whether the picture of the left side is an error.
More importantly, the manual occasionally leaves information out. Again, it's nothing serious; when step 18 fails to tell you that the plate you're screwing onto the bottom of the tank is part 7 on tree D, it's not too hard to figure it out. Similarly, step 30's diagram is drawn from an angle that makes it impossible to see that you're meant to glue in place the machine-gun assembly that you're poking through the matching hole in the upper hull, but the fact that the assembly then keeps falling out is likely to alert you to the omission quite effectively.
This is weird. It's not normal to find any omissions at all in a Tamiya instruction manual. They're usually good enough that assembly can be reduced, in ideal cases, to rubbing the instructions briskly on the outside of the box. Their best work may be as good as Lego instructions.
There are many multi-steps in the Pershing manual. Just one step number, and a half or a third of a page, contains instructions covering two or more separate parts of the model, which may have you working for more than two hours. Not least because tank assembly involves a lot of "do this, then make 11 more" sorts of steps.
Example:
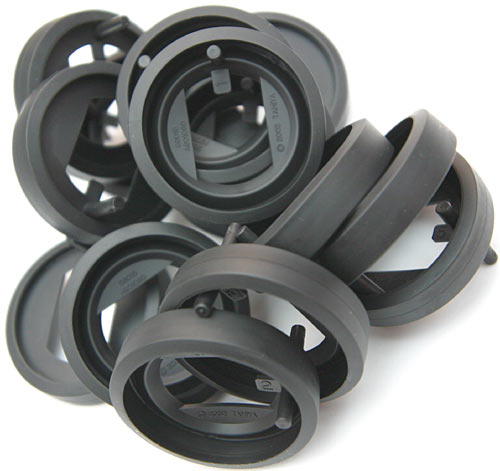
These are some of the Pershing's road-wheel tyres. They're rubber, there are 28 of them, and each one contains moulding flashing on the inside, which you have to pull out (it all ripped out cleanly, for me). Two tyres, and six other parts, go into each of the 14 wheel assemblies...

...and then you get to attach them all to these assorted suspension arms.
The Pershing's suspension is quite authentic, although the telescopic "dampers" that adorn the suspension arms are just plastic and metal decorations, with no real damping action at all.
The suspension arms have slotted shafts that go into the tank hull, where the slots receive torsion springs. This gives every arm (except for the odd double-articulated end-return-roller arrangement) completely independent action, allowing very supple suspension, and maximising the chance that there'll be a road-wheel pushing down on the track everywhere one needs to be.
The Tamiya Sherman has authentic suspension too, which means it's authentically not as good as the Pershing. Separate dual-wheel bogies don't work as well as independent separate wheels.

Great suspension isn't a lot of use without great tracks.
(Most tanks, including this model and the real Pershing, actually can't move at all without tracks; all of their drive goes to one big sprocket on each side, which will spin uselessly in the air if the tracks are missing.)
The Pershing's tracks are pre-assembled. That's good. Well, if you don't mind missing out on a few hours of very repetitive and quite fiddly work, that is.
The tracks also have a prominent central line of quite scale spikes, which passes through a slot between the road and guide wheels, and keeps the tracks well lined up. The Pershing seems unlikely to easily "throw" tracks - a thrown track is one that's partially or completely walked off the sprocket, and it is A Bad Thing.
The tracks are, however, not all metal. The main pad pieces that contact the ground are plastic. They're held together by metal pins and pin-connectors, and the whole arrangement is very solid, but if you want nothing but steel touching the ground, you'll be sad.
Since the plastic the pads are made from seems to be very tough, I doubt it'll be an issue, but it's a bit disappointing anyway.
Scale detail fanatics like to paint their tank tracks, which is fine for the static-model versions of these tanks, but not practical for anything that's going to drive on a surface more abrasive than carpet.
Of course, even if I had magic never-wears-off paint, I wouldn't have bothered painting the tracks. Too much like hard work, that is.
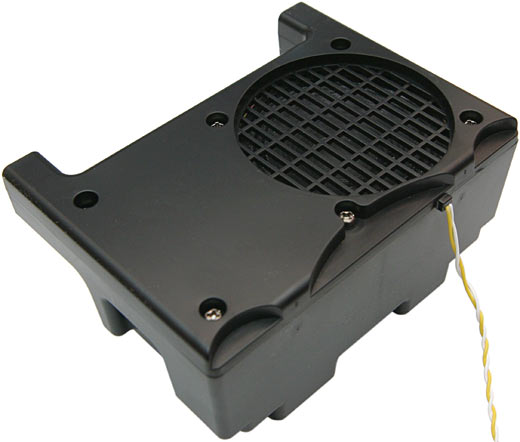
The Pershing's noises come out of this speaker box. It packs a single small widerange driver, and has two ports that give it surprising high-bass response. There's no way you're going to mistake any of the noises the Pershing makes for actual tank noises, but it sounds a lot less like a militant clock-radio than I expected it to.
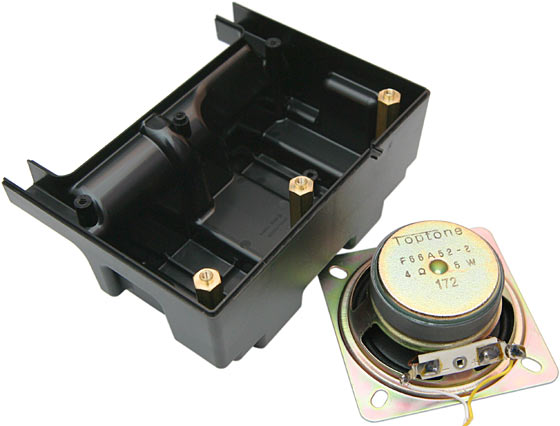
Here's what's inside the box. One five-watt TopTone driver, and some air.
TopTone, by the way, are renowned makers of speakers for, ah, undemanding applications. Clock-radios, cheap TVs, stuff like that. Complete nutters could upgrade the speaker to a more ferocious long-throw Aura OEM driver, or something.

You also get some tools with the Pershing. As well as The Inevitable Little Cross Wrench That R/C People Always Have 104 Of But Can Seldom Find When They Need One, plus a chunkier wrench for the big drive-sprocket bolts, there's an Allen key (which I forgot to put in this picture) for some socket head cap screws, and a plastic adjuster for the trim controls on the electronics. (Metal screwdrivers can freak out trimmers.)
Along with the tools, you get a variety of sticky stuff. Little blue tubes of general-purpose grease for putting on shafts, a bigger tube of ceramic grease for putting on gears, and a whole tube of Tamiya's TP-4 threadlock. Threadlock is screw glue, used to stop screws from backing out. TP-4 is Tamiya's standard sweet-smelling blue goop, which has the distinction of being safe to use anywhere, even where screws thread into plastic parts; most other threadlocks either don't work properly on plastic, or attack it.
Nonetheless, I didn't even crack the TP-4 tube, because everywhere you're meant to use it in the Pershing is a metal-to-metal joint, and good old Loctite 243 is fine for those. Tamiya threadlock isn't as strong, and apparently doesn't at all enjoy being trapped inside its tube. I doubt any human has ever managed to get less than 24 screws' worth of TP-4 out of the tube in one go.
There's also a titchy red-handled screwdriver...

...for these exceedingly titchy screws.
These screws have one function only; they attach the tank's side skirts. If you want to actually run the Pershing, though, you can't use the skirts; crud can get jammed between them and the tracks. I compromised, installed the little right-angle pieces that the side skirts screw into, but left the skirts themselves off for the time being.
If I ever install them, they'll definitely have flames on them.
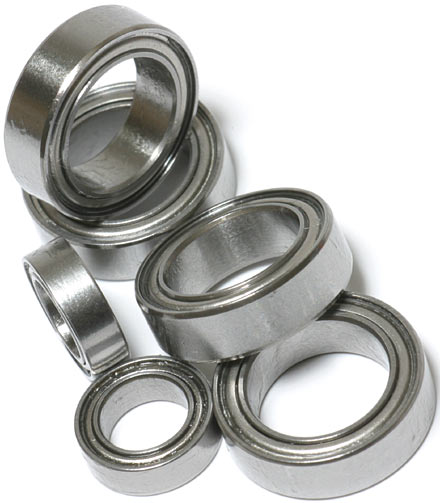
When modellers talk about bearings, they generally mean ballraces, like these. These bearings go in the tank's final-drive housings, and support the high-torque low-speed shafts that take drive to the main sprockets.
In engineering parlance, though, a bearing is just something that supports a turning or sliding component, and it can be - and usually is - a solid object. Modellers usually refer to solid bearings (metal or plastic) as "bushings".
The Pershing comes with quite a lot of solid-metal bearings; they go in the road-wheel and support-roller assemblies, so that nowhere is an all-plastic wheel riding directly on a metal axle and slowly wearing away.

Here are the bearings, and the bushings, and a bunch of other metal parts. The Pershing really does have metal where it counts, everywhere, except for the track pads.
As an example, the turret has three small captive ball bearings (BBs) under it, and they're all that touches the plastic of the upper hull. The BBs don't rotate, but they do provide a very small contact patch.
You also get quite a lot of spare parts with the Pershing. There aren't extras for everything that you might lose during assembly (or running) of the tank, but many of the parts most vulnerable to being snatched into another dimension by evil anti-model pixies generally are provided in pleasing numbers. There are plenty of spare turret-ring BBs, for instance.
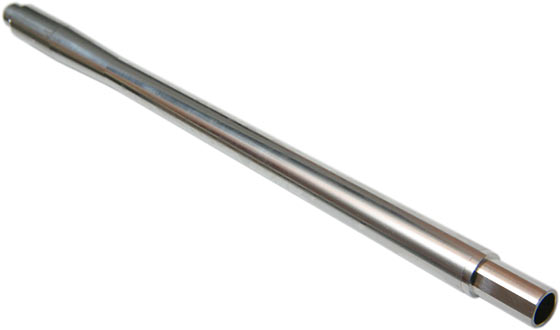
You only get one of these, though.
It's the main gun barrel, and it's a nicely machined piece of aluminium, so there are no unsightly mould lines. The muzzle brake that you glue to the end of the barrel is a two-piece plastic part, but the barrel itself is smooth and blemishless.
Unfortunately, that means it's a bit of a bugger to get paint to stick to it. I undercoated the barrel (and various other visible metal parts) with Tamiya's new #87061 metal primer, and painted the barrel with official Tamiya paint rather than the cheaper stuff I used elsewhere (see below), but that didn't help. The paint still scrapes off the gun quite easily.

The final-drive components come in this fetching chocolate-box tray. The final gears, their two-part casings, and the sprockets and centre guide discs are all cast from some anonymous white metal or other, but it ought to do. They're the highest-torque part of the model, but since (as I discover below) this model shouldn't ever deliver much more than 15 watts to each track, I doubt the drive gears will wear out.
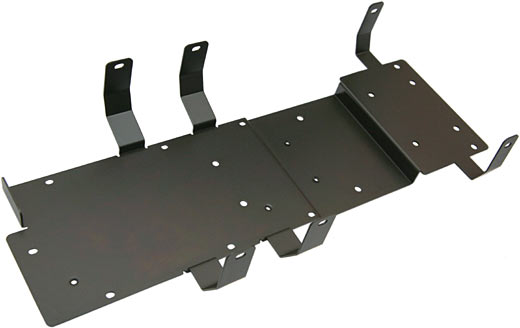
More metal. The upper and lower hulls are plastic, but everything important screws onto this steel "inner deck".

Here's the upper hull plate, as it comes out of the box. Note that the hatch holes at the front, and the cooling grille holes at the back, actually are holes; things that are meant to be perforated or open actually are and do, on this model. Many models have "hatches" that are glued-on parts, or just moulded in. The Pershing has some stuff like this, but the major grilles and hatches are all real.
There are more ballraces in the Pershing kit, but they're built into the gearboxes. These come pre-built, like the other motor assemblies, but they're driven by beefier RS-380-type motors (commonly known as "Speed 400" motors in the world of R/C models, possibly to stop punters from finding out that RS-380s without the Speed 400 label are cheaper).
380-size motors are generally considered weedy in the hobby world, but a pair of them is more than adequate for a tank this size. The gearboxes provide massive gear reduction (and torque multiplication), and the tank doesn't need to go very fast anyway, so these motors work fine.
Unfortunately, one of the drive assemblies for my Pershing is a lot louder than the other, for reason that aren't clear to me. It's a little slower, too, so the tank doesn't quite drive straight if you don't use a bit of steering trim. Nothing seems to be bent, or meshing poorly; I don't know what the problem is, and I couldn't be bothered tearing apart the pre-built gearbox to see.

The brains of the operation.
The T-06 Dual Motor Drive (DMD) Control Unit is the thing that plugs into the motors and the receiver. It handles the basic task of controlling the speed of the two motors in response to throttle and rudder input. There's a removable plastic cover on the T-06, though, which allows you to connect it to the MF-03 DMD Multi Function Unit, which is what handles all of the Pershing's fancier features.
The tank can drive just fine without the MF-03 connected. In that mode, it behaves just like the non-Full-Option tanks, like my old Sherman, before I added extra bits to it myself.
Connect the MF-03, and connect all of the extras to the MF-03, and everything else on the Pershing works. The MF-03 has some extra controls on it, too, the only one of which you're likely to have to touch is the little trim-pot that sets the Pershing's speaker volume. Available settings range from inaudible to offensive.
The two electronics modules each have a standard Tamiya battery connector, which is adequate, for a relatively-low-current-draw model like this. There's a Y-adapter provided, to let you connect both modules to the single stick pack.
Tamiya connectors (and several other cheap white-nylon connectors) are famous for welding into a solid lump when used in high-current applications. High-power R/C models need something better.
This isn't a high-power model, but all of my batteries have Anderson connectors on them, so I grafted a couple on in place of the Y-adapter's input socket.
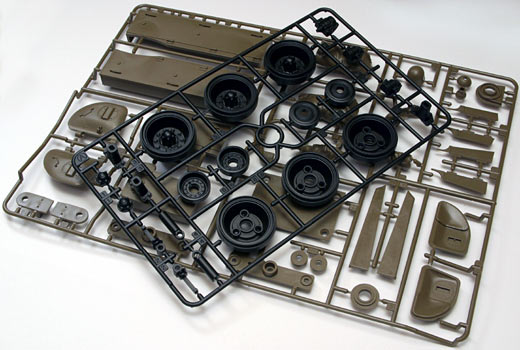
Most of the Pershing's parts come, as is normal for static and R/C scale models, on "trees" of sprue (not the tropical disease).
All of the major parts trees are moulded out of khaki-green plastic. That's a sensible choice for a model which, according to the instructions, should end up covered almost everywhere with Tamiya's TS-5 Olive Drab spraypaint (estimated number of $US5 100-millilitre Tamiya spraycans needed to complete the job: A Lot).
The black tree on top of the green one in the above picture is black because I've already painted it. I used a bit of Tamiya flat black paint - it's expensive, and you only get about one large eggcup full of the stuff per tiny can, but it's top-quality. As you'd want it to be, for the money.
To keep the cost under control, I used Top Flite Lustrekote for most of the painting. Lustrekote is high-quality model paint that comes in various colours, and in proper-sized cans, with several times the capacity of the Tamiya ones.
While I'm rabbiting on about paint, the standard paint scheme includes a few other Tamiya colours, including their "X-27" transparent red. That paint's used only for the two minuscule tail lights. I used a red Pilot marker on them instead.
Tamiya also, apparently, expect you to buy a little pot of their special X-11 chrome-silver acrylic to paint the inside of the four tiny headlight pieces, which assemble into only two lights. The total reflector area is fingernail-sized. I achieved a perfectly acceptable result with a silver pen from the newsagent; blobbing out its shiny ink onto a cotton bud and twirling the bud inside the reflector pieces did the trick.
As for spray-painting the trees, the least incompetent way I've come up with to do so involves holding the sprue-frame with locking pliers to make it easy to paint both sides, from various angles, in one go. Multiple light coats are the way to go, if you've got the patience.
I always have the patience, at first.
Frames painted on both sides can be pegged to a clothes-line to dry. If you sit your frames on newspaper for painting, you'll only be able to do one side at a time, and they'll stick as they dry.
Once the painting's done, it's not quite done, because when you snip the parts off the sprue (with side cutters or a hobby knife, not included in the kit), the spots where the part was attached will be bare plastic. Smoothing off these spots and painting them so they match the rest of the part is fiddly work; I did my usual semi-gluteal job, smoothing the spots with abrasive paper and a knife, and then dotting on black ink (from another Pilot marker) to cover them up.
No, the marker ink does not match the paint very well. Bite me, perfectionists.
I'll now draw a discreet veil over the debacle that is my attempt to paint small objects. There are more interesting things to see in the building process.
Construction highlights

By the end of instruction step eight (of 47), you've finished all of these. If you enjoy repetitive work, you'll love making road-wheels and attaching them to suspension arms.
I, by the way, neglected to paint the metal damper sleeves when I painted the rest of the metal parts. I made the executive decision that (a) they weren't very visible anyway and (b) it's a feature, not a bug.

Here are the road wheels, attached to the lower hull; this is what you've got at the end of step 11.
The inner deck hasn't been installed yet. The suspension attaches to separate aluminium rails, screwed to the inside of the hull.
The front of the model is in the foreground in this picture. The idler wheels are the ones up in the air at the very front. They're adjustable, so you can change the track tension, but there are only three possible positions and you have to take off the tracks to change the setting. The old Tamiya Sherman's track-tension adjustment isn't great, either; it has a somewhat slip-prone screw-in-a-slot arrangement.

Suspension springs, in detail.
I've removed the arm stay that stops the arms from backing out of their proper location, so you can see the spring setup clearly. This kind of "torsion bar" suspension doesn't have bars that twist at all; the springs are the things that bend. Tamiya put "proper" torsion bar suspension in their Tiger models, but some modellers disliked the amount of slop that design had. The Pershing's arrangement is slightly fiddly to assemble, but works the same way viewed from outside, and has no slop at all.

Fast forward to the end of step 20, and you've got this. The chassis is now ready for track installation. The inner deck is in place, so's a second, smaller deck that the electronics modules sit on, and you might have noticed a couple of motors, as well.
If you need to swap out a drive motor assembly in a 56016, you ain't gonna enjoy it. The motor assemblies are fastened to the inner deck, and can only be removed if you remove the inner deck first. The inner deck is either attached to or covered by, roughly speaking, every single component in the tank.
Then again, a dead drive motor and/or gearbox isn't a very common failure, at least with the bearing-equipped gearboxes used by the current Tamiya Big Tanks. I just found myself thinking about this possible annoyance, as I listened to my one quiet gearbox and one strangely loud one.

Here's what's under the final-gear-casing cover. Both gears are bearing-supported on both ends, but that's not the big news - the big news is that the shiny brass outdrives, onto which screw the track drive sprockets, just sit in a hole-with-two-flats in the middle of the final drive gear. And there's another two-flats mount for the sprocket. My Sherman has a two-flats mount for the sprocket too, but the outdrive, in both kinds of Sherman gearboxes that I've seen, attaches to the gearbox with a set-screw.
Set-screws are those little headless things that you screw down into a hole so they push on a flat on a shaft inside. It is widely agreed that they suck. They back out, if you don't tighten the bejaysus out of them; if you do tighten them like one of the Sydney Harbour Bridge's primary load bolts, then they gouge the shaft, won't come out if you want them to, and still back out, given time.
And, if you really try, you can even round them off.
The Pershing doesn't have a set-screw in it anywhere. Aaahh.

The complete lower hull, from the end of instruction step 28. Everything fits in neatly, but there is no spare room, and getting all of the cables to fit requires a bit of prodding and poking.
One stage before this, by the way, you discover that you need a soldering iron for this kit. Exactly one tiny thing needs to be soldered - an eye-lug, which you put on the end of the wire from your receiver. The lug attaches, later on, to another lug on a link cable, which connects the receiver wire to the springy wire antenna that waves out of the top of the turret.
You can forego this step entirely if you like. Just leaving the antenna bunched up inside the hull will give you more than enough range for indoor driving. If you want maximum range, on the other hand, then you should carefully cut the receiver wire short by an amount equal to the length of the extra Tamiya antenna pieces, then wind the loose antenna wire onto a card in a carefully calculated non-inductive pattern.
And then have a long, hard look at yourself, because you've just made a tank that you can control far enough away that you'll need binoculars to see which way it's pointing.
If you're installing a camera and long-range video sender on your tank, OK, make with the range maximisation. If not, though, then just doing it the way the instructions say will work fine. But if you don't have a soldering iron, then buying one just for this one joint is as loopy as buying two spraycans to cover one thumbnail worth of plastic.
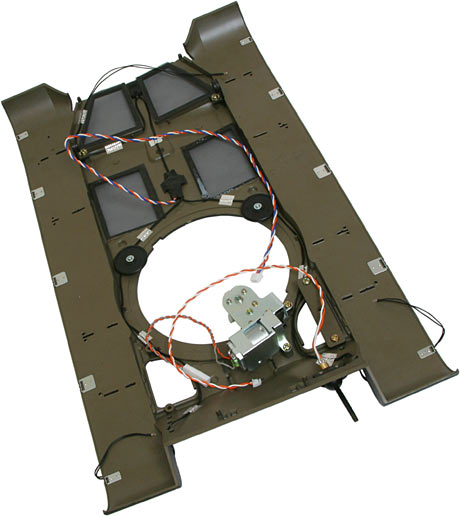
And on we go to the end of step 31. This is the upper hull plate, with all of its electronics in place. The ball-turret front machine gun has been attached, the turret rotation motor and guide wheels are in place, and so is the three-bulb head-and-tail-light harness.
The grille holes on the back of the plate don't yet have their grilles attached, but they are covered, with very fine plastic mesh. You trim the mesh to size and shape and glue it in place, and it stops crud from getting into the tank through the drive system cooling vents. Nice.
The harness for the head and tail lights, though, is too long - there's too much wire. Much too much wire. Assemble it just as Tamiya tell you to, and you'll either end up with coils of wire flopping around inside the hull, or discover an opportunity to fashion long, snail-like eyestalks for your tank.
Reeling the excess back in and pinning it down with the neat aluminium-and-glass-fibre tape that Tamiya provide for the purpose isn't difficult, but if you haven't followed the Very Boring Model Building Rule that states that you should read the whole instruction manual three times before you start (Where's the surprise? Where's the thrill?), you won't realise that you have to deal with the extra wire until you've already attached the top of the hull to the bottom.
By the way - in case you haven't, by this stage, figured out that you're building a kit, the fact that the silver wire-restraining tape is provided as a square, from which you cut out little rectangles to use, ought to clue you in.
Oh - the little silver things on the sides of the top plate in the above picture are the mounts for the side skirts, attached with the abovementioned Screws So Small That Flies Could Steal Them.

The main gun assembly - yours at the end of step 42. The recoil motor attaches to the back of the gun barrel; it's moved up and down by the elevation motor, which mounts inside the turret.
The wiring for the main gun flasher, elevation and recoil motors, and the antenna, is just that - wiring. Just wires, going up into the turret, with no slip-ring contacts to rotationally decouple them. What this means is that it's a bad idea to turn the turret round and round and round in one direction with the traverse motor. Every time the turret rotates, you put one twist in all the wires going into it. Twist them taut and keep on twisting and something awful is likely to happen.
In reality, the Pershing's turret traverse is slow (read: realistic) enough that you're not too likely to over-twist anything on one battery charge. Still, it pays to remember what way you turned it, and turn it back later.

The turret at the end of step 44 (well, almost - the antenna wire isn't connected yet), with the gun installed and the elevation motor connected to it, via its little ball-joint pushrod. There's not a lot of spare room in there.
You can see the ring gear that the traverse motor engages, on the bottom of the turret; it's toothed on the inside.
After this, you're just dropping the turret onto the hull, and then sticking zillions of little scale bits all over the tank. Hatches that not only open but have little periscope pieces stuck to the inside. Various stowage and spare track links and tools. And plenty of other stuff. Including a driver figure.
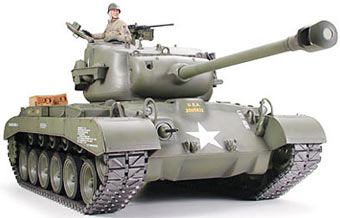
Do it all the Tamiya way and you end up with this. Very nice, very stylish, very realistic. Very covered with scale detail that won't survive being scraped against the lemon tree as your tank sneaks through, um, the, uh, jungles, of Korea. Yeah.

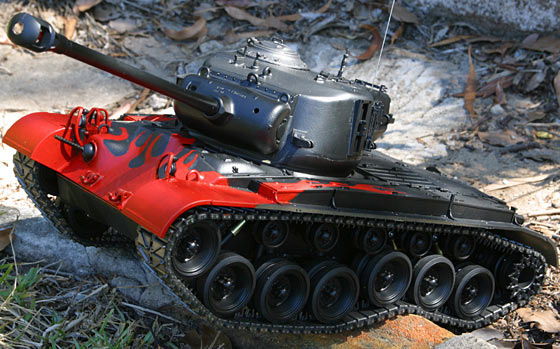
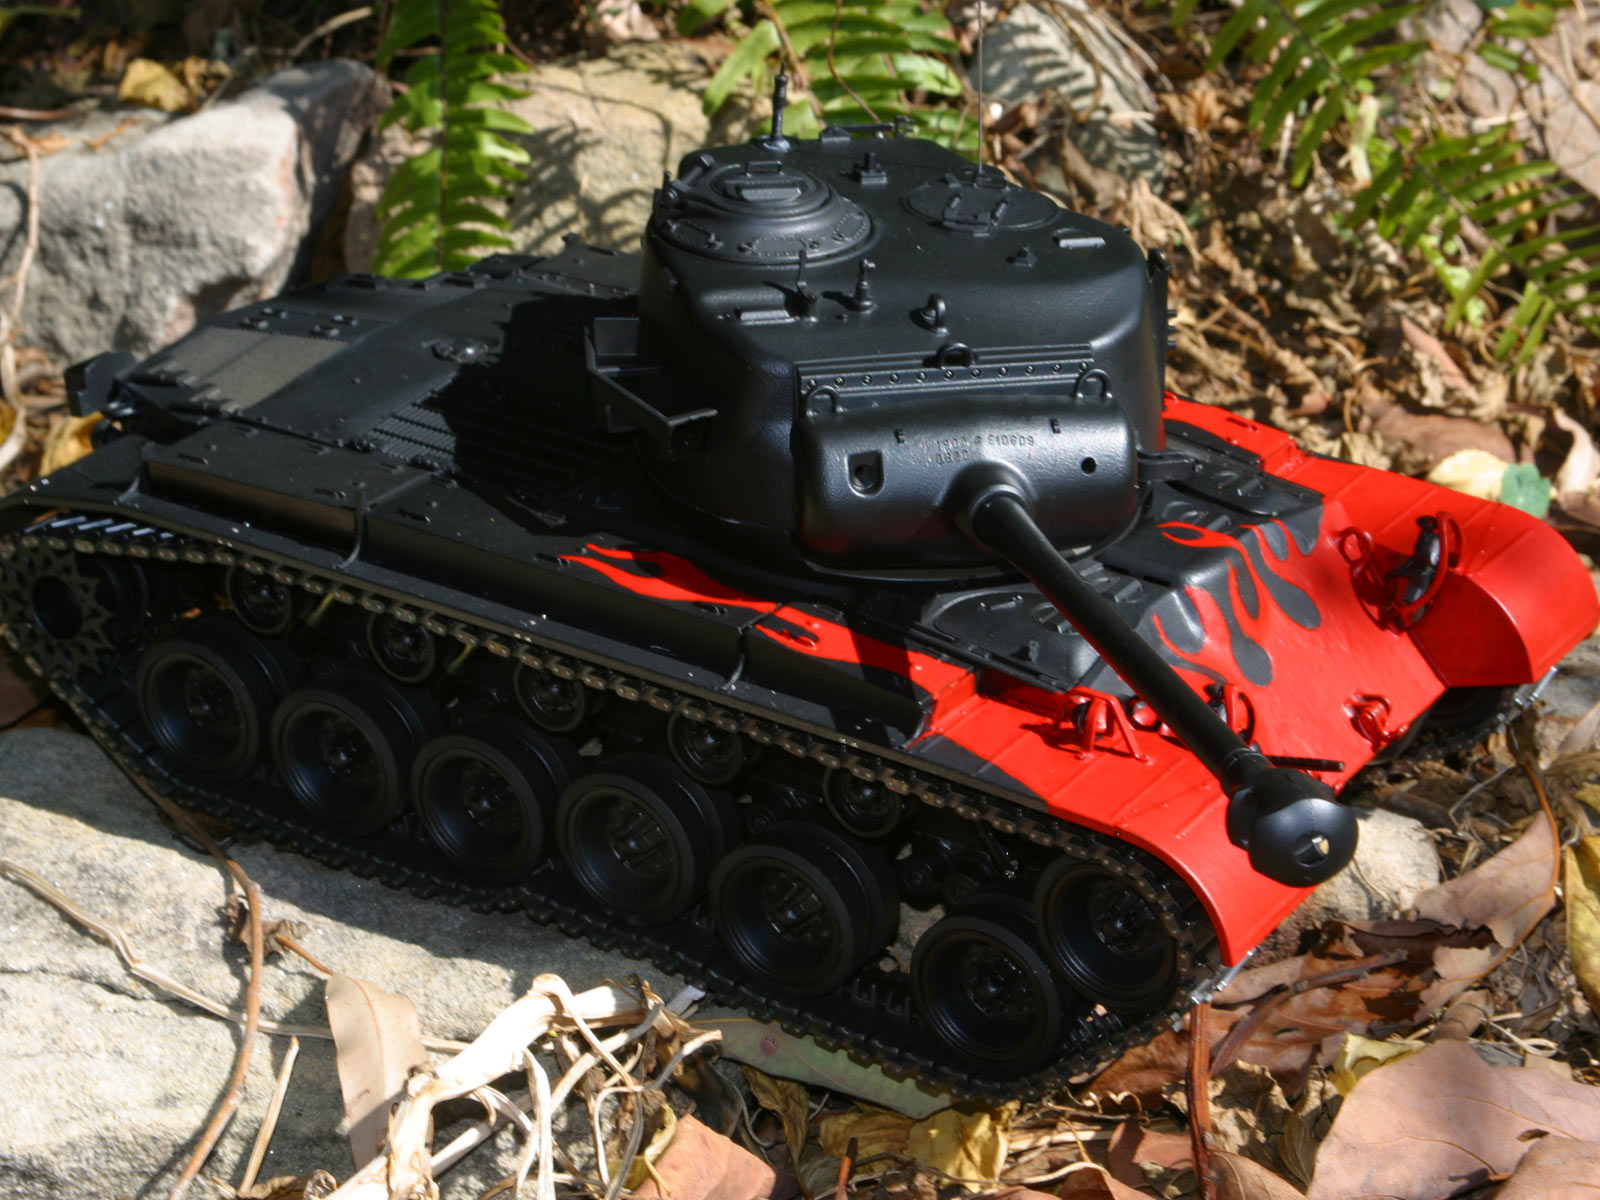
Here, in contrast, is my interpretation. I like to think of it as what Oddball from Kelly's Heroes must have been commanding, by 1950. No way would he have stuck with that rattletrap Tiger.
This tank, apart from its goofy paint job, lacks the driver figure (I'll see if my Warhammer-playing friend can spare a moment to make me an Oddball out of the standard driver figure; the top hatch opens, so it's easy to retrofit the top half of any 16th-scale chap to the tank), the exquisitely detailed 23-piece top machine gun, and various other minor trim.
Tamiya, for instance, provide black sheathing and copper forming wire that lets you make a realistic cable for the intercom box on the back of the Pershing. That looked to me as if it was just begging to snag on a stick and vanish, so I didn't bother with it.
I also didn't install the mounting parts for Tamiya's Battle System, an infrared-beam arrangement that allows their 16th-scale tanks to engage in somewhat realistic combat, complete with a four-lobed vulnerability pattern not unlike those found in real tank combat manuals (and surreal ones too, for that matter). Since I didn't have a Battle System to install, there wasn't a lot of point installing the mounting bits.
I did bother, however, with the two track linking tools that attach to the side of the turret. Tamiya provide steel screws to put in the middle of the plastic tools, to give them a realistic central thread.
There aren't any spare track links for the Pershing crew to use the linking tools on, because I couldn't be bothered painting the provided parts-tree plastic ones to look like the links of the actual tracks. But the tools look great.
In case the above picture excites you tremendously, by the way, you can download a 1600 by 1200 version of it, suitable for use as desktop wallpaper, here.
The Pershing's overall length, with gun facing forward, is 536mm (21.1 inches). It's 218mm wide (8.6 inches), and 197mm high (7.8 inches).
The Pershing doesn't have as impressive a footprint as Tamiya's Tiger tank models, since they're models of bigger tanks, in the same scale. But the Pershing's not that much smaller - the real M26 was, after all, created to give the USA something that could mix it with the heavier Wehrmacht armour. (It only weighed 46 tons, though, so it didn't really qualify as a "heavy" tank, compared with the 56-57-ton Tiger I or 68-ton Tiger II. The Pershing was called a heavy tank in WWII, but later on was quietly reclassified as a "Medium".)
The current Tamiya King Tiger kit, for instance (Hong Kong eBay price down around $US450; eTamiya.com price $US748), is 640mm long by 235mm wide. A big slice of that imposing length comes from the King Tiger's giant gun, which was a leading cause of sudden incontinence among Allied tankers who had the incredible bad luck to actually meet an operational King Tiger.
If there's ever a 16th-scale Super Pershing, it'll be longer. But will spend a lot of time getting its nose stuck in the ground.
(Note to Tamiya: If you are considering making a model of a tank with a stupidly huge gun, there are some that I'd rather see. Like this. Or, of course, this.)

Another glamour shot, showing the flame job a bit better. It doesn't look bad, from this distance.
Flame jobs are cool. Everything should have them.
Here's the pic from the top of the review, again. 1600-by-1155 version here.

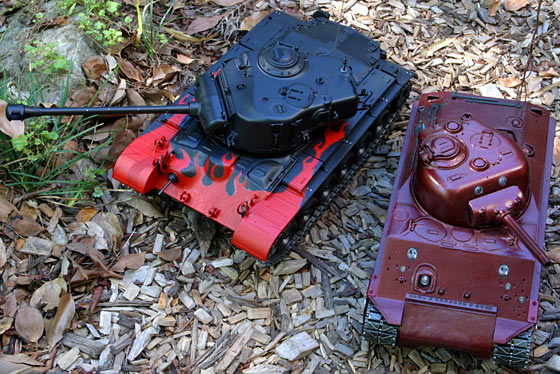
And another pose.
Driving it
Operating the Pershing is not entirely straightforward.
Without the MF-03 connected, it's easy enough; turn it on, drive away. First, you set up the T-06 motor controller by pressing a single button on it, and fully moving each transmitter axis in a prescribed order. This is the way lots of electronic speed controllers for models work, and it's very simple.
Once the T-06 is calibrated (naturally, it remembers its settings when it's turned off), it's left-stick fore-and-aft for throttle, right-stick left-and-right for steering, and away you go.
Steer hard and use moderate throttle and the tank will pirouette - turning the tracks in opposite directions, to turn in place. Use full throttle and the tank brake-turns - stopping one track and driving the other. I don't think the real Pershing could pirouette at any speed - the driver just had two brake levers and an accelerator pedal - but never mind.
Connect the MF-03, and things get more complicated.
Now, when you turn the tank on, there's an engine-start noise, and then the "motor" settles down to a high idle. The sound of a V8 engine with more displacement per cylinder than my whole car's engine has is not, of course, going to be adequately conveyed by a speaker about three inches across, but it's surprising how good the Pershing sounds.
Play with the throttle now and the tank will rev its engine menacingly, but go nowhere at all. This is partly scale-realism - it's not in gear yet, see - and partly a safety feature. It lets you demonstrate the Pershing's other features without any danger of the thing blundering off a table or down your display shelf.
Putting the tank "in gear" introduces you to the way Tamiya have gotten around the problem of controlling a seven-function tank with a four-channel transmitter. To do it, you rack the trimmer for your throttle channel all the way forward, or all the way back, and sharply yank the throttle stick to the limit in that direction. Full throttle, plus full trim, equals a "more than 100%", beyond-the-endpoint signal, which tells the tank to drop the clutch, as it were.
That's actually a bit annoying, though; when you put it in gear, the tank always hops in the direction you yanked, exactly as if the driver wasn't yet entirely familiar with the operation of the clutch. The real Pershing didn't even have a clutch, thanks to its hydraulic "Torquematic" transmission. I dunno.
Anyway, now that the tank's in gear, the engine idle is lower. Cute. Also, whenever the tank's in motion, the engine note is now joined by squeaking-track noises, which change when it's turning. Very cute. And there are motor noises for turret traverse (left stick left-and-right) and elevation (right stick up-and-down), which at higher volume settings successfully drown out the rather less glamorous sound of the real turret motors.
What's cuter still is the no-more-fuel splutter-and-die sound you get when you turn the tank off. The power switch doesn't kill the tank right away; the MF-03 keeps it turned on until it's played its engine stop sound.
The best part, though, is that you get the same sound when you turn the transmitter off, and leave the tank on.
Like many electronic speed controllers (ESCs) these days, the T-06 notices when it doesn't have any input any more, and goes into standby mode. This is good by itself - models that don't do this can go bananas if you turn the transmitter off before the model. But the fact that the engine dies when the T-06 loses signal is just beautiful. Because when you turn the transmitter back on again, the engine starts again, without you touching a thing on the tank.
I can think of no better way to introduce your new toy to your friends.
The other Full Option features of the 56016 are controlled by doing more beyond-the-endpoint tricks. Pull the left stick all the way right, with full right trim, and the headlights turn on.

The tiny bulbs give a realistic yellow glow (white LEDs would be too white), but are basically useless for illuminating the ground in front of the tank (white LEDs wouldn't be).
The above picture, by the way, shows my red paint work close up. That's not a good thing. It says, in a loud, clear voice, "When it comes to painting models, Dan is a really good motherboard reviewer."
The particular way in which I screwed up the flame job on the Pershing was by failing to undercoat it. Stupid, stupid, stupid; when you're painting on top of a dark colour, you should always undercoat with a pale colour, so that the dark colour doesn't show through.
Because I didn't undercoat - and also because I'm about as deft with a paintbrush as the average elephant - I ended up trowelling on the paint, which dried very rapidly in the Aussie summer heat, and thus maximised my natural ability to create drips and blobs and runs. I don't think the heat also maximised my natural ability to rest my arm on wet paint and/or wet paintbrushes, or to stick my hair to the model, but those things happened too.
I should probably stick with it, though. Painters better than me have become noticeably unbalanced after they gave it up.

Aaaanyway, here's the back end, with the single lit tail-light glowing, and the gun rotated to its stowage location and clipped into the neat-o hinged "travelling lock" provided for the purpose.
Whenever the throttle stick is a little bit aft of centre, the tail light lights up at full brightness; it goes out when the tank starts moving backwards. When the headlights are on, though, the tail light turns on, too, but at reduced brightness, just like the tail lights of a car with its headlights on.
Cute, once again.
To fire the front-of-hull machine gun, you rack the right stick trim down all the way, and yank the stick down. The MG fires in bursts of up to three seconds, and its amber LED lights up the end of the gun in sync with the sharp dak-dak-dak firing sound.
The main gun is the big fun, though. You fire it with the reverse of the machine gun procedure - right stick trimmed and pushed all the way up. The main gun's report is loud compared with the engine note, its flash is bright, and the recoil action looks great.
Unless, as mentioned above, the gun's pointing sideways or backwards, in which case the little hull-jerk after the gunshot still goes backwards, and looks odd.
The hull-jerk, by the way, happens even if you haven't put the tank in gear yet. So you can fully demonstrate all of the tank's non-driving features without taking it out of the display case.

It's hard to get a picture of what the Pershing's gun looks like when it fires, thanks to all the movement going on. This may give you the general idea, though.
The ghostly image of the muzzle brake shows you how far the gun moves backwards, thanks to the recoil motor and the hull-jerk.
I'm in two minds about the ingenious trimmer-assisted switching system. On the one hand, it's great to be able to do all this stuff with a mere four-channel radio, rather than having to use something with enough channels to control a fully-motorised T-35. On the other hand, though, it's hardly elegant to be shoving your trimmers around all the time, and fancy computer radios with digital trim buttons are completely unsuited to the task.
I used a cheap radio with manual trim and no fancy features beyond reversing switches for each channel, and it worked fine. But if you've got a bells-and-whistles radio with 128 model memories, you probably won't want to use it with the Pershing.
You can get around the trimmer-use problem by deliberately miscalibrating the T-06. If you don't move the sticks all the way when you set the T-06 up, and if your radio still has enough control throw that the T-06 is satisfied with what it sees, the tank will believe you've done the trimmer-shoving trick when you've actually just moved a stick all the way. But doing this will leave you with a rather twitchy tank, which may have a tendency to shoot things at inappropriate moments.
Once you've got the hang of the Pershing's controls, it's great fun to drive. And, plastic tracks or no plastic tracks, it's got considerable off-road capabilities...
...at least partly thanks to its supple suspension.
(1600-by-1200 version of the above picture? Here.)
Speed
Standard Radio Control Question Number One: "How fast does it go?"
Well, not very, of course. It's a freakin' tank. Deal with it.
On flat ground, you can wring about three and a third kilometres per hour (2.1 miles per hour) out of the Pershing. That's slower than the Tamiya Sherman, which does about 4.15km/h (2.6mph).
The Pershing's lower speed comes from lower gearing; it's got more torque and better suspension than the Sherman, which along with its wider track should give the Pershing superior off-road capabilities. Although, in real life, the lighter Sherman was apparently happier on rough terrain than the Pershing.
I haven't had time to bash my Sherman and Pershing around on a building site yet, but I don't think the plastic-tracked Pershing is going to give anything away to the Sherman when I do.
The advantage of low speed is that it makes the Pershing, like the other Tamiya sixteenth-scalers, a really good everyone-gets-a-go toy. R/C models that belt around faster than you can pedal a bicycle are all very well, but you can't play with them indoors. And you certainly can't hand the controller to your eight-year-old nephew, unless you're comfortable with the idea of the toy being re-kitted in the near future, or just disappearing down a storm drain.
R/C tanks, on the other hand, are great party toys. Everyone can have a turn, and the worst that's likely to happen is some furniture legs getting scratched and some trim bits getting knocked off the tank. Even drunk driving isn't likely to result in any harm.
For reference, the eighteen-litre, 500-horsepower Ford GAF V8 petrol engine that powered the real Pershing could drive it to a top speed of 30 miles per hour - assuming someone hadn't naughtily disabled the tank's speed governor, which was there to discourage overenthusiastic or terrified drivers from spearing off into the bushes in an expensive vehicle that didn't belong to them.
The scale speed of the Tamiya Pershing - actual speed times model scale factor - is 33.6mph. So, in scale terms, it's a bit faster than the original.
Power consumption
How much power the Pershing consumes depends on what it's doing. Hooking the thing up to two multimeters and my bench power supply, set to feed the electronics 7.2 volts like a well-charged battery, revealed that just turning the tank on drew about 260 milliamps (mA) when the tank was "out of gear", and 300mA when it'd been put "in gear". Revving the simulated engine to full RPM with the tank out of gear raised the current to 380mA.
Wiggling the gun around frantically with the tank out of gear, without any engine revving, gave 480mA draw. Firing the machine gun with the tank out of gear drew 300mA. Firing the main gun gave a sharp peak above one amp (A), as the strobe capacitor recharged, but that dropped off very rapidly; each gunshot represents an average draw of maybe 700mA for one second, so it should only eat about 0.2 milliamp-hours (mAh) of battery capacity per shot.
Putting the tank up on blocks, as it were, and spinning the tracks as fast as they'd go, drew about 1.74A in reverse, and 1.9A in forward. The peak current as the motors accelerated was above 5A, but only for a brief moment.
With the tracks actually on a surface, and with the tank restrained so that it couldn't move but was working quite hard trying to, the maximum current draw was up around 3.5 to 4A.
Turning off the receiver so the tank played its engine-stop noise and then sat quietly did not, of course, stop the current flow. In this "standby" mode, the tank still drew about 185mA.
This testing confirmed that the power switch is a "soft off" device, at least when the MF-03 is connected; the tank keeps drawing power to play its engine-stop sound, before dropping to zero draw.
At worst, this tank will need about four amp-hours of battery capacity per hour of run time. That's only likely to be the case if you're belting about on uneven ground, though. Even enthusiastic normal driving is more likely to give an average draw of about 2A, and 1A or less is likely if you're tootling around at less than full speed. Which you will be, if you're driving the Pershing like an actual tank, and not like a sprint car.
This low power consumption is good. It means you'll be able to get good run time from unremarkable battery packs.
A cheap ($US15 to $US20) "sport" pack with 1500mAh cells in it will do just fine for the Pershing, and give you about 20 minutes of full-welly motoring, or well over an hour if you drive gently.
Battery packs for models become worse and worse value as their capacity gets higher. 1500mAh? $US15 (or less than $US11, if you buy something really dodgy). 1800mAh? $US22. Brand name 1700mAh sport pack? $US30. 2400mAh, the highest capacity you can get in sub-C nickel-cadmium (NiCd) cells to date? $US45.
For undemanding applications like this, you'll be fine with packs that use cheap off-brand cells. A mere five or so amps is well within the reach of any half-decent sub-C NiCd. It's not hard to find pairs of off-brand 2400mAh stick packs for the price of a single Sanyo-celled one.
You can pay considerably larger dollars for battery packs if you opt for computer-matched better-than-usual cells, but using such a pack in a tank is nutty. They're for racers who want maximum run time and extreme predictability, and who'll beat the battery to death a lot harder than the Pershing will. Twenty amps is a common average draw for modified-motor R/C racing cars; peaks are much higher.
If you want a Pershing that can run all afternoon without a break, though, you've got a problem. Because there's practically no spare room inside the hull, you're not going to be able to install more than one battery, or a home-made D-cell pack, or what have you. If you're unwilling to strap batteries to the outside of the model, you could perhaps tow a trailer full of them - the Pershing has a proper steel towing bracket on the back. There are hinged tow-hooks on the front and back that're just plastic decorations, but the steel bracket could be used to tow another whole tank.
If you'd rather not do that, but you still want lots of capacity, then you'll just have to find the highest capacity stick pack you can. Packs built from Sanyo's top-of-the-line 3300mAh nickel metal hydride (NiMH) cells can be had for $US45 or so. You need a NiMH-compatible charger for these batteries, though; NiMH compatibility isn't uncommon, these days, but a NiCd-only charger won't detect end-of-charge if you use it with a NiMH pack, and may do something very nasty as a result.
Problems
As far as fit and finish and assembly goes, there's little to complain about in the Pershing. The instructions' shortcomings are very minor, and Tamiya's usual attention to detail is generally evident. It's not hard to find what you need when you need it, and things generally fit exactly as they're meant to.
There are a few annoyances, though.
One of them is that the bullet connectors that hook the motors to the T-06 module are very tight. That means they make good contact, but only once you've wrestled them together, which a kid building this kit is unlikely to be able to do.
The suspension assembly process is fairly fiddly, but you're not gluing anything together, so you can just keep fiddling until you get it right. The small stays for the frontmost suspension arm on each side are particularly difficult to fit, until you discover that the way to do it is to try to jam them into place, then remove them, see where the plastic around the frontmost arm hole has been gouged by the stay, and shave off the gouged portion. This is very easy; only a tiny amount of plastic needs to be removed. Then the front stays slip into place perfectly.
Tamiya's 16th scale Sherman isn't their greatest design ever - a lot of its plasticwork dates back to the 70s, when it was originally released with a single-motor, twin-clutch drive system.
One thing that's generally good about the Sherman, though, is the fact that the upper hull just clips onto the lower hull, so you can take the whole lid off the tank very easily. This makes it simple to change batteries. Adventurous drivers may manage to dislodge the Sherman's upper hull in the field, but any whack dramatic enough to manage that is likely to have done the tank some other kind of harm, so it's not a major minus by itself.
Anyway, the Pershing doesn't work like that. There's one plastic clip holding on the back of the Pershing's upper hull, but it's just there to make it easier to attach the two rear hull mounting screws, which you thread in sideways past the tracks. There are two more screws, vertical this time, to hold the front of the upper hull down - you access them through the (realistically hinged) driver's and assistant driver's hatches on the front. The driver's hatch also gives you access to the power switch.
What all this means is that taking the lid off the Pershing is a pain. There's so much wiring attached to it that you really don't want to do it, anyway. And you wouldn't have to, if it weren't for that pesky battery.
Tamiya haven't figured out a good way for you to get at the battery, to charge it or swap it for a charged pack. The instructions suggest that you can get at the battery connector through the driver's hatch, which isn't correct; a supplement tells you to undo the front screws, lever up the front of the upper hull, and yank the battery pack out through the gap. This isn't easy, and it sure isn't elegant.
It's not terribly hard to remove the turret every time you want to get at the battery. The clutch on the turret rotation motor lets you hand-turn the turret to the point where the tabs on its underside line up with the slots in its turn ring and it lifts out; if you don't know about the clutch then you'll think the click-click-click sound it makes is gear teeth slipping, but thankfully it isn't.
Unfortunately, the Pershing is so packed with wires that just removing the turret probably means you'll have to do a bit of wire-poking-down to make sure you can put the turret back on without its rotation being blocked by one or another cable. Removing and replacing the battery will definitely mess the wires up, unless you're a cable routing wizard who's managed to tie and stick everything down.
A better solution would be to add some sort of easily accessible external charge connector. The obvious solution is just another Y-adapter, into which you can plug the charger when you want to, but the soft-off power switch makes me nervous about that. You don't want to apply considerably higher than normal voltage to a device that isn't turned off with a proper hardware switch, but that's what a charger will do.
The Pershing's electronics are probably switched by a relay, and are thus perfectly safe, of course, but parallel charge connectors are a bad idea anyway; if you forget to turn the tank off before you connect the charger, you're asking for trouble.
Add a dual pole, dual throw switch, though, and you could click the battery off the electronics and onto an external charge connector, which could then be as simple as a couple of lugs sticking out of the hull somewhere inconspicuous. If they're not live when the switch is in the "run" position, and if the switch isn't able to be turned on by accident (put it under a hatch), this solution will be safe and convenient.
In general, this rather complex kit is very pleasingly quirk-free. It pretty much Just Works. If it has problems, they're quite likely to be user error.
When people foul up building R/C models, it's usually not just by getting something wrong which directly causes a disaster - a primary mistake, if you will. It's usually secondary mistakes that do it - stuff that goes wrong while you're trying to rectify your previous mistake.
Someone accidentally cuts the speed controller wires, for instance, and then reconnects them incorrectly, and fries the controller. Or someone picks the wrong screw to fasten a part, reams out the hole with it, and then glues the part in place, because it can't be screwed on any more. And then discovers that the glued-on part blocks access to something very important.
You can avoid this sort of thing by going slowly and having a bit of a think before you do anything. Don't, as mentioned above, open all of the bags and snip all of the parts off the sprue before you need them. That way lies madness, unless you're keen on diabolical 3D jigsaws.
If a part doesn't seem to fit, it's almost certainly the wrong part. If a part seems to be missing, you almost certainly are the one that lost it.
Overall
$US700 or more for a radio controlled tank, radio and so on is, I grant you, a bit on the steep side. Those possessed of sufficient imagination can probably find a satisfying war toy that'll cost them a lot less.
But the Full Option Pershing costs all that money for a reason. It's more refined than Tamiya's previous tanks, it's got all sorts of neat features, and scale model fanatics will find it a great starting point for their disturbing craft.
Then they can drive it around, very carefully, on carpet.
Clean carpet.
If you want a model tank you can bash around the back yard, the Pershing also fits the bill. Leave the fragile twiddly bits off, paint it as realistically or unrealistically as you like (or just leave the thing in bare green plastic, as I did with my Sherman for a while), and have at the rhododendrons. While the Pershing isn't immune to drive system damage caused by foolish blundering through coarse gravel or thickets of sticks, if you drive it with care, there's not much in the way of garden terrain that it won't be able to conquer. And what it can't climb, it can shoot.
The Pershing makes a great party toy, too. Strangely enough, as the party wears on, people are more and more likely to believe that radio controlled tanks are the coolest things in the entire universe. I haven't figured out exactly why this is.
So, in closing, it's a neat toy. I like it. I'm really grateful to all you nice people who gave me the money to buy it.
Have some more pictures.

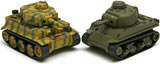
On patrol with its little brother.
Size comparison.
eTamiya.com's page for the Pershing

