Lensbaby 2.0
Review date: 21 January 2006 Last modified 03-Dec-2011.
Cameras ought to be a lot simpler than they are.
I mean, turn to the Optics chapter of your eighth-grade science book, and it explains the whole thing. All you need is some kind of flat light-sensing thing, and a lens. Light comes into the lens as neat-o parallel beams, and then the lens focuses that light onto... uh, apparently onto one tiny zero-dimensional spot, according to the usual light-and-lens illustration.
The usual diagram of a camera shows an image, usually of a tree, being neatly recreated, upside down, inside the camera.
The thing is, simple lenses don't actually behave this way, even if they're hit by the implausibly parallel photons in the basic-lens diagram - which they won't be unless the light comes from a carefully collimated source. In the absence of any convenient relatively nearby hypernovae, this isn't going to happen; plain sunlight doesn't cut it, because the sun's got width - it isn't a point source of light.
The problem with a simple lens is that it suffers particularly badly from two kinds of "aberration" - divergence from the perfect imaging qualities of the physics-text lenses, which all come from Blackboard Land where pulleys are frictionless, rope doesn't stretch and cows are inelastic.
The first kind of aberration, which only applies to spherical lenses or mirrors (refractors or reflectors whose faces are shaped like a section of the surface of a sphere), is, uninventively, called "spherical aberration".
Spherical aberration causes light that passes through points approaching the edge of a spherical lens (or which hits points approaching the edge of a spherical mirror) to be refracted (or reflected) by the wrong amount. It won't focus at the same point as light refracting (or reflecting) through the middle of the lens.
Practically, this means that when the middle of the image is in focus, the edges will be soft. And if you're shooting a normal scene that illuminates the lens from various angles (rather than, say, a candle flame in a dark room), the whole image will have a distinctive soft and dreamy look to it, from the light that's passed through the edges of the lens.
This effect is called "soft focus", and it can be more or less duplicated by putting an appropriate filter on a fancier lens, or in post-processing. Soft focus is often used in portrait photography, when it's your job to make someone look less wrinkly than they are. There, the traditional way to create it is with a fancy expensive lens containing a carefully calibrated, and usually adjustable, soft focus injector. Which, yes, is kind of like buying a modern car that includes a dial that lets you set the number of times you have to turn a crank to start the engine from zero to 50.
Anyway, if you're trying to focus light onto a flat surface - as you are, in a normal camera - a spherical lens just can't get it right.
(It'll focus perfectly well onto a spherical surface, by the way; that's what happens in the human eye.)
In case you're wondering, spherical lenses and mirrors are still in use because they're easy to make. Take two pieces of glass, put some grit in between, and rub them so that their edges overlap, and one will slowly turn into a spherical concave surface (which can be made into a mirror) while the other slowly turns spherically convex (on its way to being a planoconvex lens - flat on one side, convex on the other). It's magic.
(A similarly magic process can be used to make straight edges.)
You can make a camera, telescope or microscope using optics made this way, and it'll work - more or less.
Getting rid of spherical aberration, so the edges of the field of view of your optical instrument are more than slightly useful, is much harder. When hand-grinding a lens or mirror, you can do it by the suck-it-and-see method of testing and then "figuring" it, a process involving horrible goop and eldritch activities. Machines that can do this stuff more or less automatically exist, but they're far more expensive than machines that just make spherical lenses and mirrors.
Spherical aberration has some relatives, too. Everybody's heard of saggital oblique spherical aberration, of course; it's what causes the outer portions of the image to assume a curved and elongated appearance, giving a distinctive circular distortion. This can be very noticeable with particularly lousy lenses, like the teeny plastic ones on cheap webcams; check out this picture (from this review) for a really drastic example, or this page to see a much more restrained version. Which you'd darn well want it to be, when the lens that's doing it costs $US3800.
So that's one kind of aberration. Still with me?
The other great problem of simple lenses is "chromatic aberration". Different colours of light have different wavelengths, and wavelength is one of the factors in the equation that determines by how much light refracts when it passes through media with different refractive indices.
So, in English, different colours of light bend by different amounts when they pass through a lens. And this mucks up your focus too.
Shorter wavelengths refract more - "Blue Bends Best". (Someone also felt the need to think up "Red Refracts Rotten".) In most scenes that humans point cameras at, this means a simple lens, even one that's correctly figured to eliminate spherical aberration, will give an image with prominent "purple fringes" on high contrast dark-to-light transitions. It happens when an object's silhouetted against the bright sky, for instance.
Once again, the cheapest of cameras show off this effect most spectacularly. Here's an image (from this review) that's got plenty of purple fringing, as well as a solid dose of saggital thingummy whatsit aberration.
The human eye's curved retina fixes spherical aberration, but if you are human and you look at that same sort of scene, you'll probably be able to see (slight) purple fringes. I certainly can. What a gyp.
To reduce chromatic aberration, lensmakers stick together different lenses. A planoconvex stuck to a biconvex, for the simplest kind of correction. The error of one lens roughly cancels the error of the other, and the purple fringes are reduced.
(More complex arrangements work better, and the lenses are often made from materials, some of them quite exotic, with different refractive indices.)
Aberration of all kinds impedes a camera's ability to capture an image that looks the way the scene looks to the human eye. That's why modern camera lenses are a long, long way from just being one physical piece of ground and polished glass in a tube. Even "prime" lenses with only one focal length contain more than one "group" of stuck-together "elements", each element being one actual lens. Zoom lenses are, as you'd expect, more complex again.
But visual art is primarily about not capturing an image that looks the way the eye sees it. The world doesn't really look like a Renoir or van Gogh painting, and Salvador Dali's signature style didn't look realistic either, even when he wasn't painting peculiar things.
If you don't particularly care about image fidelity - and, let's face it, normal photography is doomed to lousy fidelity anyway, since all it can ever give you is a frozen two-dimensional slice of fossilised light, leaving out very nearly all of the information that surrounded you when you took the picture - then new vistas open up.
And they can definitely include simple lenses.
Cheap, simple lenses.
The ground floor
The usual way people today get into gritty, blurry, flare-y, could-have-been-taken-any-time-in-the-last-150-years photography is by buying a cheap "toy camera".
Holga, Diana and various more obscure cameras have a lot of fans, despite - or, actually, because of - their very basic features, frankly lousy lenses and plethora of light leaks, which the enterprising photographer can block off with tape or leave to spice up the pictures, depending on his or her preference.
The most commonly seen versions of these toy-cams are big chunky things, because they use square medium format "120" film - though all sorts of film formats have been wedged into 'em one way or another. When the camera only costs as much as five rolls of film, you're not afraid to modify it.
You can get a ton of detail onto a nice big 120mm negative, but not if you put it in a toy-cam. OK, maybe you're really into super-detailed representations of your light leaks and lens scratch diffraction, but if you're not, 35mm toy-cams exist as well, and are just as characterful. They don't deliver the trademark squares with dark corners, though.
(There are, mind you, some cheap plasticky cameras out there that're capable of taking perfectly normal photos. When they're working. Provided you don't specifically want to play with weird-brand hardware, op shops and eBay can be a great place to find used big-brand point-and-shoot 35mm cameras for close to no money at all, and some of them can be real gems. Concerned about getting a camera that doesn't work? Buy a job lot of ten for $15 - then the odds are on your side!)
Toy-cams provide a cheap way to experiment with unusual flavours of photography, but they retain the basic limitations of film. No instant feedback, and a cost-per-shot that can mount up pretty quickly if you're playing around with weird lenses and chewing through a lot of exposures. There's only so much you can do in the simulator; the secret of great photography is large amounts of bad photography.
Of course, you can get "toy" digital cameras now as well, and they have a lot of the same plusses as film toy-cams. The stuff I say in my old review here, for instance, still applies; today's baby digitals (including most of the world's mobile phone cameras) give you more memory and resolution for the money, and may have better sensors, but they still have those lovely lousy lenses.
Another route to dirt cheap photography is to make your own camera, almost certainly using film rather than a digital sensor, unless you get really creative.
If you want something that actually has a lens and adjustable focus then this is less than totally straightforward, since all of the easy shortcuts introduce light leaks, which'll spoil your film.
The very simplest film cameras get around this problem by having no lens at all. Start with a light-tight box (or make one), punch one pinhole in it in an appropriate place, and use a bit of tape or your thumb as a shutter. Pinholes let in very little light and so your exposure times will have to be long (if you want pinhole-ish images with a larger aperture, a zone plate could be for you), but that means all kinds of gimcrack shutter designs will work beautifully. If being five whole seconds late on closing the shutter again only increases your exposure by 4%, who cares?
Pinhole cameras can get pretty fancy, but the most popular photographic devices with old-fashioned lenses on them are 35mm SLR (Single-Lens Reflex) cameras.
Film SLRs, you see, are cheap.
Shop wisely and you can get a brand new auto-everything film SLR for not much more than a hundred bucks US. A similarly fancy body to suit a major line of lenses from a company that isn't giving up on the photography business goes for less than $US100.
Bodies with fewer, or no, electronic features can often be had even cheaper, as long as you don't have an attack of snobbishness.
Once you've got such a camera body, you can stick some moderately non-awful lens on it for ordinary happy snaps if you like, or you can start messing around with your own lens designs. Lenses are, usually, where the fun is in camera design.
You can use any old thing as a lens. You can just hold a magnifying glass in front of a lensless SLR and take a picture that way, if you like. The result will look extremely washed-out, though, since a tube-less lens lets unfocussed light in through the sides.
All you have to do to go beyond this, and attach your Pringles can or toilet paper tube or what-have-you to an SLR, is connect your contraption to a hacked-up "body cap". Body caps are the plastic plugs that keep dust out of the camera when there's no lens on it; they attach to the lens mount just like a lens.
That's how you make a quick and dirty SLR pinhole; take a body cap and put a hole in it. There's a lot more to pinhole photography if you care to get into the physics, but the minimum requirements are one body cap, and one sharp object.
This works, even on auto-everything techno-cams, because they're still compatible with old all-manual lenses. To achieve this, removable-lens cameras are always able to take pictures when there's no lens on the front of them at all, as far as they know.
If you take pictures when there's really no lens (or pinhole, or whatever) between the sensor and the world then you'll probably get roughly one pixel worth of data in your image, but with anything else you can use full-manual or aperture-priority mode, and proceed as normal.
I took this photo (ISO 200, 30-second exposure on a rainy early morning) with a body-cap pinhole. Yes, it pretty much sucks, but I made the pinhole with an awl in about three minutes, including the time it took to eyeball the midpoint of the body cap. The hole isn't quite round, isn't very clean, isn't punched through a thin material, and is too big. Hence, the ultra-fuzzy image. More refined pinhole cameras make much nicer pictures, though they're still not the optimal choice for portraiture.
But the above image is an image, and all that's making it is a hole. Can't get much easier than that.
But you can go further.
The big-box-and-a-cloth-over-your-head cameras that you see in historical movies and books about Ansel Adams are called "view cameras". Some dedicated medium-format photographers still use them, and they remain normal equipment for large-format photography, though most of their users aren't nuts enough to lug them around outside the studio.
View cameras are, essentially, just a board with film on it on one end (or a ground-glass sheet, for viewfinding), and a board with a lens on it at the other, with a stretchy bellows in between. Most of them let you not only move the bellows back and forth (to zoom), but also do other "movements". You can change the angle of the boards so they're not parallel (called "tilt"), and the lens doesn't even need to line up with the middle of the film ("shift").
Most of the time, there's no reason to tilt or shift, which is good news for the millions of camera users who can't do it. Sometimes, though, tilt and shift can make it possible to take an otherwise un-shootable photo, like an apparently straight-on shot of a mirror that does not show your reflection, or an upwards shot of a building with no perspective distortion.
Modern digital photo editing lets you do tricks like this much more easily and cheaply than you can with analogue technology, but for super-high quality (i.e. no loss of resolution in the bits of image you've stretched...), the old ways are still the best.
Getting back to cameras that're smaller than a breadbox, you can attach bellows to 35mm cameras, but unless you use an unusual lens, the result will only be usable for close-up macrophotography. If you want movements when you're shooting things bigger than a cockroach, you have two options.
For the first of them, I am indebted to Markus: You take a lens for a medium-format camera, and you hack it onto a 35mm camera.
Medium-format lenses are made to illuminate a large piece of film from a greater distance than 35mm lenses, so if you install one on a 35mm camera with the gimcrack contraption of your choice, they can be far enough away from the 35mm back that you can wiggle and slide them around as you like. And they cast a big enough image circle that light will still cover the sensor/film when the lens is quite a long way off axis.
There are fairly expensive adapters that make this easy, and don't actually cost very much if you're buying a new lens as well. If you got your lens off a 70-year-old blob of rot and rust that you found in a garage sale, though, your adapter may involve less retail purchasing and more amateur stitching, gluing and woodworking.
The other option for people who want movements on a small-ish camera is to buy a quite thrillingly expensive tilt-shift lens.
The expensive tilt-shift options have very high image quality, and very fine control; you can get exactly the lens/film arrangement you want, and duplicate it on demand.
If you're happy to add some of that old toy-cam randomness to the experience, though, then this is another kind of photography that you can do cheaply, with Some Darn Contraption.
Never mind the medium-format lens. You can make a tilt-shift arrangement out of a magnifying glass and a sink plunger. Similar ideas involving cooling ductwork and inner tubes suggest themselves, and I'm not the first person to have had them.
But if you (a) are not that handy and/or (b) would prefer to get a well-engineered product that won't break, won't break your camera, won't drop inadequately cleaned up bits of tape and plastic into your camera, and might deliver slightly better image quality than a magnifying-glass-and-duct-tape hack job - well, you can.
This, at long last, is it. I may have just set some kind of record, even by my standards, for length-of-preamble-before-actually-showing-the-product-under-review. But I felt it was necessary to set the scene, for that portion of the world's population who don't know what this thing is as soon as they look at it.
Some people, you see, recognise it instantly. It's called a Lensbaby, and it's been around for nigh-on three years now. In that time, it's achieved a certain notoriety, which I'll get to in due course.
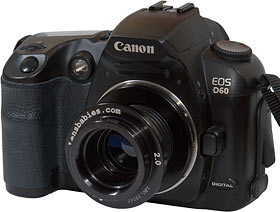
Here it is on my old camera (photographed with my new camera).
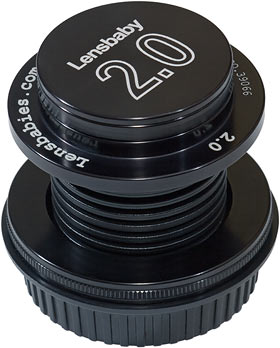
This is the version 2.0 Lensbaby with some improvements over the original. But the basic idea remains the same.
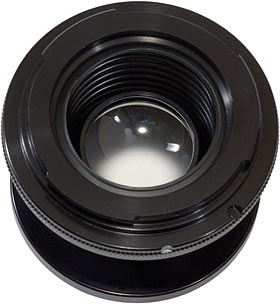
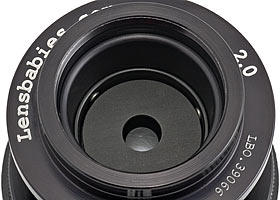
One glass lens at the front - a coated doublet now, instead of the original Lensbaby's simpler, uncoated lens. One metal camera mount at the back - this Lensbaby is for Canon's EF (EOS) cameras, but you can get versions for all of the other popular mounts. One tough circular concertina bellows in between, that can stretch and squish and bend.
The Lensbaby puts you in more direct contact with the photographic process, by letting you physically move the lens around with your very own fingers. Push it in to focus further away, pull it out to focus closer, wiggle and twist it from side to side to shift the focus point around the frame, and distort the image.
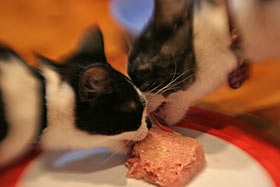
The result of this is that you can use a Lensbaby to take a toy-cam-ish picture, but with the focal centre anywhere in the frame.
Away from the centre you get the usual toy-cam blur, which gets worse and worse as you get further away from the focal point (check out this "speeder bike" pic from the Lensbaby press kit), and the whole image still has toy-cam dreaminess. The revised Lensbaby isn't quite as generally fuzzy as the original, and its focal "sweet spot" is bigger. This makes it easier to actually get a reasonably clear image of the thing you're trying to put in the sweet spot.
(Click the above image and you'll get a 1024-pixel-wide version. Find a 2048-pixel-wide version here.)
It's still easy to deliberately miss a bit, though, and get a heavy soft focus effect everywhere - especially if you're using a wide aperture, of which more shortly.
(2048-wide version here.)
The focal length of the Lensbaby is about 50mm. This means it gives you about a 40 degree wide field of view on a "full frame" 35mm camera; this makes it, despite appearances, a "normal lens".
On a digital SLR with a smaller-than-35mm sensor, lenses behave as if they're more telephoto than they really are, because the sensor only sees some portion of the middle of the circle of light cast by the lens. My EOS-20D, like its cheap-ish digital EOS forebears, has a sensor the size of an APS frame rather than full 35mm. Lenses on it therefore give the field of view of a lens with 1.6 times their focal length on a 35mm camera.
This is not totally good news for the Lensbaby.
For a start, the "focal length multiplier" gives 50mm lenses on a 20D the field of view of a roughly 80mm lens on a full-frame camera. The horizontal field of view is only about 25 degrees. That's not peeping-through-a-keyhole telephoto, but it makes it difficult to take normal indoor pictures that include a few people.
A more important - though still not crippling - problem comes from the fact that the Lensbaby is not an ordinary lens.
As long as you don't need very wide angle, you see, focal length multipliers are generally a good thing. The flaws of most lenses are most visible around the edges of their light circle. Loss of sharpness, vignetting, distortion; all worse around the edges, and often not even noticeable in the centre of the frame, even with quite cheap lenses. With a focal length multiplier, you never see those nasty edges.
If you're trying to take pictures full of "flaws", though, a sensor that crops 'em all off will annoy you. It's not often that people complain that a photo hasn't got enough vignetting, but it does happen.
The Lensbaby on a 1.6X camera is a bit twitchy. If you bend it far enough that you can actually see the interesting dim-'n'-distorted edge of the frame, you've bent it so far that it's at a really large angle to the film frame, and it's hard to get anything at all in focus.
You can, however, still do it (2048 pixel wide version here). I didn't quite get it right in this picture - the focal point makes it look as if I couldn't decide whether the girl or the shrub was more interesting - but you get the idea.
It doesn't take long to figure the Lensbaby out. The instant feedback of peering through the viewfinder while wiggling your camera's snout around helps a lot.
The Lensbaby is also very solidly made. When you're pulling on the concertina to get the closest possible focus (which is less than five inches; if you find yourself doing this a lot, the optional Macro Kit could be an idea...), it never feels as if the lens end is going to pop off, or the camera end's going to wedge itself into the mounting ring, or do some similarly awful thing.
The concertina part is easier to squish right up, though, because there's no point to squishing it to the absolute max. You get to infinity focus before you get to maximum squish.
The Lensbaby kit. The Lensbaby is in the little carry bag; the lens also comes with a standard tailcap to keep dust out when it's not installed on a camera, and a classy screw-on metal front cap. There's also a teeny LensPen to keep the glass clean, and a funny little container with an angled plastic thingummy sticking out of its side.
The container is full of black washers.
The washers let you change the Lensbaby's aperture.
You don't just press a button to change the aperture of a Lensbaby. You don't even move a lever. You drop the washers, which have different sized holes in them for different apertures, over the front of the lens.
The old Lensbaby had a rubber doodad to hold the discs. The v2.0 one has three rare earth magnets, which pull on a metallised coating on the v2.0 washers and hold them in place, hovering just over the surface of the lens.
The v2.0 Lensbaby's maximum aperture gives it a respectable f-number - 2.0. That big an aperture gives it not a whole lot of depth of field, but it lets in more light than most lenses out there. F2.8 is as much as you'll get from the lenses on most consumer digital cameras, and f3.5 is common; f2.0 lets in twice as much light as f2.8, and three times as much as f3.5, allowing your exposure time to be proportionately shorter.
This matters for indoor shooting, where even the ISO 1600 setting that various DSLRs can manage pretty cleanly these days can still leave you with shutter speeds that make people blurry.
Here's a shot, about as closely focussed as is possible with a Lensbaby, at f2.0. (2048 pixel wide version here.)
Same subject, but now stopped down a bit. (2048 pixel wide version here.)
Stopping the lens down makes it easier to shift the focus point around without creating a sharpness-free finger painting. (2048 pixel wide version here.)
You're meant to remove the aperture discs by fishing them out with the included LensPen, or perhaps with the doodad sticking out of the storage container (I think that's a hangover from the original Lensbaby, actually). And that works. But you can also remove them the manly way, by slapping the whole camera, lens first, into the palm of your hand, whereupon the magnets let go and the disc drops out into your hand.
It is my considered opinion that the Lensbaby bellows provides sufficient shock absorption to make this manoeuvre only mildly stupid. Others may disagree.
The damage
The Lensbaby provides toy-cam image quality, but it doesn't have a toy-cam price. The v2.0 kit costs $US150 plus shipping. The original Lensbaby is still on sale, too; it's only $US96.
By 35mm lens standards, this actually isn't very much. There aren't actually many lenses for 35mm cameras that cost less than $US150 and are worth buying. There are quite a few entry-level zooms under $US100, but they're all pretty optically crummy; the only sharp and clear lenses in this price range are non-zoom "primes".
(This isn't to say that lenses in this price range are incapable of taking pictures. They work just fine, and with ordinary happy-snap use probably won't wear out for a long time, either. But you might as well buy a smaller, cheaper integrated-lens camera if you're happy with the quality of an entry-level 35mm zoom.)
If you're on a shoestring budget with a well-worn 35mm back you picked up at a pawn shop for $15, though, $US150 for a lens that can't even be used for "ordinary" photography is unlikely to excite you.
You do get quality for the money, though - this isn't one of those photo-gear rip-off situations where you pay $US17 for a piece of white plastic and, even though said piece of white plastic works very well, can't escape the feeling that you have been royally soaked.
The Lensbaby feels like a premium product, deals well with use and abuse, and comes with useful extras. I wouldn't go so far as to call its price a bargain, but it's fair.
If you've got a digital SLR, you're less likely to run screaming at the prospect of dropping a Benjamin or two on a novelty lens. But it's not as clear-cut as it used to be.
The EOS D2000 was the first in the line of 1.6X-multiplier cameras that led to the 20D. Back in 1998 it cost an easy $US14,000, in today's dollars. If you could afford to buy that (of course, many D2000 users leased them, or had them leased for them by their employers), then a $150 lens was nothing.
It's still very much possible to spend big, big bucks on a digital camera, but several entry level DSLRs (which beat the D2000 in almost every department) can be had for less than $US800, and some of them include a lens. Real penny-pinchers can try buying second hand, but DSLRs hold their value well compared with most techno-hardware. As I write this, the going rate for a decent EOS-D30 on eBay is still about $US300. That's a tenth of the D30's launch price only five and a bit years ago, but it still doesn't compare well with current digicam prices.
Flash memory prices have dropped like a rock, too, so even if you opt for a few gigabytes of storage to go with a new DSLR, you can still only be talking around $US1000. Still not matchbox-with-a-hole-in-it territory, but you're probably not lighting many cigars with burning banknotes, either.
Different, just like everybody else
What did I mean when, about a million paragraphs ago, I referred to the Lensbaby's "notoriety"?
Well, the Lensbaby's been around for a while, and it's both weird and reliable, so it's quite popular with commercial photographers.
It's also become somewhat trendy with photographic poseurs, who've been marketing targets since time began. Now that I think of it, this could partially explain the popularity of the medium format toy-cams, too. 35mm toy-cams may be functionally the same thing and easier to carry around, but they look more or less like any other 35mm camera, so onlookers can't tell how indie and hip you are.
Lensbaby pictures have a very distinctive look, which jaded commercial photographers recognise and, often, decry as a sign of someone trying to make his work look all alternative and low-fi.
(Discuss.)
I have a rule about newspaper photographs of people. The more tricks the photographer's used, the more boring the person is.
Woz can safely be photographed sitting behind a desk smiling. A guy whose most interesting characteristic is that he owns a huge conglomerate that makes garden twine, on the other hand, will generally be photographed at a steep angle, through a potted plant, while he's standing on a bright orange spiral staircase and holding a crossbow.
A Lensbaby provides another trick for jobbing photogs to use when they're attempting to add interestingness to a photo. And it provides another way for the uninspired to follow in the footsteps of everyone else while making their own very personal statement about the mutability of perception, tra la, without the investment of time and energy required to do it for real.
I have tested these theories empirically, you know. When I was standing among the tourists at Echo Point photographing huge rocks through the Lensbaby, several people wanted to know what it was.
The bored looking guy who'd staked out the prime corner with his big wooden tripod and big metal panoramic camera, though, was there to shoot a picture for a poster. He had nothing to do while he waited for the light, but he still wouldn't talk to me. My Lensbaby was, to him, a Mark of Shame.
There's nothing objectively bad about Lensbaby pictures, or any other kind of photo. A photo is only bad if it doesn't (a) do what it was meant to do or (b) do something else pleasing; there are lots of intentionally and accidentally great pictures you can take with a bendy-lens, and with nothing else.
But if you're thinking of buying a Lensbaby just to be different, though, you've missed your window of opportunity.
Overall
The Lensbaby isn't the only device of its type, but only if you include home-made contraptions in the equation.
(There is at least one other flexi-lens out there - the Zoerk Multi Focus System. It's far better optically than the Lensbaby, and also far more expensive. No rational organism will ever find itself choosing between a Lensbaby and an MFS.)
So if you want to try this kind of odd photography without having to make anything, your only choice is between the Lensbaby v1 and v2.
Odd photography in general is a hobby well worth trying, not least because the entry costs can be very low.
Of course, it can be fun just making photographic paraphernalia. You can make a pinhole camera out of a cardboard box, a 35mm film canister (Wow! That makes three things you can do with them!) or any number of other things.
If you're not into the whole egg cartons and paste scene, you can get a film toy-cam, a digital baby-cam, a screw-on fisheye adapter, or any number of other things, and start having fun with photography.
A DSLR is an excellent platform for experimental photography. If you've got one, you have very little excuse for not buying, or making, an odd lens (or pinhole) or two.
Some odd lenses are well out of most people's price range, and some are highly specialised as well, but there are plenty of other options.
The experience of using a toy camera can be as much fun as the photos you take, and the same definitely applies to the Lensbaby. It takes the pressure off you to get the details right, because you can't.
If you're using a Hasselblad, you're expected to be fussy. If you've got a DSLR, you're expected to produce one correctly focussed and exposed image of everything you point your camera at, plus, generally, something between three and thirty useless and/or indistinguishable pictures of the same subject. If the subject is conscious, a significant number of the images should feature it scowling at the camera while it waits for you to stop being annoying.
If your DSLR's got a Lensbaby on it, though, everything becomes fluid and semi-random and, yes, dreamy. For all the unschooled viewer knows, you've found a way to grab raw data from the human retina, or something.
As you may have gathered, I like the Lensbaby.
Recommended.
Review Lensbaby kindly provided by Lensbabies.
