Agfa SnapScan e40
Review date: 17 October 2000.Last modified 03-Dec-2011.
If you're in the market for a flatbed scanner, you've got a lot of options. Many home and small business users buy the cheapest scanner they can find, because all they want it for is the odd happy-snap or for Optical Character Recognition (OCR) and fax duties. For these undemanding tasks, any old scanner will do, and there's no harm at all in buying a cheapie. If a $AU150 scanner bites the dust after a couple of years, who cares?
If you want something a bit better, though - you're doing some more serious graphics work, or you want a good software bundle - the brand names come into play. And in the imaging world, Agfa's a big brand.
The SnapScan e40 is down at the low end of Agfa's current flatbed scanner range, but that doesn't, according to Agfa, mean it's low quality.
On paper, the e40 looks the business. It's got respectable 1200dpi optical resolution - the resolution of the scan head itself - and outstanding 2400dpi mechanical resolution - the size of the steps in which the scan head can be moved down the scan bed. And it's got an internal sample depth of 14 bits per colour, for 16,384 intensity levels each for red, green and blue, versus the 256 levels from old eight bit hardware.
And, like every half-decent basic scanner these days, it uses the Universal Serial Bus (USB) interface. This simplifies the setup process, gives a decent data transfer rate, and delivers the user from the sluggishness and unreliability of the old-fashioned parallel port interface.
Furthermore, according to Agfa's PR folks, the e40's Your Plastic Pal Who's Fun To Be With.
No, wait. It actually, in the words of Agfa's puff page for the SnapScan e40, "makes it simple for you", because you've "got better things to do than sit around reading a manual all day long." In other words, it's got simple software that lets you do various popular scanning tasks with a couple of clicks.
Just as a side note, I'm getting sick of the style of promotional photography in which Hip Young Things are shot from above with a wide-angle lens, so they've got big heads and teeny feet. Look at that promotional page. It's rotten with 'em.
HYTs photographed in this way are usually thrusting a product of some kind toward the camera, making said product look the size of a piano. Since flatbed scanners are too big to hold that way, the Agfa HYTs are just lounging about looking windswept and interesting.
Bring back the bikini-girl school of promotional posing, I say.
Ahem.
Agfa also make a SnapScan e50, (see its specs page here), which is essentially exactly the same as the e40, but includes a transparency adaptor for scanning slides and negatives as well.
The e50's transparency scan area is only 210.8 by 36.8mm in size, though, so you'd better not want to scan any transmissive subjects bigger than a strip of 35mm negs.
The e40 is priced at $AU399, while the e50 is $AU459.
As usual, these retail prices are just a highly stylised way of starting an animated debate among different dealers as to the true value of the product in question. Street prices are lower.
What you get
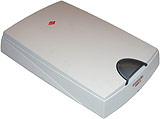
The e40's a fairly swish looking unit, with a tapered design and a comfy scallop-shaped handle on the front of the lid.
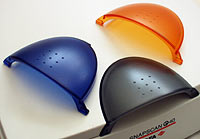
There are two other snap-on coloured handles for the lid in the e40 box. Fashion victims, rejoice.
The e40's maximum scan area is a thoroughly conventional 216 by 297mm (8.5 by 11.7 inches) - A4 height, and a little more than A4 width. The physical glass area's a bit bigger than that, to make it easier to fit things onto it, but you can't use all of the area for a scan.
The e40's noticeably bigger than many cheap A4 scanners, because of its wind-tunnel-honed shape and unusually long nose, but it's still not very bulky.
The software bundle's decent, as you'd expect from a name-brand scanner. Apart from the ScanWise software for Win98, Win2000 and Mac, there's Corel Print Office 2000 for Windows and Mac. Print Office is a highly competent all-purpose image creation and manipulation package, and it's streets ahead of the dodgy pack-ins that come with many cheap scanners.
You also get Image Recognition Integrated Systems' Readiris OCR software. It's been some time since there was a big difference between the abilities of different OCR packages, for most users; Readiris is a perfectly good example of the breed.
Setting up
As usual for many USB devices, you install the software, then you plug in the gadget. The main e40 driver software is called "ScanWise". It works with Windows 98 and 2000, and USB-equipped Macintoshes.
Agfa's Windows software installer uses a cheery interface that looks nothing like anything Windows or Mac OS normally displays, and you get to see a funky animated "About ScanWise" presentation before you can actually start installing, whether you like it or not.
People who are used to various vendors' habit of showing you the highlights of the software while it installs are likely to sit and stare dumbly at the Agfa presentation for a little while, before noticing that no files are being copied.
I don't know how long the presentation lasts, because I only looked at it long enough to find the exit button. If you do that, you have to manually click the installer on to the actual installation stage.
Besides setting up ScanWise, the installer also gives you the option to set up access to the AgfaNet Internet Print Service, which lets you send digital photos or scans over the Internet to Agfa and buy high-quality prints from local vendors. Anyone can use this service, though; the client software's a free download.
Plugging in the e40 is as simple as connecting any other USB scanner. One USB cable, one power cable. The scanner uses a slimline multi-voltage AC adapter with, in this package, a couple of short mains cables to let it be used from Australian or round-pin European mains sockets.
There's a paper manual, and you also get Adobe Acrobat format documentation for the scanner itself, and for the ScanWise software, on the driver CD. There's also Acrobat Reader, in case you don't already have it.
The ScanWise docs use the same non-standard interface look and feel as the installer and the ScanWise software itself. This means the manual supplements the clunky Acrobat navigation interface with some even clunkier Agfa-designed extras, sits in a 557 by 387 pixel box that wastes the whole of the rest of the screen. Since there's really not much to learn about ScanWise, though, this isn't as annoying as it might be.
Using it
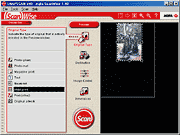
ScanWise is your standard fully automatic scanner software for beginners. It's got easy copy, e-mail and fax modes, which scan a document using settings appropriate for the document and its destination, then send it on through for you, so your printer spits out a copy or your e-mail or fax software pops up with the scan ready to be addressed and sent.
Similarly, you can send an image of a document to the OCR software and have the result squirted out into your word processor, or have image scans inserted in your word processor document, or automatically file repeated scans in particular places without having to manually say where each one should be saved.
All you have to do is pick a document type from the main ScanWise interface and hit the Scan button, and everything that can be done for you, is.
You can also do multiple selections with different settings, to pull a couple of selected blocks of text off a page, for instance, or some text and an image, or whatever.
The software also has options to turn on or off rotation of mis-aligned originals - which is particularly handy for OCR - and toggle automatic selection of subjects, where ScanWise automatically puts a selection box around what looks to it like the document. You can also tell ScanWise to select the whole bed every time, for full-document scanning.
Even the most basic scanner software lets you do all of these things, of course, - just not automatically. You generally have to do the scan, save the file, then load or import it into the other application to work on it, fax it, print it, or whatever.
These days all this is just a matter of clicking and dragging, but it's less than obvious to the beginner what settings ought to be used. Scan your happy snap at 1200dpi for incorporation into a Word document and you'll find yourself listening to the Hard Drive Symphony as you chug your way on to a file the size of Mars.
Even once you know what program wants what kind of scan, so you don't send hapless apps the wrong kind of data, it's still faster to do it the automated way, provided the automated software does a decent job.
Unfortunately, ScanWise is... well, it's not all that it could be.
Like a lot of this sort of software, ScanWise defaults to doing a preview scan every time you run it, and it doesn't let you abort the preview when you know you've seen all of the thing you want to scan. Got one small photo at the top of the scan bed? Tough. You're previewing the whole bed.
You can turn off the auto-preview, but there's not much reason to do so, because ScanWise isn't clever enough to show you the last preview it made.
Other scanner drivers just save the little preview image as a file, and load it again the next time they run. This is a handy feature - do a scan, close the scanner driver, discover you got something wrong, run the scanner driver again and there's the same preview waiting for you again.
ScanWise doesn't think you need this feature. If it hasn't done a preview yet, it shows a black panel. And you can't just scan blind, either; until you've done a preview, you can't do any other sort of scan.
And there's no way to make a preview interruptible, either.
Ordinary scanner software also remembers its image adjustment and resolution settings in between sessions. ScanWise doesn't. You can make basic manual configuration adjustments if you don't want to use the canned settings - resolution, for instance, and brightness, contrast and colour saturation, too - but they won't "stick" between ScanWise sessions.
If you actually want to do 1200dpi or higher scans of something, you'll need to click a button and type in the resolution you want. Every time you run ScanWise. Over and over.
Of course, you don't have to manually change the resolution if you're happy with the perfectly sensible settings ScanWise uses for the mundane tasks for which it is intended. If you only want to do something different once a week, or even once a day, then the inconvenience of an amnesiac driver that can't save its configuration doesn't matter. But if you're using the manual settings often, ScanWise will drive you nuts.
Quality
The e40 does a perfectly good job on text documents, but the nastiest scanner in the world can do that.
The Agfa's photo scan results are fine, for a cheap scanner. But this isn't a cheap scanner. It's a mid-priced big-name scanner whose software is supposed to auto-optimise everything.
The e40's driver has a "PhotoGenie" check-box that's meant to automatically make anything other than line art look better. Lots of scanner drivers have this sort of feature, and they generally just do much the same thing to the image as Photoshop's "Auto Levels" command - they do an automatic level-clip on the red, green and blue channels individually, stretching out maybe 98% of the intensity range to fill the whole range for each channel. This results in a little loss of white and black detail, but often also gives you nice rich natural colours, with solid shadows and properly white highlights.
You can do a better job manually, with a little practice, but Auto Levels is the magic "improve this image" button for many people.
The e40, I'm sorry to say, delivered the kind of washed-out photo scans I'm used to seeing from cheap scanners when you don't enable their automatic optimisation feature.
A post-scan Auto Levels in Photoshop made the e40's results look perfectly all right. But PhotoGenie seemed, on the whole, to make the pictures look worse.
On the shiny-coin test, which used to be a deadly trap for cheap scanners but can now be handled quite well by almost everything on the market, the e40's image-fiddling driver came to the fore.
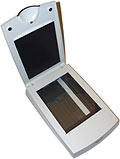
Unlike most scanners, the e40 has a matte black inside to its lid, instead of a smooth white one. This turned out to be significant.
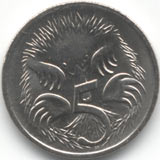
Here's the coin on the standard black background, scanned at 1200dpi. Click the image to see a full-resolution excerpt. It's commendably sharp, but rather grey.
When I backed the coin with a sheet of super-white coated inkjet paper topped off with a few more sheets of plain white paper, the results changed dramatically. This is pretty much what a good shiny-coin scan's meant to look like. But the Agfa software insisted on evening out the tone balance on the coin when it had a black background, which fouled it up.
Both of these scans were done with PhotoGenie enabled; without it, the first one looked a bit darker but didn't have any more detail, and the second one was a little paler. ScanWise clearly diddles with the intensity values in less than helpful ways whether or not you activate PhotoGenie.
Here, for comparison, is a typical unretouched shiny-coin test from a sub-$AU200 cheapie scanner, also scanning at 1200dpi, but without the e40's true 1200dpi resolution. This one has 600dpi optical and 1200dpi mechanical resolution, but judging by the fuzziness of the result (click for a close-up, again), its mechanical resolution may be none too tightly specified.
For photo scans, the cheapie does better than the e40, because you don't need monster resolution, and the cheap scanner's driver produces better looking photo output. 300dpi gets you about as much information as you can glom from a photo print, with 600dpi being the outside maximum, so any old scanner is OK.
I did a couple of white-scans with the e40 too, to look for irregularities in the e40's response.
Every consumer scanner has slightly inconsistent scan quality, though very few these days have defects you can actually see with the naked eye. Do a scan of the empty bed and stretch out the tiny intensity differences using a command like Photoshop's "Equalize", and you ought to see a load of vertical lines, which show you which cells in the scanner's head return values a little higher than they should be, and which cells return values a little lower. There may be blotches marking uneven lighting from things like internal reflections, as well.
To get a white-field scan, I checked the e40 out with the lid from another scanner, and with the coin-scanning white paper pile as well.
Well, whaddaya know. Equalising the results from the two scans gave me an absolutely clean image, except for the odd speck of dust. There was a faint yellow-cyan cast, but no stripes or blotches or other outbreaks of character.
This is not a good thing. You just can't really get this kind of evenness out of a consumer CCD imaging system such as the e40 uses. Well, not unless you cool it with liquid nitrogen, anyway.
The spookily flat result means that the e40's software's clipping off all of the lightest shades and declaring them to be white. Well, actually, it seems to be declaring them to be about 1% cyan and 1% yellow, but that's white enough for most people.
You get nice white scans this way, and it's a good way of reducing background grain in document scans. But it'll eat the fine detail from your photo of, say, fluffy clouds.
The e40's 14 bit internal resolution ought to allow the scanner to pull a full, rich, groovy looking 24 bit image out of even faded originals. But the software just won't let it. You can fool around with the Contrast slider and try to get a decent result, but if you're going to do that, you might as well get a cheaper scanner.
Just to make it harder, the brightness, contrast and saturation sliders have no numerical readout to tell you what setting you've chosen. They're just a sliding ball. It's therefore very difficult to make the same settings time after time. Which you have to do, because the sliders all go back to zero every time you quit ScanWise, because it doesn't remember its settings.
Since the e40 driver can't spit out anything but 24 bit colour data and eight bit greyscale, you can't do a grey-looking scan in full 48 bit resolution and then play with the levels yourself in Serious Software. Other low cost scanners, like the Acer Scanner 1240UT I review here, have 14 bit per channel resolution like the e40. They can deliver 48 bit data to the few programs, like Photoshop, that can handle it. 14 bits per channel is only 42 bits total, so not all of the gigantic 48 bit gamut's being used, but it's still potentially a great deal more flexible than 24 bit.
The e40's 42 bit internal resolution, though, is sent straight to ScanWise, which seems to treat it in very much the same way that an ogre with a runny nose is likely to treat a fine lace wedding dress. You might as well not have the extra bit depth, for all the good it does you.
As far as I can tell, there's no way to tell PhotoWise not to fool with the raw data it's getting from the pickup head.
This means that if you want to scan something that's almost entirely black, like the abovementioned coin on the default background, you're out of luck; PhotoWise will punch up the brightness like a mad thing. Even pulling the Brightness slider all the way down may still give you only a mid-grey. PhotoWise just can't deal properly with anything that doesn't match its opinion of a "normal" document.
Deliverance?
If you've got a good scanner with crummy drivers, one solution is to install better drivers. Sometimes, the drivers for a manufacturers' more upmarket scanner, or the driver for a similar scanner sold under a different badge, will give you the features the stock driver lacks.
Agfa's "proper" scanner driver software is FotoLook, downloadable from here. But it doesn't detect the e40. Perhaps it's possible to make the e40 work with FotoLook - sometimes you can copy some strategic files and solve these sorts of problems - but I wasn't in the mood to shuffle files around randomly.
Speed
The e40 takes about 27 seconds to do a 75dpi preview scan - you can set it to use a lower or higher preview resolution if you like. This time includes the thick end of ten seconds of "warm-up" time, even if the scanner's lamp hasn't had time to turn off and, plainly, no warm-up is needed.
Subtract the warm-up time and the e40 preview's acceptably fast, though it'd still be nice to be able to interrupt it. With the extra pause, though, it's slow. Casual home users aren't likely to care very much, but it's amazing how time telescopes while you're staring at a computer screen.
A full bed 150dpi scan takes 46 seconds, again including several seconds of nothing in particular going on at the beginning of the scan. This time the pause is referred to as "initialization" time.
A full bed 300dpi scan takes a lengthy five minutes and 26 seconds. I'm not sure why this is. It ought to be much closer to three minutes. There's some drive-chewing caused by the large amount of data in the big scan - a full A4 300dpi scan isn't something that many people are going to need to do more than once in a blue moon - but it doesn't account for all of the extra time.
Now, five-minute-plus times for full-bed 300dpi aren't exactly unknown. The Acer Scanner 1240UT is just as slow. But various cheapo scanners manage the same job in a fifth of the time. Go figure.
Overall
The e40 hardware may well be an absolute performance tuned sports car of the mid-priced scanner world. Unfortunately, it's hitched to a giant wagon full of pastel-painted manure called ScanWise.
I have absolutely no darn idea at all why companies that spend all the money to make a scanner, and elect to aim its software at beginners, can't drop another couple of grand on having their driver teams add an "expert" mode that makes the scanner software work like everybody else's scanner software, if you want.
If you're after a straightforward basic scanner, the e40's OK. But Agfa's PR blurb for the thing says "Every last detail is perfectly reproduced, even in difficult highlight and shadow areas". Well, that so far as I can determine is a bunch of hooey, thanks to the crummy software.
The e40 may get as much of the detail as a home user is likely to care about, but it does not "perfectly reproduce" it. You can make the results OK in a second in an image editing program, but if you're happy to do that then you might as well buy a sub-$200 scanner, not a $AU399 one.
Inside this product, there's probably a really good scanner trying to get out. Tell me if it ever makes it.
SnapScan e40 kindly provided by Agfa Australia.
