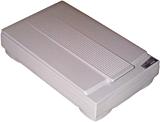
Avision 620C flatbed scanner
Review date: 14 May, 1999.Last modified 03-Dec-2011.
A while ago now I checked out Avision's 260C Plus flatbed scanner (review here). It's a basic flatbed unit with a parallel port interface, and considering how little it costs (it retailed for about $180 Australian at the time, and is now $139; since $AU1 is presently about 65 U.S. cents, they're practically giving the things away in cereal boxes) its 300 by 600 dpi output was pretty impressive. The 260C's not a top flight scanner by any stretch of the imagination, but hey, it's certainly cheap.
Time marches on, and here's Avision's next low-end offering, the 620C. It's superficially similar to the 260C - a bit longer, a bit taller, but with the same 8.5 by 11.69 inch (A4 sized) scan bed. It's still considerably smaller than most flatbeds. It comes with a practically identical software bundle to the 260C, and sells for $189.
What you get
Like the 260C, the 620C is a no-frills proposition. There's no power switch - if you want to turn it off, you unplug its AC adaptor. The parallel port interface remains, too, which means you can't use it with a Macintosh and you'll need a bidirectional parallel port (which pretty much everything since the 486 era has) or you'll be looking at very slow scan speeds.
Naturally, the scanner comes with a parallel port cable and a AC adaptor; you also get a software CD. The CD contains a TWAIN driver for all versions of Windows, a dedicated image acquisition and management program called PaperCom, and the same slightly elderly version of Xerox's decent TextBridge Optical Character Recognition program. There's also MGI PhotoSuite SE, an image manipulation program that's... well... worth what you pay.
Better specs
The 620C beats its predecessor in both resolution and colour depth. Its 600dpi optical resolution and 1200dpi mechanical resolution are both double the figures for the 260C (the higher base resolutions allow the marketing folk to put an outrageous "19200dpi" on the side of the box - this is, of course, with a ton of interpolation), and it's got 36 bit colour, too, versus 30 bit for the older scanner.
Numbers are all very well, though - the big question is whether it's actually a better scanner. In normal use, few people will have cause to use scan resolutions higher than 300 by 300 dpi; at this resolution, a full-bed scan will deliver more than 25Mb of raw data to the computer. If you regularly scan very small things, or need fabulous detail, higher than 300dpi resolutions will be useful to you. But for the everyday tasks for which most low cost scanners are used, 300dpi is plenty.
Higher bit depth is a more useful feature. If, like most users, you let the scanner driver software spruce up the scan a bit with level and gamma adjustment, it pays to have more bits per pixel to play with, so that even quite drastic manipulation of the image as it's acquired won't result in the system running out of colours and giving you an ugly, banded image.
36 bit colour has 12 bits per channel (red, green and blue) for a total of 68,719,476,736 possible colours; the final image as delivered to the computer can only be, at most, 24 bit (16,777,216 colours), but with 36 bit acquisition hardware you can, theoretically, chop out only 1/4096th of the total colour gamut and still get a smooth result.
The fact that your image-tweaking isn't necessarily the same for all three colour channels, but the scanner can't assign more bits to one channel and fewer to another, means that this spectacular feat is often impossible. And, in reality, the colour accuracy of the scan head of a budget scanner like this is unlikely to be anything like good enough to deliver the results its specifications imply. But my testing still showed that the 620C delivered clearly superior images. But I'm getting ahead of myself.
Setting up
The 620C, like the 260C and many other cheap scanners, is a parallel port unit, and comes with Windows software. There's a passthrough port on the back of the scanner for your printer; the scanner has to be turned on for the printer to work, and you can't use both simultaneously.
The software is very easy to install, though you get the same non-standard looking "Mr Scan" driver as the 260C uses. No matter; it works. PhotoSuite SE is acceptable for basic image editing tasks, though pretty much anything else currently available will out-feature it. It's not at all in the league of the low-cost image processing leader, Paint Shop Pro. Xerox's elderly TextBridge Classic OCR program is also easy to install and use, though elderly; the text it outputs, provided your original document was clearly printed and pretty straight, is likely to require not too much editing.
Testing
In operation, the 620C is nearly silent, against the noticeable motor noise from the 260C. Because of its parallel interface, the 620C will paralyse your computer while it's scanning. This makes its scan speed fairly important, as you can't do anything but twiddle your thumbs and gaze out of the window while it does its thing. I found the 620C to be about two-thirds the speed of the 260C for both preview and main scans, and its eerie silence made it seem even slower. Fortunately, this still doesn't mean it's very slow; you'll be sitting about for more than a minute and a half if you choose to do a full-bed scan at 300dpi in colour, but most of your scans will be much smaller, and therefore much faster, than that.
Like the 260C, the 620C achieves a very clean white-page scan, by cheating. It "clips" all of the very lightest shades of an image to white, which removes the subtle lines and blotches that would otherwise mar the scans. These imperfections are invisible in normal circumstances unless you've got a really crummy scanner, but they can show up when you start manipulating images. In a professional scanner, white-clipping is highly undesirable - if the user wants to even out the top end, they can do it themselves with their image manipulation program - but for a low-end product it does more good than harm, and slightly reduces file sizes to boot.
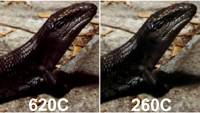
Here's a comparison of the 620C and 260C's results on scanning a photo of an obliging resident of my back yard at 300dpi (click for the full size version). The JPG compression has taken the edge off both scans very slightly, but the 620C has brought out significantly more detail and more accurate colour, too - the redder tint of the 620C scan is spot-on, whereas the 260C scan is greyer. Both of these images have been scanned with the scanner driver's "auto level adjustment" feature turned on, and then given a further going over with Photoshop's Auto Levels filter, which can be counted on to improve nine out of ten images it's used on. The original scans, and test scans without the auto level adjust feature turned on, were greyer but otherwise showed the same differences.
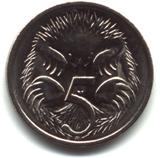
The shiny-coin test used to be death for cheap scanners, but both the 620C (left) and the 260C deliver decent results. The 620C scan, done at 1200dpi, captures significantly more detail than the 600dpi 260C version (click for the full-size image).
I scan quite a few circuit boards, and for this job the 620C is clearly superior. The bodies of these resistors are only a quarter of an inch long, but the 620C's 1200dpi scan captures a great deal of detail. The 260C's 600dpi results (inset) are OK, but not nearly as good. Even taking the lower resolution into account, it's considerably fuzzier.
Of course, scanning a circuit board of any size at 1200dpi will give you a computer-choker of an image file; 100dpi is plenty for most purposes. The slightly better colour reproduction the 620C offers will help at any scan resolution.
For scanning photographs, 1200dpi is overkill, and 600dpi is probably higher than you'll ever need for an ordinary print. This comparison, again with the 260C results inset in the 620C ones, shows little difference in real detail beyond that shown in the much smaller 300dpi photo scans above.
Overall
I like this scanner a lot. It's barely more expensive than the 260C was when I reviewed it, but its image quality is noticeably better, it supports a very high maximum resolution, and it takes up barely more space. The parallel interface is a bit of a drag, as is its overall lower speed, but for the money you really can't complain. If you're after a simple, workmanlike, low cost scanner for your Windows box that won't choke on more demanding jobs, check the Avision 620C out.
Pros: |
Cons: |
|
|


